[For Seniors] Introducing May-themed Origami!


Origami is a popular recreational activity in senior care facilities.
Finger exercises are effective for stimulating the brain, and displaying completed pieces or feeling a sense of accomplishment adds to the enjoyment.
May is a month filled with events, such as Children’s Day and Mother’s Day.
So this time, we’ll introduce origami with a May theme.
Origami that activates both the fingers and the brain while feeling the season—and offers a sense of achievement—can be considered an ideal recreation for older adults.
By all means, try making May-themed origami together with the older adults around you.
- [For Seniors] Enjoy May: A Collection of Seasonal Craft and Wall Decoration Ideas
- [For Seniors] Recommended Events for May: A Roundup of Ideas That Get Everyone Engaged
- [For Seniors] May Calendar Craft: Motifs that color May, such as Children's Day (Tango no Sekku), Mother's Day, and seasonal flowers
- [For Seniors] May-Themed Wall Decoration Ideas Full of Seasonal Flair
- [For Seniors] Easy Koinobori Crafting: A Collection of Fun Ideas Using Various Materials
- [Recreation] Summary of Recommended Origami Ideas for Seniors
- [For Seniors] Fun Origami That Also Works as Rehabilitation
- [For Seniors] Enjoy Something New Every Day! Today’s Origami
- [Easy!] Flower paper-cut art you can make using just scissors
- [For Seniors] Enjoy at Day Service: A Roundup of May Craft Ideas
- [For Seniors] Perfect for June: Introducing simple origami projects
- [For Seniors] Make an April Calendar: Fun Ideas to Brighten Your Mood
- Simple origami that can be folded from a single sheet
[For Seniors] Introducing May-Themed Origami! (81–90)
Bouquet of carnations

The second Sunday in May is Mother’s Day.
On Mother’s Day, we give carnations to express our everyday gratitude.
Many seniors have probably received or given carnations on Mother’s Day.
Here’s a craft idea that may bring back memories while you make it.
Crumple origami paper to create carnations.
Doing this expresses the frilly petals of a carnation.
For seniors, gripping the origami also provides a bit of hand exercise.
Make the stem and leaves from construction paper, and attach the carnation flower.
Making several carnations into a bouquet to give as a gift to the seniors’ families would be lovely, too.
Tulip
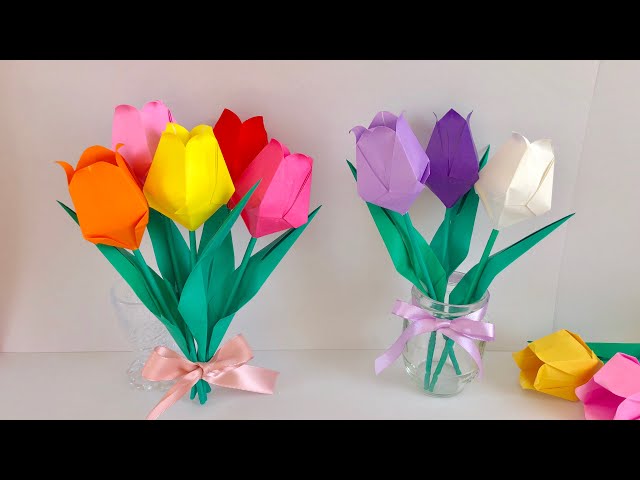
Here’s an idea for folding a three-dimensional spring flower, a tulip.
First, make a “zabuton fold” with the origami paper, then fold it in half into a triangle twice.
Open up the overlapping triangular sections to squash-fold them into squares.
On both sides, fold the left and right corners diagonally upward so they align with the center line.
Next, turn and shift the paper so that the sides you just folded are on the inside, and slightly fold the lower left and right edges of the sides you haven’t touched yet inward.
Finally, gently open the top opening while pushing inward, and the tulip flower is complete.
If you make a stem and leaves with another sheet of origami and attach them, it will look just like a real tulip!
Tulips and windmills

The wall decorations of tulips and windmills that evoke a spring atmosphere feature a bright, warm design.
Cut red and yellow origami paper to make tulip petals.
By snipping the tips of the petals and overlapping them with glue, you create a three-dimensional effect.
Make the stems and leaves with green origami paper; when arranged on the wall, it gives the impression of a field of spring flowers spreading out.
For the windmills, cut out the base and cross-shaped parts and assemble them into a windmill shape.
Finely cut the propeller parts, add windows and decorations, and glue them on for even more depth.
The vivid colors of the tulips and the windmill design create wall art that conveys the warmth of spring.
Poppy

Poppies, which bloom from spring to summer, are also known as hinageshi or gubijinsō, and they produce colorful, round, and charming flowers.
This craft aims to create poppies that feel like the joy of spring, making them look three-dimensional as if they’re popping out from the backing paper.
You cut origami into petal shapes and assemble them into a flower, layering the pieces after making slits to give the flower a three-dimensional form.
Once the petal outline is done, place yellow in the center, and finally combine it so it looks like it’s blooming from the stem and leaf pieces attached to the backing paper, and you’re finished.
Mother’s Day wreath

Here’s a cute wreath idea perfect for Mother’s Day.
You’ll make four parts—the wreath base, a ribbon, ShellieMay, and carnations—and then glue them together to finish.
For the base, make seven identical pieces and attach them to form a ring.
The ribbon can be made from a single sheet of origami paper.
For ShellieMay, fold the face and body separately, then draw the facial features with a pen to finish.
For the carnations, use small origami sheets and cut them into circles with scissors that create a zigzag edge.
Stack several layers to make each flower.
One alone will look a bit sparse on the wreath, so make a few.
Once all the parts are ready, glue them onto the base with good balance, and you’re done!