[Nursery/Kindergarten] Crafts you can play with after making them

At daycare centers and kindergartens, there are many opportunities to make toys using familiar recycled materials.
Making their own toys and playing with them lets children enjoy the process of creating, builds confidence, and gives them a sense of accomplishment—benefits that greatly support their development.
Let’s actively incorporate lots of these activities.
This time, we’re introducing craft ideas that kids can play with after making them.
Tops, pinwheels, puzzles—ideas that are sure to spark children’s curiosity!
Feel free to adapt them while incorporating the children’s ideas, and create one-of-a-kind toys bursting with originality!
They’ll surely grow attached to them, and the fun will double.
- [For toddlers] Simple but amazing craft ideas — including toys they can play with
- [Childcare] Recommended for 3-year-olds! Craft activity ideas
- [Childcare] Playful craft ideas to enjoy with 5-year-olds
- Craft activity ideas for 4-year-olds
- [Childcare] Recommended for toddlers! Toy ideas you can make and play with
- Paper cup crafts that elementary school kids will love! A collection of fun project ideas
- Let’s make it with 3-year-olds! Fun handmade toy ideas
- Recommended for 5-year-olds! Simple DIY toy ideas
- Toddler-approved fun! DIY toy ideas for 2-year-olds
- [Childcare] Easy! Make a DIY target game. Playful craft and fun game
- [Childcare] Simple DIY ideas you can use for pretend shops
- Easy to make! DIY ideas for Whack-a-Gator
- Craft activity ideas that parents and children can enjoy together during a preschool observation day
[Nursery/Kindergarten] Crafts You Can Play With After Making (81–90)
Snow globe made from a plastic bottle

Here’s how to make a snow globe using a plastic bottle.
Prepare an empty bottle from a lactic acid bacteria drink, decorative pom-poms, beads, glitter, liquid glue, and a hot glue gun.
Put the beads and decorative pom-poms into the empty drink bottle.
Fill the bottle about halfway with liquid glue, then add water.
Color a piece of paper with colored pens, place it into the bottle, and let it tint the liquid.
Mix everything together, then top up with water to push out any air, and you’re done.
Close the cap tightly and secure it with a hot glue gun so it won’t open.
Wrap vinyl tape around the top to finish.
Decorating with washi tape might make it even cuter!
Button practice toy

Here’s a toy idea that lets kids practice buttoning using Anpanman’s facial parts.
It’s made with felt.
First, stack two circular felt pieces to create the base of Anpanman’s face.
Embroider the eyebrows, nose, cheeks, and mouth outline on it, then sew buttons onto the eyes, nose, and cheeks.
After that, sew the corresponding attachable parts that fasten onto the buttons, and you’re done! You can use either snap buttons or regular buttons with holes—choose whichever seems more fun for your child.
Perfect for button practice! Onigiri

Here’s an idea for felt rice balls that help kids practice buttoning! First, cut a rectangle from white felt and fold it.
Keeping the middle of the folded edge intact, cut it into a rice ball shape.
Make fillings like pickled plum or salmon and sew on snap buttons.
Sew matching snap buttons to the center of the rice ball’s inside as well.
Sew a two-hole button to the upper inside part of the rice ball, and make a slit on the opposite side.
Finally, glue a strip of seaweed cut from black felt to the outside, and you’re done! Attach your favorite filling and close the rice ball with the buttons to enjoy making onigiri.
Unbreakable soap bubble

Let me introduce unbreakable soap bubbles.
Prepare wire, ring-shaped magnets, round stickers, prism tape, and a hole punch, then let’s get started.
Attach four strips of prism tape to the magnet so they form a dome, making sure not to cover the hole of the ring magnet.
On the side opposite the magnet, stick on a round sticker to secure it, then punch a hole in the center with the hole punch.
Using shorter pieces of prism tape, make another dome in the same way and add a round sticker as before.
Make one more of the same piece.
Curl the tip of the wire and thread the three pieces onto it from smallest to largest.
Finally, thread the one with the magnet so the magnet ends up on top, and you’re done! It will spin around like a soap bubble.
binoculars
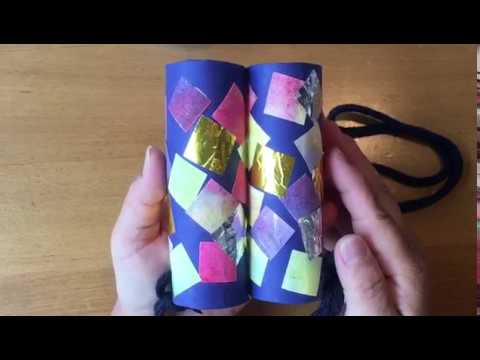
Why not try making binoculars out of toilet paper tubes? Since the process uses scissors and glue, it’s perfect for helping three-year-olds practice their crafting skills.
First, cut a rectangular piece of paper to fit around the toilet paper tube.
Next, put some glue on your hands and stick the paper on in order.
Once you’ve wrapped the paper around both tubes, attach them together and add a string—that’s it! Kids can use them while strolling around the kindergarten or nursery yard, or take them along to the park or on a walk.
It’s a great craft idea to get little hands moving.
Handmade maracas

Here’s an introduction to easy, handmade maracas you can make with everyday materials.
Gather a capsule toy case, a toilet paper roll, a plastic bottle, beads or buttons, and vinyl tape, and let’s get started.
Cut off the neck portion of the plastic bottle, roll the toilet paper core to make a sturdy handle, and attach it securely with vinyl tape.
Put the buttons or beads inside the capsule toy case, fasten it firmly with vinyl tape, and close the lid.
Once it’s finished, shake your maracas, sing along, and have fun!
[Nursery/Kindergarten] Crafts You Can Play With After Making (91–100)
origami

We’re introducing how to fold a stylish spinning top that you can make with just three sheets of origami paper! It’s perfect for making and playing together with your child or friends.
You’ll create each part with the three sheets of paper and assemble them at the end.
There aren’t many difficult steps, and you won’t need glue or scissors, so kids can easily give it a try.
You can also freely customize it by changing the colors or adding patterned paper, letting you express your originality! It would make a delightful handmade gift from a child, too!