[Nursery/Kindergarten] Crafts you can play with after making them

At daycare centers and kindergartens, there are many opportunities to make toys using familiar recycled materials.
Making their own toys and playing with them lets children enjoy the process of creating, builds confidence, and gives them a sense of accomplishment—benefits that greatly support their development.
Let’s actively incorporate lots of these activities.
This time, we’re introducing craft ideas that kids can play with after making them.
Tops, pinwheels, puzzles—ideas that are sure to spark children’s curiosity!
Feel free to adapt them while incorporating the children’s ideas, and create one-of-a-kind toys bursting with originality!
They’ll surely grow attached to them, and the fun will double.
- [For toddlers] Simple but amazing craft ideas — including toys they can play with
- [Childcare] Recommended for 3-year-olds! Craft activity ideas
- [Childcare] Playful craft ideas to enjoy with 5-year-olds
- Craft activity ideas for 4-year-olds
- [Childcare] Recommended for toddlers! Toy ideas you can make and play with
- Paper cup crafts that elementary school kids will love! A collection of fun project ideas
- Let’s make it with 3-year-olds! Fun handmade toy ideas
- Recommended for 5-year-olds! Simple DIY toy ideas
- Toddler-approved fun! DIY toy ideas for 2-year-olds
- [Childcare] Easy! Make a DIY target game. Playful craft and fun game
- [Childcare] Simple DIY ideas you can use for pretend shops
- Easy to make! DIY ideas for Whack-a-Gator
- Craft activity ideas that parents and children can enjoy together during a preschool observation day
[Nursery/Kindergarten] Crafts You Can Play With After Making (91–100)
Making a phone out of cardboard

Let’s make a play telephone so you can enjoy chatting with friends or parents by saying “Hello!” Cover a piece of cardboard with paper in your favorite color, then add number stickers and drawings to act as the screen.
A smartphone-style phone works too, but a flip phone or cordless-handset style is recommended because the numbers are always visible, giving your child more chances to interact with numbers.
You can explain the number layout as you build it, or just let them work freely without worrying about placement.
Have lots of fun chatting with your own cute, original phone!
milk carton car

Here’s an idea for a milk carton car that you can actually ride and enjoy.
This project uses a plant stand with casters and milk cartons to make a vehicle.
Once the base is complete, cover it with felt and decorate it.
The visual design is up to you, but it’s a good idea to use popular characters as motifs.
You could also model it after an Anpanman car.
By the way, the plant stand with casters can be purchased at a 100-yen shop.
It’s a very cost-effective idea, don’t you think?
Marble rolling with a paper plate

How about making a marble run that kids will be obsessed with? First, draw circles on a paper plate to match the size of the marbles and cut them out.
To keep the marbles from falling through, glue construction paper on the back of the holes to create marble pockets.
Finally, cut straws into random lengths and stick them freely onto the paper plate to form paths for the marbles—that’s it! It’s also fun to decorate the plate by drawing pictures or adding stickers.
Depending on how the straws are arranged, you can create all kinds of marble runs that showcase each child’s personality.
You can play with your own carefully crafted piece or swap with friends and play.
It’s a toy that will have you forgetting the time as you play to your heart’s content.
You can enjoy matching pictures too! A plastic bottle toy
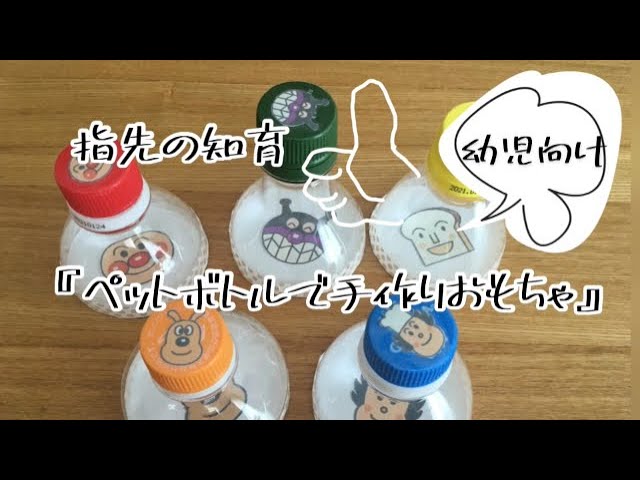
Here’s an idea for a PET bottle toy that’s perfect for educational play.
First, prepare several plastic bottles.
Next, cut each bottle at about one-third from the top.
Then, insert a piece of thick paper with a character drawn on it into the open section.
Finally, stick a sticker of the same character on the bottle cap, and it’s complete.
Kids can enjoy opening and closing the caps and matching the character designs.
Using caps in different colors makes it look colorful and extra cute.
Super Simple Chopstick Gun

A simple chopstick gun you can make with disposable chopsticks and rubber bands! Many of you might have made and played with one this way when you were little.
Prepare three pairs of chopsticks and split each pair into single sticks.
Choose one stick to be the barrel, sandwich it with two sticks on the sides, and secure them with rubber bands.
Use cut pieces of chopstick to make the trigger and grip, then attach them to the part you assembled first.
Hook on a rubber band and do some test shots while adjusting the trigger angle, and you’ve got an easy-to-make chopstick gun!
Making a drum with a balloon

Let’s try making a drum using a balloon! Cut off the mouth of a balloon and stretch it over a roll of packing tape.
Secure it firmly with electrical tape, and decorate the outside however you like to finish the drum.
For the drumsticks, attach a small, tightly balled piece of tissue to the end of a chopstick and fix it with electrical tape.
Then cover it with two plastic bottle caps and secure those with electrical tape as well to complete the sticks.
Since there aren’t many steps that require scissors, lots of kids can easily enjoy both crafting and making music!
fishing

Let’s make a fishing game where you can catch all kinds of sea creatures—big fish, small fish, crabs, and jellyfish! We’ll use recycled materials to create the fish, such as small empty containers like plastic bags, yogurt cups, lactic acid drink bottles, and toilet paper rolls.
Embed a magnet from the inside where the fish’s head or dorsal fin will be.
For the fishing rod, attach string (like kitchen twine) to a pair of chopsticks and put a magnet at the end.
You can wrap the chopsticks with masking tape to make them cute.
Have fun making your children’s favorite sea creatures and playing with them!