[Nursery/Kindergarten] Crafts you can play with after making them

At daycare centers and kindergartens, there are many opportunities to make toys using familiar recycled materials.
Making their own toys and playing with them lets children enjoy the process of creating, builds confidence, and gives them a sense of accomplishment—benefits that greatly support their development.
Let’s actively incorporate lots of these activities.
This time, we’re introducing craft ideas that kids can play with after making them.
Tops, pinwheels, puzzles—ideas that are sure to spark children’s curiosity!
Feel free to adapt them while incorporating the children’s ideas, and create one-of-a-kind toys bursting with originality!
They’ll surely grow attached to them, and the fun will double.
- [For toddlers] Simple but amazing craft ideas — including toys they can play with
- [Childcare] Recommended for 3-year-olds! Craft activity ideas
- [Childcare] Playful craft ideas to enjoy with 5-year-olds
- Craft activity ideas for 4-year-olds
- [Childcare] Recommended for toddlers! Toy ideas you can make and play with
- Paper cup crafts that elementary school kids will love! A collection of fun project ideas
- Let’s make it with 3-year-olds! Fun handmade toy ideas
- Recommended for 5-year-olds! Simple DIY toy ideas
- Toddler-approved fun! DIY toy ideas for 2-year-olds
- [Childcare] Easy! Make a DIY target game. Playful craft and fun game
- [Childcare] Simple DIY ideas you can use for pretend shops
- Easy to make! DIY ideas for Whack-a-Gator
- Craft activity ideas that parents and children can enjoy together during a preschool observation day
[Nursery/Kindergarten] Crafts You Can Play With After Making (41–50)
Let’s make it together as a parent and child! A rocking horse craft

Let’s make a wooden hobbyhorse that toddlers can play with.
You’ll need two 1-meter pieces of wood and one 50-centimeter piece.
First, cross the two 1-meter pieces and fasten them together with screws.
Next, attach the 50-centimeter piece horizontally near the bottom of the crossed pieces to serve as a footrest.
That’s all for the steps, so as long as you have the tools, even beginners can make it.
When you cross the wood, adjust the lengths so that the intersection is about shoulder height for the rider.
Also, make sure the ends of the crossed wood do not extend beyond the rider’s shoulders.
The higher the footrest is, the harder it will be to mount, so it’s recommended to attach it at a low position.
Musical Instrument Crafting: Guitar

We’d like to introduce a DIY musical-instrument craft: a guitar you can play once it’s finished.
Prepare four paper cups, three rubber bands, a felt-tip pen, tape, and scissors.
First, place the bottoms of two paper cups together and secure them with tape so they don’t shift.
Next, make three slits in the rim of each of the remaining two paper cups.
Insert these slit cups onto the taped-together cups, and hook the three rubber bands onto the slits so they don’t cross over like an X.
Finally, pluck the rubber bands to check that they make sound—that’s it! The steps are simple, so give it a try!
Milk Carton Yo-Yo

An unbreakable yo-yo made from a milk carton.
Cut the milk carton open so it forms a cross, and use stickers or markers to decorate the inside.
Make two holes in the bottom and thread a rubber band through them, then connect additional rubber bands to make it longer.
Gather the four cross-shaped flaps toward the center so the decorations face outward, tape them in place, and then secure firmly with a stapler to finish! If you swing it too hard, it becomes harder to catch.
It’s best to encourage gentle play, saying things like, “Try it gently so the rubber band doesn’t stretch out too much.”
catch-ball machine

How about making a fun catch-ball machine that shoots the ball and pawn with a satisfying pop? First, cut a circle in the center of a paper plate to match the diameter of a toilet paper tube, then cut away one quarter of the plate and overlap the edges to form a cone, taping it in place.
Next, cut slits into one end of the toilet paper tube, hook two rubber bands in a cross shape into the slits, secure them with tape so they don’t come off, and attach a ball made by wrapping tissues with tape to the rubber bands.
Thread the toilet paper tube through the hole in the paper plate and fix it in place.
Finally, make one more soft ball out of tissues and tape, and you’re done.
It’s fun to play alone, and making several to play with family or friends sounds great too!
Fun educational game
https://www.tiktok.com/@soramame.sensei/video/7254149835400416514This is a simple indoor game where you gently stack colorful cardboard pieces—cut into shapes of foods kids love—onto a toilet paper roll using chopsticks or your hands.
Because it requires careful control of force, it helps develop fine motor skills, concentration, and recognition of colors and shapes.
You can use everyday materials! Even if pieces fall, it’s still fun, so children naturally experience cooperation and a sense of accomplishment as they play.
Kids with and without disabilities can enjoy it together, and you can adjust the difficulty with a bit of creativity.
It’s a gentle, handmade activity that even adults can get absorbed in.
Handmade triangle puzzle
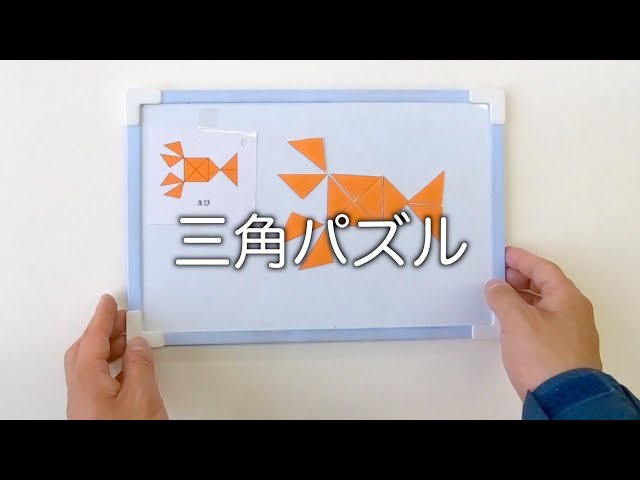
This is an indoor activity where you use colorful construction paper to make triangles of various sizes and combine them to complete pictures and shapes.
Children can work at their own pace and freely, which helps them enjoyably develop concentration, spatial awareness, and creativity.
Because there are few chances to fail and it’s easy to experience success, it’s also effective for boosting self-esteem.
The materials are simple and you can start right away, which is a big plus.
With a little ingenuity, kids can create their favorite animals, vehicles, or even story worlds—so adults, too, should dive in and enjoy it together!
plastic bottle shower

All you have to do is poke holes in the bottom of a plastic bottle with an awl, and your plastic-bottle shower is complete! It’s the perfect toy for water play season.
If you decorate the bottle with waterproof materials like vinyl tape, you can give it a unique, personalized look.
You can also change how the water comes out by adjusting the number and size of the holes, so you can prepare different patterns and have fun experimenting.
Plastic-bottle showers are safe and suitable even for infants, making them an excellent choice.
It’s a good idea to make plenty as summer approaches.