[Nursery/Kindergarten] Crafts you can play with after making them

At daycare centers and kindergartens, there are many opportunities to make toys using familiar recycled materials.
Making their own toys and playing with them lets children enjoy the process of creating, builds confidence, and gives them a sense of accomplishment—benefits that greatly support their development.
Let’s actively incorporate lots of these activities.
This time, we’re introducing craft ideas that kids can play with after making them.
Tops, pinwheels, puzzles—ideas that are sure to spark children’s curiosity!
Feel free to adapt them while incorporating the children’s ideas, and create one-of-a-kind toys bursting with originality!
They’ll surely grow attached to them, and the fun will double.
- [For toddlers] Simple but amazing craft ideas — including toys they can play with
- [Childcare] Recommended for 3-year-olds! Craft activity ideas
- [Childcare] Playful craft ideas to enjoy with 5-year-olds
- Craft activity ideas for 4-year-olds
- [Childcare] Recommended for toddlers! Toy ideas you can make and play with
- Paper cup crafts that elementary school kids will love! A collection of fun project ideas
- Let’s make it with 3-year-olds! Fun handmade toy ideas
- Recommended for 5-year-olds! Simple DIY toy ideas
- Toddler-approved fun! DIY toy ideas for 2-year-olds
- [Childcare] Easy! Make a DIY target game. Playful craft and fun game
- [Childcare] Simple DIY ideas you can use for pretend shops
- Easy to make! DIY ideas for Whack-a-Gator
- Craft activity ideas that parents and children can enjoy together during a preschool observation day
[Nursery/Kindergarten] Crafts You Can Play With After Making (21–30)
Spins great! A whirligig made from a milk carton

Open the milk carton and let it dry completely, then cut off the bottom part.
Cut off the spout, turn the inside outward, and fold it in half.
Sketch an oval shape, cut it out, and draw a daruma face on each side.
After sticking the pieces together with double-sided tape, paint the daruma.
Punch holes along the fold, thread a string through, and your buzzer spinner (whirligig) is complete.
Enjoy figuring out the timing for loosening and pulling the string.
Try challenging yourself to see how many times you can make it spin.
A mysterious horse that walks without power

Here’s an idea for making a moving horse out of construction paper! First, cut a rectangle from construction paper that’s 3 cm wide and 15 cm long.
Then, on both the left and right sides, make two slits each, 1 cm wide and 5 cm long.
Fold the middle of the slit sections into a valley fold to form the head and tail, and make mountain folds on the sides to create the legs.
Use scissors to round off the corners of the legs.
This will allow the horse to move.
Color it with crayons and draw the face to finish.
Try letting it walk down a slope and have fun!
How to Make a Kite You Can Enjoy Playing With on New Year’s

Here’s an idea for making spinning tops with acorns—very popular as an autumn craft.
You can buy acorns online, but since they’re often found on the ground in season, it’s great to use ones you’ve collected.
If you do, be sure to wash them and disinfect them with boiling water to prevent bugs before using.
The method is very simple: just make a hole in the acorn and insert a toothpick.
If the acorn is hard and difficult to pierce, have an adult help.
Drawing faces or patterns with a pen makes them extra cute!
New Year’s fun with traditional games! A milk carton bamboo-copter (taketombo)

A bamboo-copter is tricky to fly at first, but once you get the hang of it, it’s lots of fun.
Here’s an idea for making one using a milk carton and a straw.
First, cut out one side of the milk carton, then cut it into a strip that’s about one-third the width.
Next, fold the strip in half, and about 5 mm from the valley fold, make mountain folds on both sides.
This completes the wing.
Then, cut a slit into one end of the straw and attach it to the wing as a handle.
If you color the white side of the milk carton with markers, it will look pretty when you fly it.
Pop-up! Shishimai Lion Dance Toy

The lion dance popping out of a paper cup is so cute! Let’s get started by preparing a paper cup, chopsticks, yarn, vinyl (plastic) tape, construction paper, double-sided tape, and scissors.
Poke a hole in the bottom of the paper cup big enough for a chopstick to pass through.
Cut a plastic bag to fit the mouth of the cup and tape it around the rim of the cup.
Reinforce it from above with vinyl tape, push the tip of the chopstick through and secure it with tape, then make the lion dance face out of colored construction paper and attach it.
Wrap the entire paper cup with construction paper, and you’re done.
This is a craft that even little kids can enjoy for New Year’s, so give it a try!
Let’s make a horse head out of newspaper!
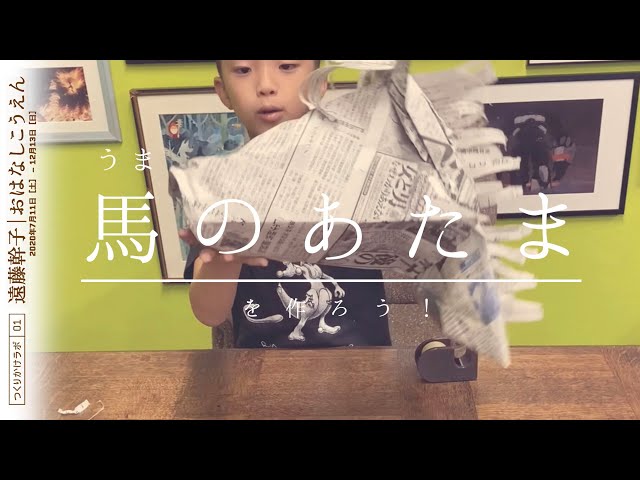
Here’s a 3D horse craft idea using newspaper! You’ll need three sheets of newspaper, scissors, and cellophane tape.
Use newspaper you have at home to make items that transform you into a horse.
With the three sheets, you’ll create a hat, a horse face, and a horse mane.
There are key points to watch out for in each step, so follow along carefully with the video as you make it.
Once you tape the three parts together, it’s complete.
You can also make reins to expand the ways you can play!
Play with the wind! A colorful carousel

Let’s make a merry-go-round that you can spin and play with.
First, make a hole in the center of the base of one paper plate and the bottom of a paper cup.
Next, cut a 12 mm straw to 2 cm, then snip one end into fine fringes and flare them outward to make a stopper.
Thread the paper plate and the paper cup (with the bottom facing up) onto the uncut end of the straw, and tape the stopper part to the paper plate to secure it.
After attaching the 2 cm straw you just made as a stopper right above the paper cup, punch a hole in one end of an 8 mm straw.
Pass a short piece of 6 mm straw through that hole, place a paper plate shaped like an umbrella over it, and glue it in place.
Hang horse illustrations from the inside of the umbrella, insert the 8 mm straw into the 12 mm base straw, and it’s complete.
If preschoolers are making it, prepare the 8 mm straws with holes in advance.