
With the arrival of spring and the move up to the next class, the five-year-olds are surely brimming with excitement as they enter their final year at the preschool.
You can see them enjoying themselves—taking on projects with a strong sense of purpose and showing their originality.
This time, we’re introducing spring craft ideas that are perfect for five-year-olds.
We’ve gathered a range from slightly more challenging projects to ideas they can actually play with.
These are activities that five-year-olds will find rewarding to work on.
Teachers, please enjoy them together with the children!
Note: Because children’s creations are treated as works, we use the term “seisaku” in the text to mean “production/creation as a work.”
- [For 5-year-olds] Let's make it in April! A collection of craft ideas using recycled and natural materials
- [Childcare] Playful craft ideas to enjoy with 5-year-olds
- [May] A collection of craft ideas to try with 5-year-olds
- Recommended for 5-year-olds’ September crafts! A collection of ideas to enjoy autumn
- [Origami] Simple Origami Folding Ideas to Savor Spring with 5-Year-Olds
- [Childcare] Recommended crafts and activities for March, such as Hina Matsuri (Doll’s Festival) and cherry blossoms
- [For 4-Year-Olds] Feel the Spring Up Close! Fun and Easy Craft Ideas You’ll Love
- May: Craft Ideas That Excite 4-Year-Olds!
- [Childcare] Perfect for March! A collection of craft ideas recommended for 5-year-olds
- [For Age 3] Let’s make it in April! A collection of craft ideas to feel spring events and nature
- [For 5-year-olds] Let’s Make It! A Collection of Recommended Craft Ideas for February
- [5-Year-Olds] Creative Project Ideas to Try in June! Let's Broaden Their Range of Expression
- For three-year-olds: A collection of craft ideas featuring spring events and creatures that you’ll want to make with your three-year-old
[Age 5] Let’s Make It! A Collection of Craft Ideas that Feel Like Spring (1–10)
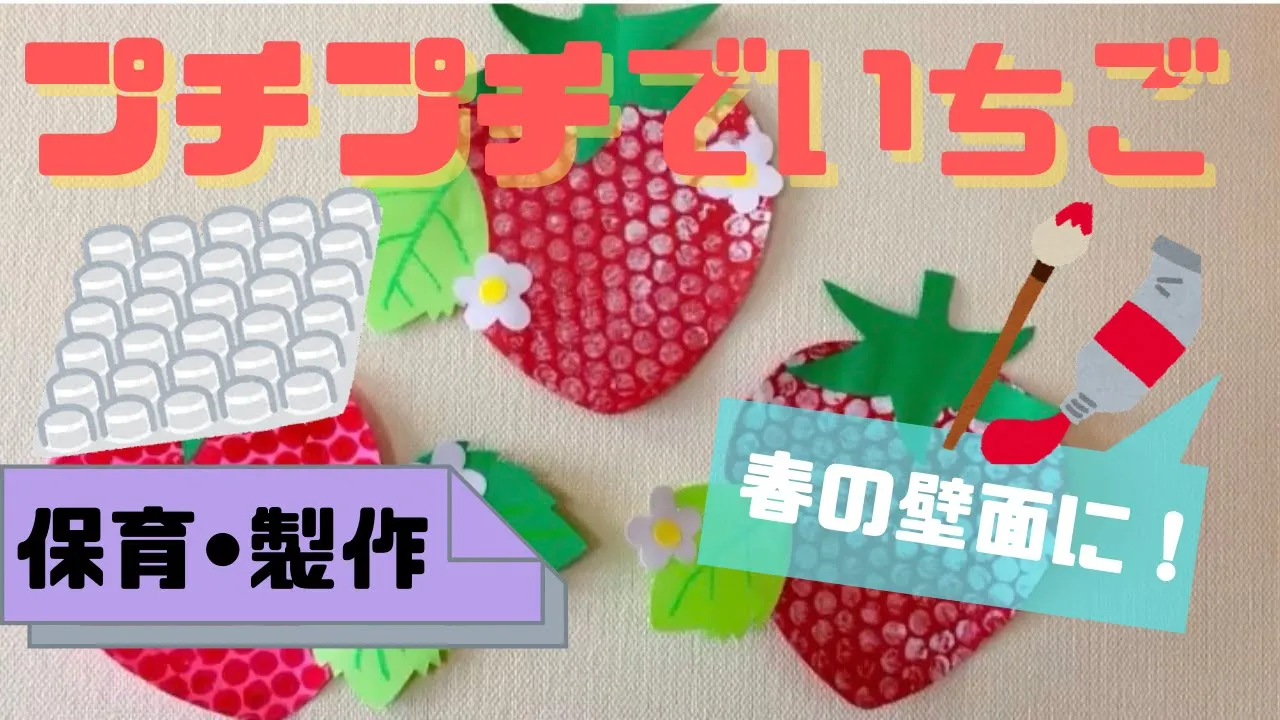
Fits perfectly on walls too! Cute bubbly strawberries

When you think of strawberries, you picture all those seeds on the surface! In this craft, we’ll use bubble wrap and paint to represent the strawberry’s seeds.
After cutting construction paper into a strawberry shape, layer on bubble wrap brushed with paint and stamp it.
Once the paint dries, finish by adding a calyx made from construction paper.
The classic combo is stamping white paint onto red construction paper, but stamping red paint onto pink paper is cute, too.
What color are strawberry seeds again? Chat about that while you make some delicious spring strawberries.
Wavy 3D butterfly with fluttering wings

The wings sway gently, making it look like a real butterfly is flying.
As March brings warmer weather, it seems like something you could enjoy taking outside to play.
Prepare two pieces of colored construction paper measuring 28 cm wide by 3.5 cm tall, and a sheet with a butterfly drawing that is 9 cm across at the center.
Use a paint-dipped plastic bottle cap to stamp patterns, then stick them onto the butterfly’s backing.
It’s best to attach them with the awareness of making the wings three-dimensional.
Add antennae with a pipe cleaner, and it’s complete.
Use your favorite colors of paper and paint to create your own original butterfly.
Three-dimensional dandelion made with Suzuran tape

Let’s make a three-dimensional dandelion using pom-poms, which are often used in school sports day dances.
By using yellow raffia tape, you can capture the dandelion’s distinctive petals.
Wrap yellow raffia tape around a small piece of cut cardboard; once it has enough volume, slide it off the cardboard and tie the center with another piece of yellow raffia tape.
Cut through the looped sections with scissors, then trim it into a rounder shape.
Glue this onto a backing sheet, and draw the stem and leaves underneath to finish! If the children are still practicing with scissors, an adult should handle the rounding and trimming steps.
Pop-up! Fluttering Tulip

This is a tulip craft with a charming, fluttering, raised look.
Fold the origami paper in half horizontally, then fold both sides toward the crease.
Fold back along the previous crease, and fold so the piece becomes one-third its size vertically.
Draw half of a tulip on it, cut along the line with scissors, and you’ll have six parts.
Glue each part together, attach them to a backing sheet, and adjust the shape to complete the flower.
Making a stem and leaves as you like will make it even nicer.
It’s a tulip craft that makes your heart flutter with the coming of warm spring—please give it a try.
Easy! Flapping Ladybug

When the weather gets warm, you feel like running around in meadows and flower fields, don’t you? It’s also the season when animals and insects become active.
Let’s try making a ladybug craft that’s perfect for March! Cut out three circles from red and beige construction paper.
Fold the two red circles in half and stick them onto the beige circle.
Attach them to a head made from black construction paper, draw patterns on the wings, and you’re done.
The fluttering wings are so cute—why not make a bunch and use them as wall decorations?
Cute and easy! 4 butterfly picks
Here’s how to make butterflies in four different, fun ways.
The first is to draw swirling patterns with crayons on construction paper.
The second is torn-paper art: glue small pieces of origami paper onto construction paper.
The third is to color aluminum foil with color markers, spray it with water, and then transfer the color onto construction paper.
The last idea uses cooking parchment: attach pieces of colored cellophane to it.
Each method is lovely and results in a uniquely personal piece.
Finish by attaching pipe-cleaner antennae and gluing on the body with a drawn face.
With a milk carton! Ladybug Toko-Toko Drum

It’s a spring-themed musical toy! First, fold the spout of a milk carton inward to make a box shape, then wrap it with green origami paper to create the feel of soil and leaves.
Cut tulip petals and stems out of construction paper, and draw faces on the flowers with crayons.
Attach the tulips to the sides of the box, and decorate ladybugs using circles cut from construction paper or round stickers.
Glue the ladybugs onto a pair of chopsticks with wood glue to make ladybug drumsticks.
When you tap the box with the drumsticks, you can enjoy cheerful sounds as if a ladybug is walking through a spring tulip field.
It’s a craft that uses fine motor skills and a sound play activity all in one, so try it with different themes and motifs!