[Christmas & New Year] Craft Ideas for Day Services in December


December is a month when you can feel the Christmas atmosphere, including through decorations at day-service centers.
Christmas, New Year’s, and other major events come one after another.
In Japan, December is written as “Shiwasu,” reflecting how bustling this time of year can be.
Older adults may also be sensing the arrival of December.
So this time, we’re introducing craft ideas for day-service centers that are perfect for December.
We’ve assembled a wide variety of projects—decorations to brighten up Christmas, pieces that boost the festive mood, and New Year’s items, too!
They’re great to make and display in your own room, and would surely delight family members as gifts.
Enjoy a wonderful December with heartfelt, handmade items!
- [For Seniors] Fun Crafts Recommended for December
- For Seniors: Auspicious Handmade Zodiac Ornament Craft Ideas
- [For Seniors] Let’s Make New Year Decorations by Hand! A Collection of Easy Ideas Using Everyday Materials
- [For Seniors] Recommended for day services! Simple and cute small craft ideas
- [For Seniors] Try Making a Handmade Christmas Wreath! A Collection of Ideas Using Everyday Materials
- For seniors: Introducing handmade decoration ideas to welcome a wonderful Christmas
- For seniors: Decorate the December wall with a tree. Easy ideas using origami and yarn.
- Christmas crafts using paper cups
- [For Seniors] Introducing Fun Crafts Made with Plastic Bottle Caps
- Easy way to make Christmas stockings
- [For Seniors] January Craft Ideas for Day Service Activities
- Take-Home Craft Ideas for Winter: Perfect for Day Services for Seniors
- [For Seniors] Recommended for Christmas Crafts! Simple Handmade Project Ideas
[Christmas / New Year] Craft ideas for day-service programs in December (91–100)
3D Christmas candle

This is a three-dimensional candle motif assembled from origami.
Use an accordion-folded piece of origami as the base, then place a white sheet with the same accordion folds over it.
Next, fold in the diagonal creases you made on the top sheet, attach the flame piece there, and it’s complete.
Its simple appearance makes it easy to add decorations, and your choice of colors can really show your personality.
It might also be fun to connect several pieces of origami to make a large candle.
Three-dimensional Christmas tree

Introducing a Christmas tree you can make with five sheets of origami! It has a voluminous, three-dimensional finish.
We recommend combining dark and light green like fir needles, and using washi paper as well.
The key to the folding method is to make crisp, firm creases.
Once you’ve made all five pieces, align the corners and glue them securely for stability.
Combine the trunk pieces, and it’s complete! Finally, add beads or any decorations you like to make it more festive.
Display this tree and let’s boost the Christmas spirit!
Simple Santa Claus

This is a cute Santa Claus you can make with a single sheet of origami paper.
First, with the white side facing up, fold it into a triangle vertically and horizontally, then unfold.
Fold the top corner toward the center, then fold the tip upward.
Next, fold the bottom corner up toward the top crease, and fold it halfway back down.
Turn it over, fold back the top right and top left corners by about 1 cm, then fold the top right and top left down toward the center.
Adjust and fold the right and left sides once more, and your Santa Claus is complete.
The final adjustment step involves a bit of fine work, but carefully folding together makes for good exercise for your hands and fingers!
A pocket tissue cover sewn in two steps
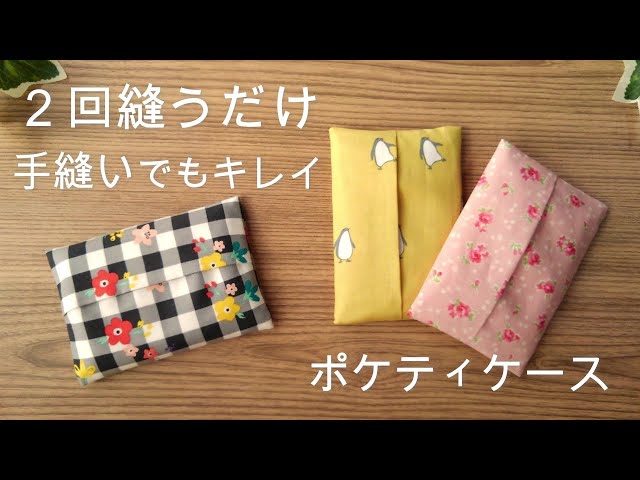
A handmade pocket tissue cover that can be finished with just two seams.
You can use any fabric you like, making it a perfect idea for Christmas-themed gifts featuring Santa, reindeer, and more.
Draw guide lines on the wrong side of the prepared fabric with a chalk pen, then press mountain and valley folds with an iron.
Next, starting from the third crease from the left, fold in order toward the second crease from the right.
Fold the rightmost crease and tuck it inside, then fold along the second crease from the left.
After folding along the leftmost crease, sew along the lines you drew with the chalk pen.
Backstitch, trim the excess, turn it right side out, and you’re done.
A kadomatsu made from an empty sweets box

A kadomatsu made by reusing empty snack boxes after you’ve finished the treats.
Let’s create an item that celebrates the New Year’s arrival while evoking a sense of nostalgia.
When making the main body of the kadomatsu, we recommend using a rounded empty box.
After wrapping the box with jute twine, use a hot glue gun and scissors to shape it.
Roll copy paper into a tube, wrap it with tissue paper to create the bamboo, then decorate with flowers made using origami, arrangement wire, and floral tape to finish.
Why not try crafting this traditional item, familiar and beloved among older adults as well?