Simple yet amazing crafts: craft ideas that elementary school students will want to make


“I don’t have much time for crafts…” “But I want to make something that will amaze everyone when it’s done!” If that sounds like you, you’re not alone.
In this article, we’re sharing craft ideas with simple steps that still make you say “Wow!” when they’re finished—featuring clever mechanisms and magical effects.
From moving toys to piggy banks where coins disappear, these are fun, play-with-after-you-make-it projects.
They’re easy to try with everyday materials, so go find your favorite and give it a go!
- For summer vacation homework! Simple and amazing crafts for elementary school students that you’ll want to make after seeing them
- For upper-grade boys! Simple yet awesome craft project [Don’t call it lazy]
- Paper cup crafts that elementary school kids will love! A collection of fun project ideas
- Fun crafts using straws
- Elementary School Students: Simple One-Day Science Project and Craft Ideas
- Simple but awesome! Craft ideas for upper-grade girls
- DIY science projects that elementary school boys will love: ideas you can make with everyday materials
- Recommended for elementary school students! Science fair topics & craft ideas
- Toys you can make from cardboard crafts! Authentic ideas you can build and play with
- [Hand Sewing] Easy crafts recommended for elementary school students. Let's handmake something cute!
- Crafts parents and kids can enjoy together. Recommended craft ideas to keep children entertained.
- [For Upper Elementary Students] Simple but Awesome! A Collection of Summer Vacation Craft Ideas
- [For Kids] Today’s Handmade Craft Ideas
Moving! Playable and Fun Toy Craft Ideas (91–100)
paper cup light
@chooobo2 This time, I’m introducing how to make the “Original Light from a Paper Cup 💡” that we’ll create in the workshop on November 16 ✨ The picture you draw will glow in the dark 😳! Since Christmas is coming, I drew a tree! Depending on age, just coloring and adding stickers is enough—the pen colors and sticker shadows glow and look so cute 🩷 This time I drew on a clear file, but drawing directly on plastic wrap is also OK 🙆♀️◎ (Use a transparent clear file.) Using a clear file makes it easier to draw than on plastic wrap, and the finished piece is less likely to break! Workshop details are posted in the Instagram Highlights!Made in DecemberChristmas craftsChristmas partyTranslation#HandmadeToysPaper cup craft
♬ All I Want for Christmas Is You – Mariah Carey
Let’s make an exciting item using a paper cup! First, cut a piece of a clear file (plastic folder) to match the size of the paper cup’s rim.
Use a permanent marker to draw any picture you like.
Next, cut out the bottom of the paper cup and decorate the sides with stickers, etc.
Finally, place the drawing you made on the rim side of the paper cup, cover it with plastic wrap from above, and secure it with a rubber band—that’s it! If you shine a light through the hole where you cut out the bottom and aim it at a wall, your picture will be projected on the wall.
It looks perfect for Halloween or Christmas too.
Try playing with it in a dark room!
For demon-slaying only! Bean-throwing rubber band gun
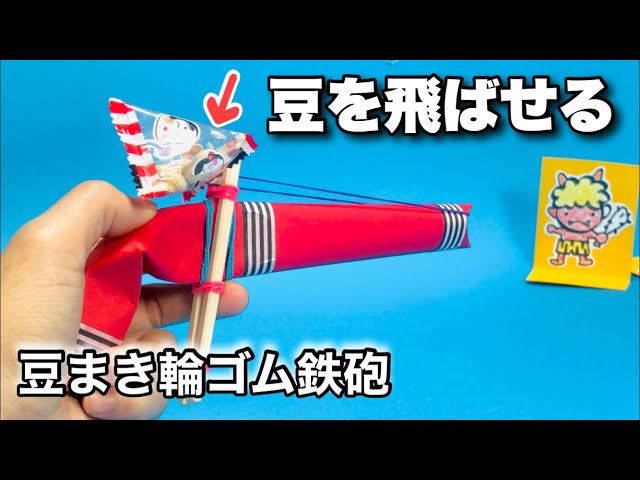
Oni-busting only! Here’s how to make a bean-throwing rubber band popper.
Prepare chopsticks, roasted soybeans (fukumame), construction paper, tape, scissors, and rubber bands.
Roll the construction paper into a tube, then secure the tube with rubber bands by clamping it between a pair of chopsticks folded in half.
The key is to wrap the rubber bands tightly so they don’t loosen.
Be careful not to cut your hand on the ends of the chopsticks.
When launching, dent the tip of the paper tube, hook on a rubber band, set it, and play.
When playing, don’t aim at people and make sure to play safely.
Moving! Playable and Fun Toy Craft Ideas (101–110)
How to make a croaking frog

This is a cute craft where a frog hidden inside a paper cup peeks out while croaking.
You make a hole in the bottom of the cup and insert a bendy straw; by using this straw, you can move the frog up and down.
The key is the bendable part of the straw—when it rubs against the hole in the paper cup, it makes a sound like a frog’s croak.
You can add originality by choosing the frog’s expression and decorating the paper cup however you like.
Target-throwing game with disposable chopsticks and clothespins

Let me introduce a target-shooting game that launches with a burst of energy using chopsticks and a clothespin.
Prepare two chopsticks, a clothespin, tape, and a plastic bottle cap to make it.
For the launcher, clip the clothespin’s metal spring onto a chopstick, then tape the clothespin’s handle and the chopstick together to form the base.
Cut a slit in the plastic bottle cap and fasten it to the chopstick with a rubber band.
Make a target out of a milk carton and draw point values on it.
Set a marble-sized ball on the finished launcher and try aiming at the target.
Have fun seeing how many points you can score!
Disposable chopstick holder
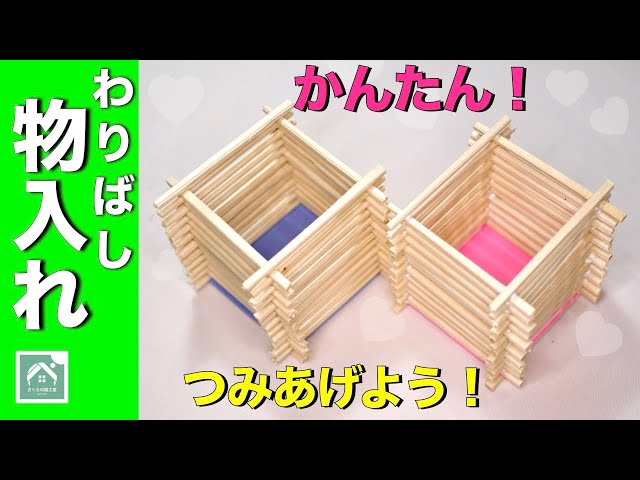
Here’s a chopstick accessory holder that’s perfect for a summer vacation craft.
Prepare 12 pairs of disposable chopsticks, glue, and colored construction paper.
Split the chopsticks in half, then use scissors to cut all the way around the midpoint to make them half-length pieces.
With 12 pairs, you’ll get 48 sticks.
Cut the colored paper into a square, apply glue to the left and right sides, and attach chopsticks; then flip it over, rotate it, and glue chopsticks onto the sides that don’t have them yet.
Apply glue where the chopsticks overlap and stack the sticks one by one.
Make sure they stack up straight.
Let it dry thoroughly, and it’s done!
How to make a chopstick tree
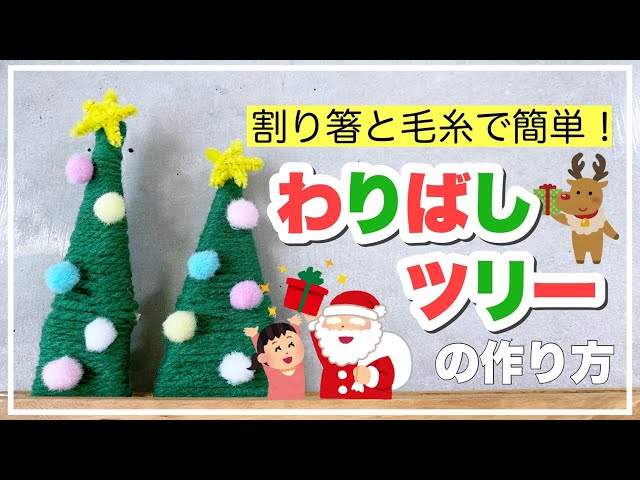
Here’s how to make a chopstick tree that lets you enjoy a cozy nighttime atmosphere when you light it up.
Prepare chopsticks, yarn, glue, and decorations like beads, then get started.
First, build the tree’s frame with chopsticks.
Wrap yarn evenly around the base.
For a summery feel, you could use colors like light blue or pale green.
Once you decorate it with summer-themed items such as watermelon or fish-shaped wind chimes, your chopstick tree is complete.
It’s sure to captivate elementary school kids, too.
Try changing the seasonal theme as you make it—you might discover something new each time.
Chopstick grabber
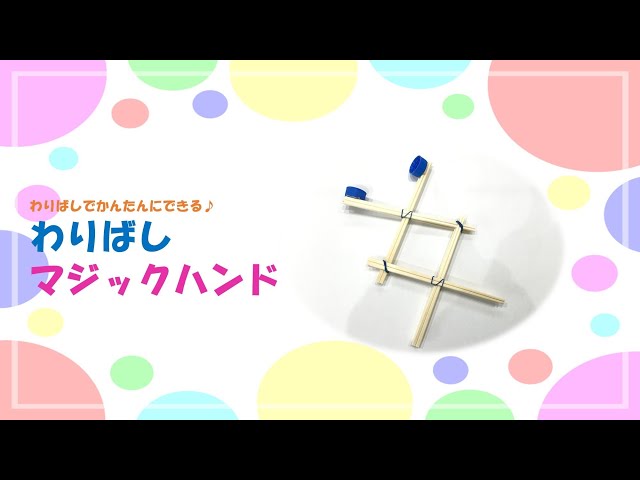
Let me introduce a chopstick grabber that’s fun to make and fun to play with.
Prepare eight wooden chopsticks, double-sided tape, plastic bottle caps, and rubber bands.
Stack four chopsticks in a crisscross pattern and secure the center with a rubber band.
Make another set the same way.
Combine the two finished sets and bind them with rubber bands where the chopsticks overlap to hold them together.
Finally, attach two plastic bottle caps to the tip, and it’s done.
Try moving the handle and have fun playing with it!