[For Seniors] Let’s Start a Fun Craft Activity

In elderly care facilities and day service centers, craft-based recreation is essential.
Because it involves fine motor movements, it helps with rehabilitation and stimulates the brain.
In this article, we’ve gathered easy and enjoyable craft ideas that older adults can make with minimal effort.
Even those who have never done crafts and lack confidence will find it easy to get started.
Most materials are things you already have at home or can quickly pick up at a dollar store.
If you’re interested in crafts, give them a try!
- [For Seniors] Introducing Fun Crafts Made with Plastic Bottle Caps
- For Seniors: Simple and Lovely Crafts – A Collection of Take-Home Project Ideas for Day Service
- [For Seniors] Easy and Fun! Tsumami Zaiku Craft Ideas
- [For Seniors] DIY Hand Rehabilitation Tools to Strengthen Fingertips: A Collection of Handmade Ideas
- [For Seniors] Recommended for day services! Simple and cute small craft ideas
- For Seniors: Auspicious Handmade Zodiac Ornament Craft Ideas
- [For Seniors] Enjoy at Day Service: A Roundup of May Craft Ideas
- [For Seniors] Practical Crafts to Make in Day-Service Recreation: Idea Roundup
- [For Seniors] DIY Rehabilitation Aids: A Collection of Easy-to-Make Ideas
- [For Seniors] Enjoy Your Alone Time: Perfect Ideas for Passing the Time
- [For Seniors] Have Fun Making Things Based on Today’s Mood! Today’s Recommended Craft
- [For Seniors] Easy Craft Activity Using Straws
- [For Seniors] Enjoy the Hot Summer to the Fullest! A Collection of Easy Craft Ideas
[For Seniors] Let’s Start Fun Craft Activities (131–140)
Pin Friends
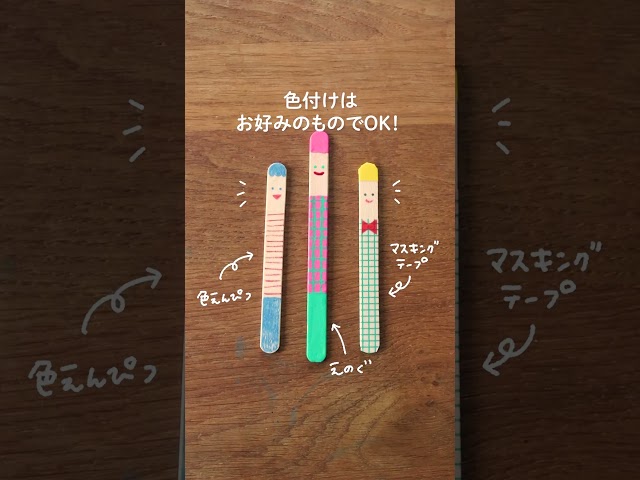
Let me introduce some very cute “pin friends” made from popsicle sticks.
Draw faces on the sticks and add color.
Using washi tape or colored pens to create patterns will make them look bright and adorable.
Once you’ve finished drawing, glue the popsicle sticks onto clips and you’re done.
They’d look stylish and cute attached to a small message card or letter.
Making several in different sizes to create a set of pin friends would look festive when lined up, too.
Give it a try!
Miniature wooden house

The “miniature wooden house” is a simple craft made using ice cream sticks.
First, draw a house blueprint on cardboard and cut the sticks to match the dimensions.
After gluing the sticks onto the cardboard, assemble them so that the cardboard faces inward.
This will form the shape of a small house.
Adding details like window frames and doors will enhance the originality and give the piece character.
Painting it or adding decorations will complete a miniature house that’s even more fun to display.
It’s also lovely to make them with family and friends and enjoy admiring each other’s creations.
Miniature wooden house
The “miniature wooden house” is a simple craft made using ice cream sticks.
First, draw a house blueprint on cardboard and cut the sticks to match the dimensions.
After gluing the sticks onto the cardboard, assemble them so that the cardboard faces inward.
This will form the shape of a small house.
Adding details like window frames and doors will enhance the originality and give the piece character.
Painting it or adding decorations will complete a miniature house that’s even more fun to display.
It’s also lovely to make them with family and friends and enjoy admiring each other’s creations.
cabbage white (butterfly)
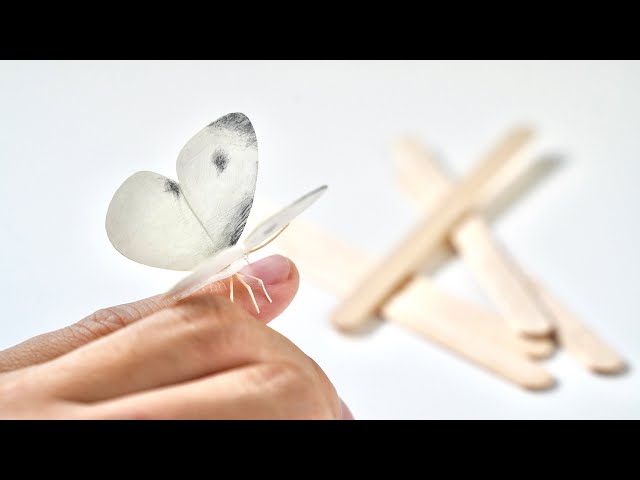
Here’s how to make a cabbage white butterfly using ice cream sticks.
Glue the sticks together to form the wing sections.
Shape the wings so they have a rounded form by trimming, shaving, and cutting as needed.
Make the body and antennae, then attach them.
Paint each part, and once dry, glue them together in the shape of a cabbage white butterfly to finish.
Each piece is delicate, so assemble carefully.
The large wings have a three-dimensional look, as if the butterfly might take off at any moment.
Give it a try!
robot arm

As a craft you can enjoy with familiar materials, a “robot arm” is perfect for stimulating fine motor skills and imagination.
First, prepare six sticks with holes drilled at both ends and in the middle.
Be careful—if you use too many, the weight will make it unstable.
Arrange two sticks in an X shape and insert a toothpick through the overlapped center to secure them.
Then fix the ends of the X shapes to each other to stabilize the frame.
Attach a short stick at the tip as a claw, and add a plastic bottle cap as a handle at the other end to complete the robot arm.
It’s a craft idea that offers plenty of satisfaction and smiles, since you can use it to pick up and move small objects.
House-shaped key holder

Introducing a house-shaped key holder that will instantly make your home look more stylish.
Gather ice cream sticks, a hot glue gun, a utility knife, and acrylic paint to get started.
Arrange the ice cream sticks into the shape and size of the house you want, then use a pencil to mark the cutting lines.
Once the basic prep is done, cut along the lines with the utility knife.
While gently holding the arranged sticks so they don’t shift, glue them together with the hot glue gun.
Paint with acrylics, install a screw to hang the keys, and you’re done.
It’s also cute and recommended to make several in different acrylic paint colors and display them together.
rubber band car

Let me show you how to make a rubber band car where ice cream sticks quickly transform into a car.
Start by gluing the ice cream sticks together to create the base of the car.
Cut a straw and glue the pieces on to make the axle holders for the wheels.
Fit plastic bottle caps onto cut bamboo skewers and glue them in place to create the wheels.
Make a hook or catch for the rubber band, and once you attach the rubber band at the end, it’s complete.
The car launches using the spinning force from the rubber band, and it’s a lot of fun.
Try painting the ice cream sticks and make your very own original car!