[For Seniors] Let’s Start a Fun Craft Activity

In elderly care facilities and day service centers, craft-based recreation is essential.
Because it involves fine motor movements, it helps with rehabilitation and stimulates the brain.
In this article, we’ve gathered easy and enjoyable craft ideas that older adults can make with minimal effort.
Even those who have never done crafts and lack confidence will find it easy to get started.
Most materials are things you already have at home or can quickly pick up at a dollar store.
If you’re interested in crafts, give them a try!
- [For Seniors] Introducing Fun Crafts Made with Plastic Bottle Caps
- For Seniors: Simple and Lovely Crafts – A Collection of Take-Home Project Ideas for Day Service
- [For Seniors] Easy and Fun! Tsumami Zaiku Craft Ideas
- [For Seniors] DIY Hand Rehabilitation Tools to Strengthen Fingertips: A Collection of Handmade Ideas
- [For Seniors] Recommended for day services! Simple and cute small craft ideas
- For Seniors: Auspicious Handmade Zodiac Ornament Craft Ideas
- [For Seniors] Enjoy at Day Service: A Roundup of May Craft Ideas
- [For Seniors] Practical Crafts to Make in Day-Service Recreation: Idea Roundup
- [For Seniors] DIY Rehabilitation Aids: A Collection of Easy-to-Make Ideas
- [For Seniors] Enjoy Your Alone Time: Perfect Ideas for Passing the Time
- [For Seniors] Have Fun Making Things Based on Today’s Mood! Today’s Recommended Craft
- [For Seniors] Easy Craft Activity Using Straws
- [For Seniors] Enjoy the Hot Summer to the Fullest! A Collection of Easy Craft Ideas
[For Seniors] Let's Start Fun Craft Activities (301–310)
Handmade kaleidoscope

Empty toilet paper rolls pile up if you don’t throw them away.
Why not use those rolls and construction paper to make a lovely kaleidoscope? The look of a kaleidoscope changes depending on the steps you take and the items you use, letting you enjoy a variety of worlds.
Peer inside and you’ll see a glittering, beautiful space unfold.
This time, let’s make one using a toilet paper roll, construction paper, microplastics, double-sided tape, and more.
The process is simple, making it a great recommendation for seniors.
Just wrap your favorite colored paper around the toilet paper roll, and you’ll have a one-of-a-kind kaleidoscope.
Handmade rain mobile

Crafts for seniors using construction paper are easy and a lot of fun.
In particular, the handmade “rain mobile” can be created quickly using only materials from a 100-yen shop, so seniors can work on it with confidence.
By using thicker construction paper, it becomes sturdier and more three-dimensional than regular paper, resulting in a very striking piece.
The stylish mobile represents raindrops with colored paper, and it’s complete.
It also looks lovely as an indoor wall decoration, making rainy days more enjoyable.
This is definitely one of the construction paper craft activities we recommend for seniors.
Shuriken Origami

Let’s combine two sheets of origami in different colors to make a classic ninja item: the shuriken.
You’ll create parts with twisted, sharpened tips, then stack and align them to complete the shuriken.
Because the color contrast really stands out in this craft, be particular about your choice of origami paper and finish it with your own design.
It’s great for encouraging fine finger movements and concentration during the folding steps, and it’s also recommended as a target-throwing tool to help build arm strength.
Kusudama made with six sheets of origami
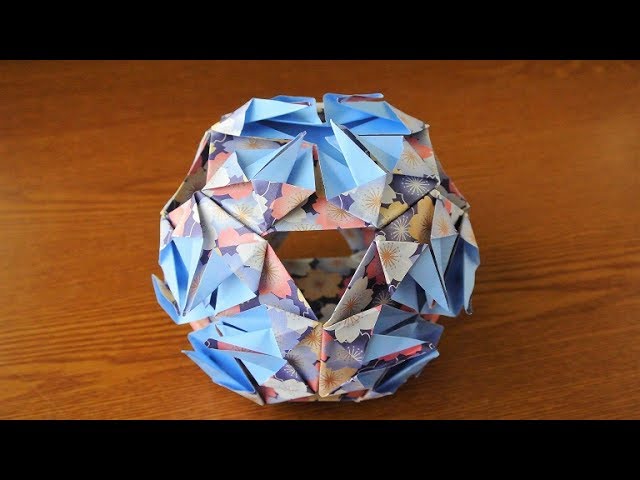
Kusudama balls, densely covered with flowers and decorations, are festive ornaments that symbolize wishes for longevity.
Let’s recreate that flower-packed, three-dimensional look by combining origami.
Prepare six sheets of origami paper with different patterns on the front and back, and use them to make dimensional units.
Carefully and gently fold the pleats with precise reverses—this is a key point that contributes to the roundness when the units are assembled.
The gaps that appear when the six units are combined are also part of the charm, and their light-transmitting structure adds an airy feel.
Origami-Only Spinning Kaleidoscope

This craft uses eight colors of origami paper, creating a twirling motion that looks like a kaleidoscope.
The key is the shape of each piece: making precise, fine creases and producing uniform parts will ultimately enhance its beauty.
After unfolding the parts and connecting them in a straight line, extend both ends to link them together; once you form a large ring, it’s complete.
By fitting the parts together firmly, the shape won’t collapse when you rotate it inward or outward, and you can enjoy the beautiful pattern changes that make use of the white on the reverse side.
Wind chime made with origami

Origami wind chimes that coolly brighten up the hot summer are adorably eye-catching and make a perfect accent for indoor decor.
Fold a sheet of origami in half until it becomes one quarter of its original size, draw the shape of a wind chime, and cut it out.
Make a small hole in the center and thread a string through it.
By gluing together the pre-cut pieces, you’ll create a three-dimensional wind chime.
Change up the colors and patterns to add a personal touch.
Although it involves fine motor work, using your hands stimulates the brain, making this a great activity for seniors.
Once finished, the wind chime sways as if producing a gentle sound in the breeze, and just looking at it will make you feel cooler.
Origami name tag
Let me show you how to make a name tag out of origami that looks like a woven ribbon.
We’ll fold it using a rectangular piece made by cutting a square of origami paper in half.
It’s very easy to fold, so you can make two tags from one sheet, and you can even use the leftover paper for decoration.
You can place it like a place card and use it as a nameplate, or attach this ribbon tag to crafts made during an activity to write the creator’s name—it’ll look cute either way.
For the ribbon’s tail, you can either cut the notch with scissors or create it by folding, so choose whichever method you prefer.