At daycare and kindergarten! A collection of Halloween decoration ideas

When it comes to major events in October, Halloween is top of the list!
Many of you are probably thinking about decorating nursery or kindergarten classrooms with a Halloween vibe.
So in this article, we’ve rounded up Halloween decoration ideas to brighten up your space!
We’re featuring everything from simple items to slightly more elaborate decorations.
There are also crafts that even little kids can enjoy!
Be sure to read to the end and find the ideas that are perfect for you!
- Irresistible for 5-year-olds! A collection of recommended craft ideas for Halloween
- Halloween crafts made easy! A collection of cute ideas you can make with everyday materials
- Toddler-Approved Halloween Crafts: Ideas That Captivate 2-Year-Olds
- [For toddlers] Simple but amazing craft ideas — including toys they can play with
- [For Seniors] Wall Decorations to Enjoy October
- Enjoy a handmade Halloween! A collection of craft ideas for fun in childcare
- At daycare and kindergarten! A collection of Halloween decoration ideas
- Get the Crowd Excited! Perfect Performance Ideas for Halloween at Daycare and Kindergarten
- Fun Halloween Game Ideas for Preschools and Kindergartens
- [Preschools & Daycare] Costume and Cosplay Ideas for Halloween
- Get kids excited in childcare! A collection of ideas for making Halloween treat bags
- Let's Make and Display! Origami Perfect for Halloween
- [For 4-Year-Olds] Fun to Make! A Collection of Halloween Craft Ideas
At Nurseries and Kindergartens! Halloween Decoration Ideas (21–30)
Halloween garland made with yarn and toilet paper rolls
This is a garland that uses toilet paper rolls to take your Halloween vibe up a notch.
First, cut the toilet paper roll in half and apply double-sided tape so the yarn will stick easily.
Then wrap yarn in Halloween colors—orange, purple, and black—around it.
Next, glue on triangle eyes and cat ears made from black origami paper, plus eyeballs made from round stickers, and you’re done.
Thread them onto a string and enjoy decorating your room with a cute garland full of Halloween spirit!
yarn mummy
You can make a mummy craft using everyday items like scrap materials and cardboard.
Paint a toilet paper roll black and wrap white yarn around it.
Just add eyes, and your mummy is complete.
If you have small children, taking a footprint on cardboard also makes a lovely piece.
Paint the cardboard white, stamp a footprint with black ink, then wrap white yarn around it and add eyes.
Using a footprint lets you keep a record of your child’s growth.
Making it together with your child will turn the crafting process into a cherished memory, too.
At nurseries and kindergartens! A collection of Halloween decoration ideas (31–40)
Halloween Cup Wrapped with Yarn
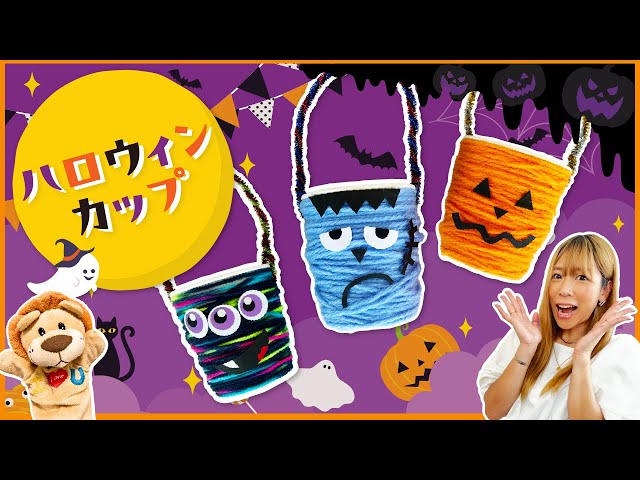
Make Jack-o’-lantern, monster, and Frankenstein cups using yarn and paper cups.
First, apply double-sided tape to the paper cup and punch two holes near the rim.
Peel off the backing paper, then wrap the yarn around and around the cup.
Create facial features from construction paper or use stickers to add expressions.
Choose two pipe cleaners, twist them together into a bundle, and thread them through the holes you made in the cup.
Shape them like a handle, and you’re all set.
You can hang them from the ceiling or fill them with treats to give as gifts—perfect for livening up Halloween in all sorts of settings.
Cat-ear headband made with yarn
@mery.jp Which one is everyone going to make, a black cat or a white cat? 🐈⬛HalloweenHalloween cosplay#HalloweenCoord#HalloweenCostumeHalloween Party#Cat HeadbandHandmadeHandmade#100-yen-shop#Halloween
♬ Insane – Black Gryph0n & Baasik
These are soft, fluffy headbands with a pleasant feel—perfect for Halloween costumes or for kids who love cats.
You’ll need a headband, wire, yarn, glue, ribbon, pearl stickers, and small bells.
Apply glue to both ends of the headband and wrap the yarn around it.
Shape the wire into ears, attach them to the headband, and secure them by wrapping yarn around while gluing in place.
Finally, decorate with ribbons, bells, and pearl stickers, and you’re done!
A mobile made with your favorite characters

Why not decorate the room with your children’s favorite characters? You can use characters from anime or games as materials, or—if characters aren’t allowed at your school—use animals or picture books they love instead! Once you’ve chosen the materials, print them out on a computer.
Also print one reversed copy so you can glue the front and back together.
Laminate the finished pieces and cut them out, then punch holes so you can attach strings.
Try decorating them like a mobile, using branches the children found in the yard or during outdoor activities.
Swaying gently in the pleasant spring breeze, they’ll look absolutely lovely.
In conclusion
I think we gathered only things that even small children can make together! Halloween tends to have a strong horror-like image, but we chose items that are as cute as possible. Place them around the room, stick them up, or hang them, and enjoy Halloween together with everyone!