[Childcare] A collection of craft ideas to make for Mother's Day


Are you a teacher wondering what to make for Mother’s Day? Here are handmade gift ideas that children from infant (0 years) to 4-year-old classes can enjoy.
From stamped flower bouquets to practical coasters and display-worthy photo frames, each project lets children’s individuality shine.
Gifts packed with gratitude are sure to bring a smile to whoever receives them.
We hope you find these ideas helpful! Note: In this article, we use the term “seisaku” (制作) to refer to children’s creations as “works.”
- [Mother’s Day & Father’s Day] A collection of Family Day gift-making ideas
- [Mother's Day] Projects to Make with Kids! A Collection of Carnation Craft Ideas
- Handmade Grandparents' Day gifts at preschool! A collection of ideas using various materials
- May: Craft Ideas That Excite 4-Year-Olds!
- Handmade gifts for Respect for the Aged Day! A collection of popular craft ideas in childcare
- [Photo Frame] Ideas for Making Picture Frames with Paper Plates
- [May] A collection of craft ideas to try with 5-year-olds
- [May] Have Fun with 3-Year-Olds! Craft Ideas Perfect for May
- [Childcare] Let's make and display in May! Wall Decoration Craft Ideas
- [For 2-Year-Olds] A Collection of Fun Craft Ideas to Make in May
- [Childcare] Let’s make things with various materials! A collection of recommended craft ideas for April
- [Childcare] Feel May! A special feature of fun craft ideas to make
- Craft activity ideas that parents and children can enjoy together during a preschool observation day
[Childcare] A collection of craft ideas to make for Mother’s Day (21–30)
stained glass-style photo hanger

Express beautiful stained glass using a clear file and aluminum foil! You can slip photos or letters into the back, so it’s a great idea for a gift.
First, draw a stained-glass outline on thick paper, then sandwich it with a clear file of the same size and trace the lines with a permanent marker to transfer the design.
Once transferred, color it in from the back with a permanent marker.
Glue crumpled aluminum foil (to create wrinkles) onto the front of the thick paper, and attach colored construction paper of your choice to the back.
Sandwich this in the clear file and secure it to finish.
Punch a hole at the top, thread a ribbon through, and make it ready to hang on the wall.
A telegram-like letter holder

Telegrams are an easy way to send a congratulatory message, and these days there are lots of cute ones, like those that come with stuffed animals.
This idea is about making a handmade version of such a telegram.
Cut construction paper into the shape of a bear and cover the entire surface with crumpled tissues.
Then attach face parts made from construction paper on top, and finish by having the bear hold a tube made by wrapping decorative washi paper around a toilet paper roll core.
Slip a heartfelt letter into the tube and give it as a gift.
It’s a lovely idea that can be made with many different motifs besides a bear.
[Childcare] A Collection of Craft Ideas to Make for Mother's Day (31–40)
How to make fluffy carnations

You can make lovely carnations with tissue paper and paper straws.
Cut the tissue paper into rectangles, stack several identical pieces, and accordion-fold them.
Staple the center, trim both ends into zigzags, then fluff up each layer to form the flower.
Use a straw for the stem: wrap it with masking tape to turn it green, and snip a slit on one end.
Open the slit and attach the flower to finish the carnation.
Make several and wrap them with lace paper to create a bouquet.
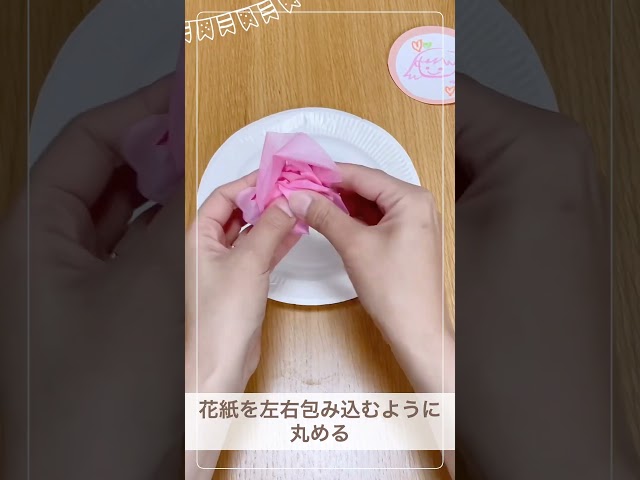
Make it with kitchen paper! A cute bouquet

Here’s a craft idea for making flowers that also lets you enjoy a bleeding-ink effect.
Prepare two circles cut from kitchen paper and draw on them with water-based markers.
Once you’ve finished drawing, stack the circles, scrunch them up, pinch a bit of the back side at the center, and wrap a chenille stem (pipe cleaner) around it as the stem.
Then simply spray the kitchen paper with water using a mist sprayer to let the ink bleed.
Make several and bundle them together to create a lovely bouquet! It’s especially fun to use multiple marker colors and enjoy the blended color changes.
Adorable portrait! A floral wreath
Have the children draw a portrait of their mom and use it as the centerpiece to make a wreath.
First, have them draw the portrait on a white sheet of drawing paper cut into a circle.
Then stick it onto a slightly larger circular sheet of paper.
Prepare a paper plate, put double-sided tape around the rim, and have the children attach crumpled tissue paper to represent flowers.
Finally, stick the portrait paper in the center and it’s done! It’s also cute to add the children’s photos next to it.
Writing a message like “I love you, Mom” will surely make her happy too.
Make it with paper plates! Handmade carnation

A paper plate turns into a beautiful carnation! Here’s a fun idea that changes as you go.
Cut out the inside of the paper plate so only the rim remains, then color the rim in pink or red.
Next, make small slits all around the edge, and on one spot cut all the way through.
Apply double-sided tape all the way around the inside of the rim, and starting from the spot you cut through, wrap it around a stem made from a disposable chopstick.
Once it’s fully wrapped, open up the slit portions and shape them into a flower.
You can make the stem by wrapping green origami paper around the chopstick.
Also great as a wall decoration! Carnations made of paper

This is a carnation made using red construction paper cut into half-circles.
It’s an idea that can be displayed flat, so it’s great for wall decorations, too.
First, cut the construction paper into a circle, then cut it in half.
Make four of these, then accordion-fold each one from the edge so it forms a fan shape.
Next, snip along the edge with scissors to create petals.
Finish all four in the same shape, stack them, and slide them left and right to form the carnation.
Attach a stem and leaves made from green construction paper to complete it.