Crafts parents and kids can enjoy together. Recommended craft ideas to keep children entertained.


Here are some recommended craft ideas that parents and kids can enjoy together!
When you hear “crafts,” you might think of summer vacation homework.
But crafts are also perfect for everyday play and passing the time at home!
With common household items like plastic bottles, milk cartons, cardboard, and clay, you can make all kinds of fun creations.
You can have a blast making them with your child, play with what you’ve made, or even exchange your creations as gifts with each other…
You’re sure to share lots of fun moments!
These ideas will captivate both adults and kids, so be sure to enjoy them together as a family!
- For summer vacation homework! Simple and amazing crafts for elementary school students that you’ll want to make after seeing them
- Simple yet amazing crafts: craft ideas that elementary school students will want to make
- Craft ideas using plastic bottle caps [for boys]
- Paper cup crafts that elementary school kids will love! A collection of fun project ideas
- Fun crafts using straws
- [For Kids] Today’s Handmade Craft Ideas
- Adults will be hooked! A collection of craft ideas using toilet paper rolls
- [Indoor Activities] A Collection of Craft Ideas Recommended for Elementary School Students
- [For toddlers] Simple but amazing craft ideas — including toys they can play with
- DIY science projects that elementary school boys will love: ideas you can make with everyday materials
- Toys you can make from cardboard crafts! Authentic ideas you can build and play with
- Made of paper! A fun collection of DIY toy ideas you can play with
- [For Kids] DIY Snowman Craft Ideas!
Crafts parents and kids can enjoy together. Recommended craft ideas to keep children entertained (101–110)
Let’s try making a tangram

Here’s an idea for making a handmade tangram, a puzzle that’s popular with children.
There are many store-bought options, but you can make one yourself if you have construction paper.
Creating it on your own also leads to discoveries about numbers.
Tangrams let you freely choose colors and shapes while having fun, and they nurture creativity and spatial awareness.
As kids cut out the pieces and arrange them, they naturally develop fine motor skills and concentration.
Completing a figure or making an original design gives them a sense of accomplishment and boosts their confidence.
A handmade tangram isn’t just a toy—it becomes a warm, enriching experience that supports children’s intellectual and emotional growth.
Melon Soda Clip
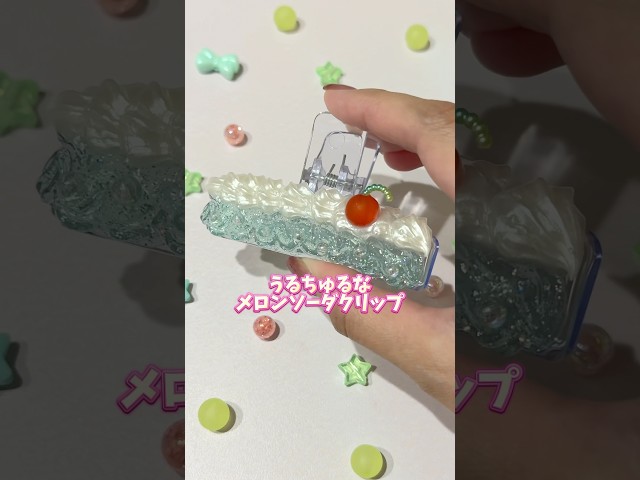
Let me introduce a refreshing and mature-cute melon soda clip.
Prepare a clip, whipped-cream glue, red beads, and deco parts, and let’s get crafting.
Pipe the whipped-cream glue onto the clip.
The key is to pipe it in wavy swirls.
Attach a deco part to a red bead to make a cherry accent, then stick it on.
Put a cap on top and let it dry, and you’re done.
Give this original clip a try!
Easy acrylic keychain made with labels

Introducing an easy acrylic keychain you can make with labels—perfect for creating your own original designs.
Peel off a plastic bottle label, place it design-side up, and stick it onto a milk carton.
Put it in a square tray and pour hot water over it.
Then, sandwich the design between pieces of a card case cut slightly larger than the design, and trim around the edges.
Attach a keychain ring and you’re done.
Give this simple, custom acrylic keychain a try—the steps are easy and beginner-friendly.
Shrinky dink crafts with everyday materials

Everyday items can actually be used as materials for shrink plastic crafts.
There are many types of plastic, and not all of them will work.
Polystyrene is fine.
Check the symbol on the container carefully when choosing.
Once you find something usable, draw on it just like you would with regular shrink plastic.
Polystyrene cups shrink and crumple into a rounded shape as they bake, which is fun to watch.
Be careful, though—aluminum foil can sometimes stick! You can turn them into coasters or make a toy wristwatch.
Before you throw containers away, be sure to check them and give this a try!
bowling toy

You can enjoy a full-fledged mini bowling game just by cutting cardboard and gluing it together.
All you need are everyday items like cardboard, a utility knife, wood glue, a ruler, a compass, and a circle template, so it’s easy to make.
Crafting the bowling pins, the marble launcher, and the lane involves some fine work, but there aren’t any difficult steps, so it looks like a fun project for parents and kids to make together! You can also draw your favorite letters or pictures and decorate it—totally fine! Create your own original bowling game.
Since everyone can play, enjoy the game with friends and family.
Crafts that parents and children can enjoy together. Recommended craft ideas to keep kids entertained (111–120)
Clay makeup tools

We’re going to make a makeup box and makeup tools using colorful clay! Besides clay, if you also prepare a spatula, an empty box, and decorations like glitter and sparkles, it’ll turn out really cute.
Let’s start with the makeup box! Stick clay in your favorite colors around the outside of the empty box.
Inside, insert dividers or clay cut to shape so you can organize your makeup tools.
For the makeup tools, make anything you like—lipstick, nail polish, eyeshadow—shaping them however you want.
Add glitter, sparkles, or sequins to each one and… you’ll have an adorable set of DIY makeup tools!
Remaking a 100-yen shop clock
@nantomokuzai Remake a 100-yen shop clock! Clip clock 👍✨Summer Vacation Craft#Summer Vacation Workshop#100-yen shop DIY#100-yen shop arrangement
♪ Original song – Nanmo-kun – Nanmo-kun
The part you can see from the back of a table clock or wall clock—the section with the battery compartment and the knob for setting the time—is called the movement.
You could say it’s the heart of the clock.
In fact, clock movements are sold on their own at 100-yen shops and home improvement stores, and you can use them to make your own original clock! If you’re good at woodworking, try starting from scratch by buying a wooden board and cutting a groove to fit the movement.
If that’s not your strong suit, there are also assembly kits with pre-cut grooves available, so you can use those instead.