Crafts parents and kids can enjoy together. Recommended craft ideas to keep children entertained.


Here are some recommended craft ideas that parents and kids can enjoy together!
When you hear “crafts,” you might think of summer vacation homework.
But crafts are also perfect for everyday play and passing the time at home!
With common household items like plastic bottles, milk cartons, cardboard, and clay, you can make all kinds of fun creations.
You can have a blast making them with your child, play with what you’ve made, or even exchange your creations as gifts with each other…
You’re sure to share lots of fun moments!
These ideas will captivate both adults and kids, so be sure to enjoy them together as a family!
- For summer vacation homework! Simple and amazing crafts for elementary school students that you’ll want to make after seeing them
- Simple yet amazing crafts: craft ideas that elementary school students will want to make
- Craft ideas using plastic bottle caps [for boys]
- Paper cup crafts that elementary school kids will love! A collection of fun project ideas
- Fun crafts using straws
- [For Kids] Today’s Handmade Craft Ideas
- Adults will be hooked! A collection of craft ideas using toilet paper rolls
- [Indoor Activities] A Collection of Craft Ideas Recommended for Elementary School Students
- [For toddlers] Simple but amazing craft ideas — including toys they can play with
- DIY science projects that elementary school boys will love: ideas you can make with everyday materials
- Toys you can make from cardboard crafts! Authentic ideas you can build and play with
- Made of paper! A fun collection of DIY toy ideas you can play with
- [For Kids] DIY Snowman Craft Ideas!
Crafts that parents and children can enjoy together. Recommended craft ideas to keep kids entertained (121–130)
Bird call making

As a craft project perfect for children who love nature observation, I recommend making a bird call.
Prepare a hand-sized wooden branch and drill a small hole in the center.
Screw in a metal part called an eye nut, and when you twist it so the wood and metal rub against each other, it produces a sound like birdsong.
Real birds may sometimes respond to this sound, so trying it out in a park after making it is part of the fun.
The volume and pitch change depending on the type of wood and the depth of the hole, so by experimenting and recording the differences, you can enhance the quality of the project as an independent study.
It’s a hands-on idea that lets kids connect with nature while sparking curiosity about how sound works.
Let’s play with paper blocks!

Prepare some construction paper and try playing with paper blocks.
Using long, narrow strips of construction paper, make triangles, circles, and squares, then assemble them into artworks.
By folding or curling the narrow strips, you can express a variety of shapes.
Attaching the parts you’ve made with glue or clear tape and combining them will broaden the range of your creations even more.
As children think about shapes and combine them to make pieces, they can expand their imaginations.
You can also mount the combined works on construction paper for display.
For pieces with movement, hanging them with thread is also recommended.
A one-of-a-kind toy clock in the world

The idea is to make a clock using a clock movement and a board, then attach various toys to it.
You can get a clock movement at a 100-yen shop or a handmade goods store, and you can buy the board for the clock face at a home improvement store.
First, draw diagonal lines on the board to find the center point, and mark where to drill the hole for the movement.
Next, use a protractor to decide where to place the numbers on the clock.
After drilling the hole and painting if you like, it’s time to decorate the face.
Use a hot glue gun to attach the toys however you like.
Finally, secure the clock movement in the hole, and you’re done.
Arrange your favorite toys with style and create a wonderful clock!
disposable chopstick coaster

Introducing a chopstick coaster that lets you feel the warmth of wood.
Gather disposable chopsticks, glue, sanding sealer, varnish, and a brush, and let’s get started.
Glue chopsticks around the base board.
If you score the chopsticks with a utility knife before splitting them, they’ll break cleanly.
Lightly sand the tips to round them off.
Continue gluing the chopsticks from the outside toward the inside.
Adjust the size of the chopsticks as you go, fitting them while slightly changing the angle.
Brush on varnish and let it dry, and you’re done.
Give it a try!
Crafts parents and children can enjoy together. Recommended craft ideas to keep kids entertained (131–140)
small accessory case
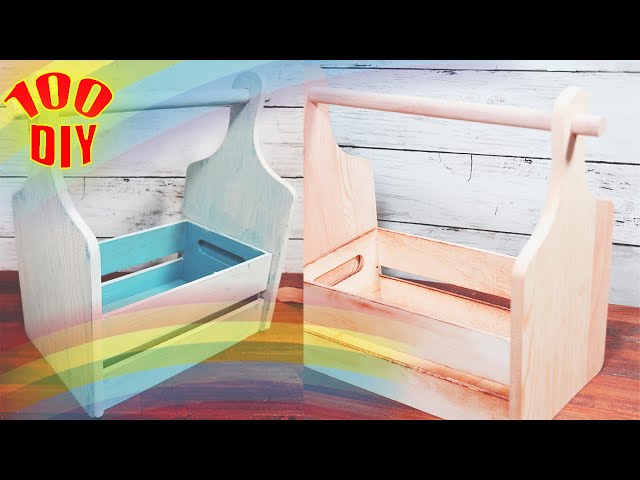
Let me introduce a cute and handy little storage container.
Get a wooden box, a cutting board, a round dowel, a hot glue gun, and a saw, and let’s get started.
Use the hot glue gun to attach the cutting board to the left and right sides of the wooden box.
Cut the round dowel to the appropriate length, sand the ends smooth, thread it through the holes, and secure it with the hot glue gun.
The process is simple and easy to make, so definitely give it a try.
It’s also recommended to paint it to add a personal touch.
Dinosaur Snow Globe

Many children love dinosaurs, don’t they? Some probably have lots of dinosaur merchandise, too.
So let’s make a summer vacation project using dinosaurs: a snow globe in a glass container filled with liquid laundry starch (or school glue) and purified water.
Use a hot glue gun to attach a dinosaur figurine to the inside of the glass lid.
Be careful when using the glue gun, as it gets very hot.
Pour the laundry starch (or glue) and purified water into the container, then tint it with paint in your favorite color.
If you add glitter, you’ll get a sparkly, authentic-looking snow globe.
Close the lid and turn it upside down, and you’ll have a beautiful snow globe with a dinosaur inside.
Handmade shaker coaster

Introducing original handmade “shaker” coasters that capture the feel of the seasons.
Gather styrofoam board, background design paper, a clear file, plastic sheet, double-sided tape, beads or seashells, and sand, and let’s get started.
First, decide what kind of coaster you want to make.
Cut the styrofoam board to create the coaster base.
Attach the base pieces together for the bottom section.
Apply masking tape around the edges, add seashells and sand inside, then seal it with the lid using double-sided tape—and you’re done! Give it a try!