[Indoor Activities] A Collection of Craft Ideas Recommended for Elementary School Students

These days, DIY has firmly taken root as a go-to hobby.
When you visit a home improvement store or a 100-yen shop, you’ll even find dedicated sections for it.
Plenty of households probably already have the materials and tools on hand.
In this article, we’ve rounded up craft ideas recommended for elementary school students who are interested in making things!
We’ll introduce everything from board games everyone can play together to practical ideas you can keep using at home after you’ve made them.
Find the project that suits you best and give it a try!
- Crafts you can make with 100-yen shop items! A collection of fun project ideas that elementary school kids will love
- Simple yet amazing crafts: craft ideas that elementary school students will want to make
- [For Elementary School Kids] Handmade Toy Craft Ideas
- [Let’s Make and Play!] Handmade Toy Ideas You Can Create Yourself
- [Summer Vacation Crafts for Lower Grades] Make It with Everyday Materials! Simple Yet Awesome Craft Ideas
- Handmade games: DIY craft ideas you can make and play
- [For Upper Elementary Students] Simple but Awesome! A Collection of Summer Vacation Craft Ideas
- [DIY] A Collection of Handmade Moving Toy Craft Ideas
- [For Kids] Have Fun at After-School Day Service! A Special Feature on Indoor Game Ideas
- Toys you can make from cardboard crafts! Authentic ideas you can build and play with
- For summer vacation homework! Simple and amazing crafts for elementary school students that you’ll want to make after seeing them
- For upper-grade boys! Simple yet awesome craft project [Don’t call it lazy]
- Crafts parents and kids can enjoy together. Recommended craft ideas to keep children entertained.
[Indoor Activities] Craft Ideas Recommended for Elementary School Students (21–30)
Marble maze made from a candy box

Here’s a marble run you can make using an empty candy box! Prepare a box where the lid and the compartment for the candy are separate.
On the side that held the candy, glue cardboard strips along two opposite edges and cut a hole where you can retrieve marbles that fall through.
On the lid, sketch the course, glue cardboard where you want walls, punch a few holes, and mark a start and a goal.
Once it’s ready, stack the two parts with the lid on top, and you’re done.
Depending on how you design the course, you can create marble runs with various levels of difficulty!
10 Musical Instruments Made from Plastic Bottles

Musical instruments can produce all kinds of sounds and are fascinating, but many people may feel hesitant to buy a lot when they’re not sure how much they’ll actually use them.
Here, we’ll introduce many instruments you can make using plastic bottles.
For example, castanets made by attaching plastic bottle caps to cardboard, a whistle made by punching a hole in a cap and inserting a straw, and even instruments with different pitches just by letting the air out of a plastic bottle.
There are also plastic bottle drums and a “petphone,” made by connecting plastic bottles cut to various lengths.
Use these as references and give it a try!
[Indoor Activities] A Collection of Craft Ideas Recommended for Elementary School Students (31–40)
Five-shot rubber band chopstick gun
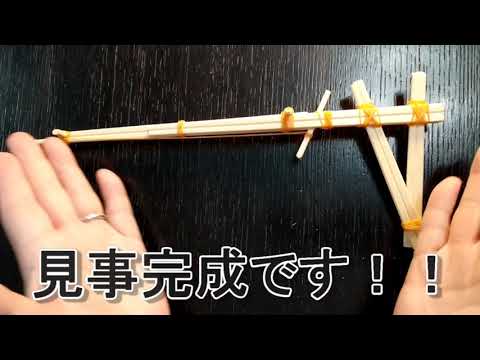
With five disposable chopsticks and sixteen rubber bands, you can make a five-shot rapid-fire chopstick gun! Cut the chopsticks to the required lengths for the body, trigger, and grip parts, and assemble them into a gun shape while securing them with rubber bands.
If you set five rubber bands with the trigger locked on the finished gun, you’ll have a chopstick gun capable of rapid fire.
It’s exciting to think you can make a rapid-fire chopstick gun so easily! When cutting, the edges tend to become jagged, so be sure to sand them smooth with a file or sandpaper to avoid injury.
basket

Why not try making a basket out of construction paper? First, make a loop from a strip of construction paper.
Then prepare eight strips that are half the length of the paper used for the loop.
Cross two strips to form a plus sign and attach their ends to the outside of the loop.
Cross another two strips and attach them to fill the gaps.
Attach the remaining four strips in the same way, but this time, attach them to the inside of the loop.
Prepare two long strips and weave them through the gaps between the papers attached to the loop, alternating over, under, over.
Finally, add a handle and you’re done!
Automatic-firing chopstick gun

Why not try making a unique chopstick rubber band gun with an automatic launcher? When you turn on the power, the screw part rotates, causing the hooked rubber band to move upward and eventually slip off and fire—it’s a simple mechanism.
Kids who are interested in how batteries and motors work, or who are good at assembling plastic models, will likely be eager to take on building a chopstick rubber band gun with this kind of mechanism.
If they first understand the simple construction and how the rubber band is launched, they’ll probably enjoy each step of the process even more.
Marble Rolling Tower

How about a stylish marble run, a Marble Rolling Tower, made from toilet paper cores and colored construction paper? First, stack three toilet paper cores vertically to make one long tube.
Next, let’s create the tracks where the marbles will roll using colored construction paper.
Prepare a rectangular sheet of colored paper, cut it lengthwise in half, then fold the half sheet in half two times.
Unfold the second fold, and along the crease you just made, cut a series of deep, fine slits from one edge to the other.
Once that’s done, fold it into a long, thin triangle to form the track.
Finally, attach the track diagonally to the tube like a slide, and glue a piece of cardboard to the very bottom of the tube as a base—done! Try making it with different colors of paper.
Extending Sword

Here’s how to make an extendable sword using a plastic wrap core and paper.
First, cut the core and use construction paper or similar to make the handle.
Next, make the blade with calendar paper.
Cut the paper so it’s as long as possible.
Roll it tightly so it fits inside the plastic wrap core.
Apply cellophane tape to the paper and adjust it so it matches the inside of the core, then stick it in place.
Once it’s the right size, you’re done! You can twist to extend and retract it for play.
Be careful not to pull it out too far.