[Indoor Activities] A Collection of Craft Ideas Recommended for Elementary School Students

These days, DIY has firmly taken root as a go-to hobby.
When you visit a home improvement store or a 100-yen shop, you’ll even find dedicated sections for it.
Plenty of households probably already have the materials and tools on hand.
In this article, we’ve rounded up craft ideas recommended for elementary school students who are interested in making things!
We’ll introduce everything from board games everyone can play together to practical ideas you can keep using at home after you’ve made them.
Find the project that suits you best and give it a try!
- Crafts you can make with 100-yen shop items! A collection of fun project ideas that elementary school kids will love
- Simple yet amazing crafts: craft ideas that elementary school students will want to make
- [For Elementary School Kids] Handmade Toy Craft Ideas
- [Let’s Make and Play!] Handmade Toy Ideas You Can Create Yourself
- [Summer Vacation Crafts for Lower Grades] Make It with Everyday Materials! Simple Yet Awesome Craft Ideas
- Handmade games: DIY craft ideas you can make and play
- [For Upper Elementary Students] Simple but Awesome! A Collection of Summer Vacation Craft Ideas
- [DIY] A Collection of Handmade Moving Toy Craft Ideas
- [For Kids] Have Fun at After-School Day Service! A Special Feature on Indoor Game Ideas
- Toys you can make from cardboard crafts! Authentic ideas you can build and play with
- For summer vacation homework! Simple and amazing crafts for elementary school students that you’ll want to make after seeing them
- For upper-grade boys! Simple yet awesome craft project [Don’t call it lazy]
- Crafts parents and kids can enjoy together. Recommended craft ideas to keep children entertained.
[Indoor Activities] A Collection of Craft Ideas Recommended for Elementary School Students (31–40)
Marble run with a milk carton and paper plates
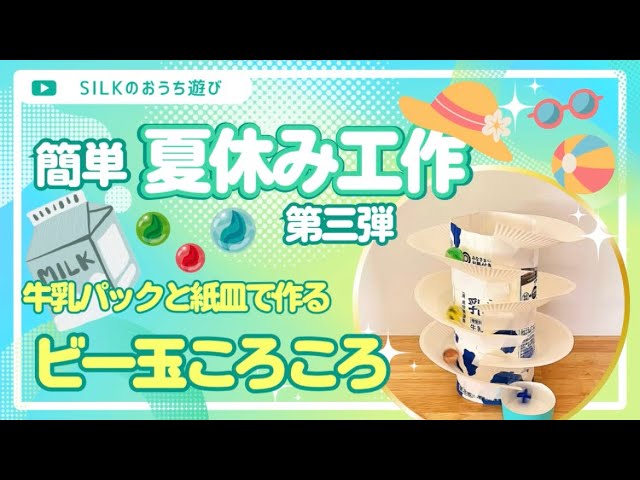
Let’s make a spiral marble run using a milk carton and paper plates! First, cut off the spout and the bottom of the milk carton and turn it into a cylinder by removing the corners.
Next, cut out the center of a paper plate to make a donut shape, snip one spot to open it up, then make several cuts from the center hole outward.
Wrap these around the milk carton to form slide-like ramps.
It’s a good idea to roll a marble from time to time as you build to check that it rolls properly.
Finally, cut off the bottom third of a paper cup, attach it under the end of the slide, and use it as the catcher—then you’re done!
Marble Climbing

When you think of a marble run, you usually imagine marbles rolling from top to bottom, but this one makes the marble go upward.
First, prepare a wooden board with many holes big enough for a marble to fall through, and combine it with other wooden boards at an angle to form a box shape.
Next, make a small box just large enough to hold a marble.
Cut holes in the front and back of this box so the marble can pass through.
Attach strings to the box so you can pull it from both sides, creating a mechanism that lifts the marble upward—then it’s complete.
If, while lifting the marble, it slips through the box’s holes and falls into one of the holes in the wooden board, you’re out.
If the marble climbs all the way to the top without falling, you win!
Marble Climbing
When you think of a marble run, you usually imagine marbles rolling from top to bottom, but this one makes the marble go upward.
First, prepare a wooden board with many holes big enough for a marble to fall through, and combine it with other wooden boards at an angle to form a box shape.
Next, make a small box just large enough to hold a marble.
Cut holes in the front and back of this box so the marble can pass through.
Attach strings to the box so you can pull it from both sides, creating a mechanism that lifts the marble upward—then it’s complete.
If, while lifting the marble, it slips through the box’s holes and falls into one of the holes in the wooden board, you’re out.
If the marble climbs all the way to the top without falling, you win!
Cute mini-sized craft

Mini crafts made with easily available materials from 100-yen shops, such as origami paper, straws, and stickers.
You can whip up small items like keychains, mini bags, paper flowers, and wind chimes in no time.
They’re perfect for decorating your room or for small gifts to friends.
With a little creativity and ingenuity, you can make all kinds of accessories, so why not use the ideas introduced here as inspiration to create your own original pieces? Turning your own ideas into tangible form can be a very rewarding experience.
5 Easy DIY Crafts You Can Try

Kids love crafts, but as first graders it can be hard to stay focused for a long time.
So here are some quick craft ideas you can finish in a short time.
You can make five things: a moving boat, a guitar, a fortune slip (omikuji), a ghost that pops out of a box, and a spinning top.
The materials are mostly recyclables—things you likely have at home—such as milk cartons, plastic bottles, wooden chopsticks, straws, ice cream sticks, and plastic bags.
You can play with each item after you make it, so once you’re done, decorate it however you like and put it to use as a fun at-home activity.
[Indoor Play] Craft Ideas Recommended for Elementary School Kids (41–50)
Three-dimensional artwork made with aluminum foil

Here’s an idea for creating your own three-dimensional artwork using shiny aluminum foil.
Cut the foil to your preferred lengths, then crumple and compress it firmly into shape.
If you’re making a dragon, it helps to form separate parts—such as the body, tail, and horns—and refine each piece as you go.
Once all the parts are ready, check the balance and assemble them, securing everything firmly with glue or tape.
Finally, paint it in your favorite colors to complete a realistic, dynamic dragon.
The finished piece reflects light and has a strong presence, making it an eye-catching decorative item.
It’s a craft that lets you enjoy changing shapes freely and imagining a story as you create.
Easy! A chopstick rubber band gun that can even use hair ties

This rubber band gun made from disposable chopsticks is very simple—you just bundle the chopsticks together and fasten them with rubber bands.
First, stack four chopsticks and secure them in two places with rubber bands.
To catch the rubber band that will serve as the projectile, leave the top and bottom sticks of the four sticking out a bit longer.
Attach a clothespin together with the topmost rubber band at the rear.
The rubber band projectile is gripped by both the clothespin and the chopsticks; when you pull the clothespin, the band shoots out.
Try using a hair tie as the projectile—it won’t hurt much even if it hits you.