[Indoor Activities] A Collection of Craft Ideas Recommended for Elementary School Students

These days, DIY has firmly taken root as a go-to hobby.
When you visit a home improvement store or a 100-yen shop, you’ll even find dedicated sections for it.
Plenty of households probably already have the materials and tools on hand.
In this article, we’ve rounded up craft ideas recommended for elementary school students who are interested in making things!
We’ll introduce everything from board games everyone can play together to practical ideas you can keep using at home after you’ve made them.
Find the project that suits you best and give it a try!
- Crafts you can make with 100-yen shop items! A collection of fun project ideas that elementary school kids will love
- Simple yet amazing crafts: craft ideas that elementary school students will want to make
- [For Elementary School Kids] Handmade Toy Craft Ideas
- [Let’s Make and Play!] Handmade Toy Ideas You Can Create Yourself
- [Summer Vacation Crafts for Lower Grades] Make It with Everyday Materials! Simple Yet Awesome Craft Ideas
- Handmade games: DIY craft ideas you can make and play
- [For Upper Elementary Students] Simple but Awesome! A Collection of Summer Vacation Craft Ideas
- [DIY] A Collection of Handmade Moving Toy Craft Ideas
- [For Kids] Have Fun at After-School Day Service! A Special Feature on Indoor Game Ideas
- Toys you can make from cardboard crafts! Authentic ideas you can build and play with
- For summer vacation homework! Simple and amazing crafts for elementary school students that you’ll want to make after seeing them
- For upper-grade boys! Simple yet awesome craft project [Don’t call it lazy]
- Crafts parents and kids can enjoy together. Recommended craft ideas to keep children entertained.
[Indoor Play] Craft Ideas Recommended for Elementary School Kids (41–50)
An exceedingly simple chopstick gun
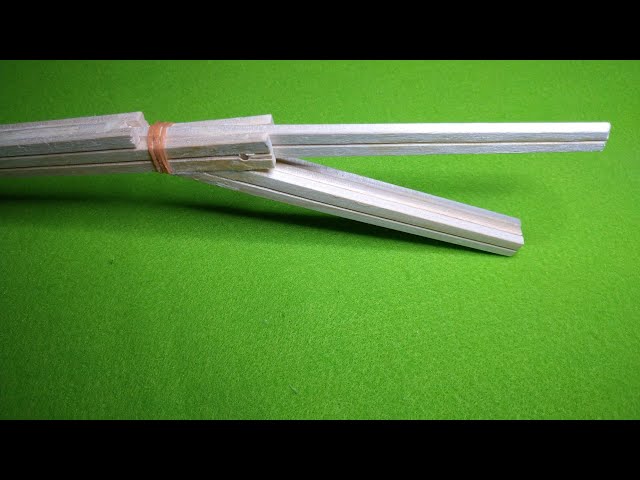
A simple rubber band gun made from disposable chopsticks and rubber bands is a craft project that both kids and adults can get hooked on.
However, the one introduced here is surprisingly authentic, with steps that even involve using a utility knife and a screwdriver.
Kids should make it together with an adult and enjoy the process.
You can also make targets easily with chopsticks, so once you’re done, you can have fun playing a target-shooting game! It’s simple, but you can customize it with a bit of creativity, letting you experience the fun of making things.
Be sure to build and play together—kids and adults alike—and enjoy a great time!
[Indoor Play] A Collection of Craft Ideas Recommended for Elementary School Students (51–60)
gel candle

At 100-yen shops, you can find a product called gel candles, and with them you can easily make homemade candles.
Gel candles are easy to handle, and you can even pour two different colors one on top of the other to create a two-layer candle.
The way the colors blend slightly between the layers also gives it a lovely look.
Plus, by placing items you like—such as colored sand, seashells, or dried flowers—into the glass before pouring in the gel candle, you can create a more stylish and original piece.
Give it a try and make one with your own sense of style.
A UFO catcher made from a candy box

A UFO catcher made from an empty Tabecco Animal cookie box is a playful craft.
Use the box as the base, and create the frame and decorations with construction paper and colored paper.
Combine straws of different thicknesses—slide a regular straw inside a tapioca (boba) straw—to support the movement of the arm.
Reinforce it with parts from a milk carton, and thread string through it so the arm can move up and down; this mechanism is key.
Design the tip of the arm so it can grip prizes securely.
Using double-sided tape or glue during assembly will make it sturdier.
It’s a cute, fun-to-play idea that makes great use of everyday materials.
Paper cup Tyrannosaurus

This activity involves combining paper cups to create a three-dimensional, dynamic Tyrannosaurus.
The key is how you connect the cups: by trimming the edges and adding slits, you can set firm angles.
Build it by linking the cups from the head to the tail, then attach separately made legs and arms at the end to finish.
Try different variations, such as using cups of the same color for a cohesive look or mixing different colors for a colorful effect.
Maze ideas
@tomonite_official A handmade maze using a wrap core! This looks fun for both kids and adults♪ Try making it together with your child 😊 Please use this idea with adult supervision and with safety in mind. Featured from Instagram: a post by @mimita_asobi ✨ Thank you for the wonderful post. ↓↓↓ ───────────────── 【Not trash: A Spinny Maze with a Wrap Core】 Today’s post is a “spinny maze”! The child was super focused! But then they said, “Make a harder one next time,” 🫣 I guess it was a bit too easy for a five-year-old! You can make lots of different versions☺️ The child was able to make it themselves too, so everyone, try making it with your kiddo 👍🏻 ̖́- ▷Materials for today 〇 Wrap core (cardboard tube from plastic wrap) 〇 Paper (construction paper or copy paper is fine) 〇 Wrapping film 〇 Double-sided tape 〇 Stickers (or draw directly on the film) 〇 Pens/markers for drawing ───────────────── This is Tomonite @tomonite_official. Even on busy days, we want family time to be full of smiles! We share: 🏠 Time-saving housework and parenting hacks 💎 Convenient items with great time and cost performance 👶 Relatable parenting moments and heartwarming videos ✨ A favor ✨ Likes and comments really encourage us! If you found this post helpful or enjoyed it, we’d be happy if you leave a 👶 in the comments! All posts introduced by Tomonite are shared with permission from the original creators. Comments that may hurt others may be hidden by our team. We’d love for everyone to enjoy comfortable conversations and to connect a lot here ✨#AtHomePlayworkSimple craftMaze
♬ Bling-Bang-Bang-Born – Creepy Nuts
You can make a fun maze with a cardboard wrap core! Here’s a simple way to do it.
First, cut construction paper to the length of the wrap core, and draw a maze on it using any writing tools you like.
Attach double-sided tape to the paper with the maze and wrap it around the core.
Next, cut a piece of wrapping film to about 5 cm and stick your favorite stickers on it—that’s it! Thread it through the wrap core to play the maze game.
If you make the construction paper removable, you can enjoy original mazes over and over again.
It’s also recommended to use stickers of your favorite characters to enjoy a themed world.
Fly! Core Rocket

Here’s how to make an easy “core rocket.” You’ll need a plastic wrap core, a toilet paper core, two rubber bands, and a straw.
First, cut the straw so it’s just a little longer than the opening of the toilet paper core.
Link the two rubber bands by looping them together.
Tape the rubber bands to the straw, then tape the straw onto the plastic wrap core with cellophane tape.
Once it’s set up so the toilet paper core can be launched, you’re done! Decorate the toilet paper core however you like to make your own original rocket.
Have fun and get creative!