[Indoor Activities] A Collection of Craft Ideas Recommended for Elementary School Students

These days, DIY has firmly taken root as a go-to hobby.
When you visit a home improvement store or a 100-yen shop, you’ll even find dedicated sections for it.
Plenty of households probably already have the materials and tools on hand.
In this article, we’ve rounded up craft ideas recommended for elementary school students who are interested in making things!
We’ll introduce everything from board games everyone can play together to practical ideas you can keep using at home after you’ve made them.
Find the project that suits you best and give it a try!
- Crafts you can make with 100-yen shop items! A collection of fun project ideas that elementary school kids will love
- Simple yet amazing crafts: craft ideas that elementary school students will want to make
- [For Elementary School Kids] Handmade Toy Craft Ideas
- [Let’s Make and Play!] Handmade Toy Ideas You Can Create Yourself
- [Summer Vacation Crafts for Lower Grades] Make It with Everyday Materials! Simple Yet Awesome Craft Ideas
- Handmade games: DIY craft ideas you can make and play
- [For Upper Elementary Students] Simple but Awesome! A Collection of Summer Vacation Craft Ideas
- [DIY] A Collection of Handmade Moving Toy Craft Ideas
- [For Kids] Have Fun at After-School Day Service! A Special Feature on Indoor Game Ideas
- Toys you can make from cardboard crafts! Authentic ideas you can build and play with
- For summer vacation homework! Simple and amazing crafts for elementary school students that you’ll want to make after seeing them
- For upper-grade boys! Simple yet awesome craft project [Don’t call it lazy]
- Crafts parents and kids can enjoy together. Recommended craft ideas to keep children entertained.
[Indoor Play] Craft Ideas Recommended for Elementary School Students (71–80)
desk lamp
@gakky_07 How about this for your summer vacation project?Summer Vacation Craft#Summer VacationDesk lamp
♬ original sound – Gakki –
Here’s an idea for making a desk lamp that uses a magnet-mountable LED light.
The stand is entirely wooden, and the arm is movable so you can adjust the angle.
First, think about what size you want and what kind of structure you’re aiming for, and try drawing a design plan.
Once the plan is ready, figure out the lengths and quantities of wood you’ll need and source the materials.
These days, you can even find small pieces of wood at 100-yen shops, so those might work as well.
One of the joys of woodworking is choosing the finish—whether to go for a natural look with varnish or oil, or paint it your favorite color—so definitely consider a variety of options.
Key rack made from 100-yen shop materials

This is a key rack packed with ideas, made using photo frames.
Prepare three identical photo frames: two will form the body and one will be the lid.
Start by making the body.
First, cut a cork sheet to fit the inside dimensions of a photo frame, apply a decorative remake sheet, and attach it to the first frame.
Next, glue the second frame on top of the first.
That completes the body.
Then, use hinges to connect the third frame to the body as a lid.
Finish by attaching an arch latch.
By inserting aluminum pins into the cork sheet, you can hang your keys on them.
It’s a creative project that turns photo frames into a key rack.
Try painting it or adding your own touches to make it uniquely yours.
Original handmade watch

When you go to a 100-yen shop or a handmade goods store, you can find just the clock movement for sale.
Let’s use that to make your own original clock! For the base of the clock, use a photo frame or a plastic plate.
Once you decide where to fix the movement, drill a hole.
Tighten the nut to secure the movement, and then decorate it to your liking.
Paint it, attach parts, or add glitter to make it sparkle—depending on your ideas, you’ll end up with a clock full of originality!
[Indoor Activities] A Collection of Recommended Craft Ideas for Elementary School Students (81–90)
Candy Magnet

Let’s make a magnet that looks like a candy with twisted ends.
The materials and steps are very simple, so it’s highly recommended.
First, prepare strong magnets from a 100-yen shop, a plastic bottle cap, and a fabric scrap with a pattern you like.
Start by gluing the magnet to the back of the bottle cap.
Next, cut the fabric scrap to 14 cm by 10 cm, then fold back and glue three sides, leaving just one of the short sides unfolded.
Once the glue is dry, wrap the bottle cap with the fabric and secure it with glue.
Finally, to create the candy shape, gather and stitch the fabric at both ends with thread.
You’re done! Try making lots in different colors and patterns.
Original T-shirts made with stencil printing

How about making your own T-shirt over summer vacation? We’ll use a technique called stenciling to create an original T-shirt.
You place a cutout of letters or illustrations on the fabric and paint over it with ink or other pigments.
Since you’ll wear the T-shirt, you’ll likely wash it too.
When stenciling on T-shirts or fabric, be sure to use fabric ink that won’t wash out.
While this can be a summer vacation homework project, it can also become a fun summer memory.
You might even make matching T-shirts for the whole family.
There are stencil T-shirt kits available online, so why not give them a try?
Stone painting

During summer vacation, there are times when you go out with your family to rivers or mountains, right? When you do, why not try picking up stones and making art with them? Of course, stones you’ve collected from around your neighborhood are fine, too.
First, paint the stones you’ve prepared with white acrylic paint.
This small extra step will help your work turn out beautifully.
Then, use acrylic paints to create animals, plants, and more by adding color.
If you also use items like pipe cleaners or empty cans, you can make pieces that look very realistic.
Please use this as a reference and give it a try!
Let’s make a cardboard pochette
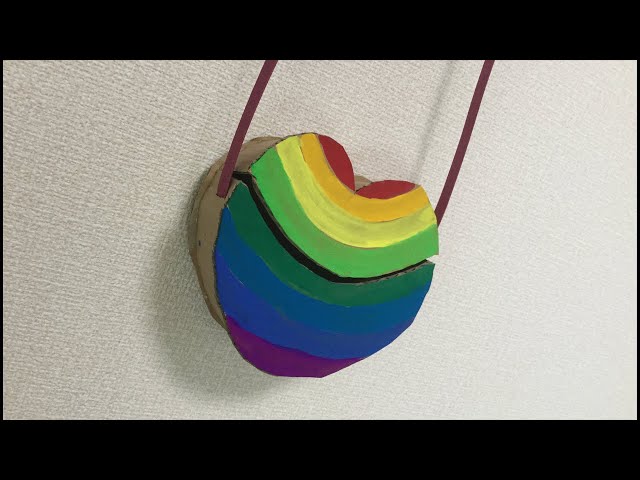
Here’s an introduction to making a pochette using cardboard.
Do you have cardboard boxes at home from parcel deliveries or from purchases at the supermarket? If you have some on hand, you can make a pochette simply by cutting it into shape, folding it, and assembling it.
Cardboard has lines where the inside is hollow.
The key is to keep those lines in mind when you cut.
If you want to create curves in your cardboard parts, cut across those lines.
Doing so will expand your creative possibilities.
Designing the pochette itself is sure to be an enjoyable time, too.