Irresistible for 5-year-olds! A collection of recommended craft ideas for Halloween


Halloween season is finally here! Here are some magical craft ideas you can enjoy with five-year-olds.
Crafts featuring ghosts and pumpkin motifs spark children’s imaginations and liven up any costume party.
From glow-in-the-dark lights in a pitch-black room to colorful lanterns and cute ghost mobiles, every project will have them working with shining eyes.
Once everything’s finished, let’s all enjoy a Halloween party together! Be sure to make happy memories with the children.
Because the children’s creations are treated as finished works, the term “制作 (seisaku)” is used in the text to mean “production/creation.”
- [Childcare] For 5-year-olds! Autumn craft ideas
- [For 4-Year-Olds] Fun to Make! A Collection of Halloween Craft Ideas
- [Childcare] Perfect for October! Autumn crafts to enjoy with 5-year-olds
- Get kids excited in childcare! A collection of ideas for making Halloween treat bags
- Let's Make and Display! Origami Perfect for Halloween
- For 5-Year-Olds: Enjoy Autumn! Easy Origami Ideas
- Craft Activity Ideas for 5-Year-Olds: November Edition
- Halloween gets even more exciting! A collection of DIY mask ideas using a variety of materials
- Recommended for 5-year-olds’ September crafts! A collection of ideas to enjoy autumn
- Irresistible for 3-year-olds! A collection of fun Halloween craft ideas to make
- [Childcare] Playful craft ideas to enjoy with 5-year-olds
- Toddler-Approved Halloween Crafts: Ideas That Captivate 2-Year-Olds
- [For 5-year-olds] Recommended for Christmas! A collection of fun crafts to make
Ideas kids aged 5 will love! Recommended Halloween crafts (21–30)
Origami Halloween wrapping
@yumi_chiiku origamiOrigamiOrigami wrappingHalloween
♬ Halloween · cute horror song – PeriTune
Let’s make a candy-shaped wrapping box that can hold a small gift.
First, crease the origami paper finely, then roll it into a tube and twist one end to shape it like a candy.
Make two identical pieces and overlap the tube sections to complete the wrapping box.
It may seem difficult, but as long as you carefully do the creasing steps, it comes together in no time—give it a try! If you use Halloween-colored origami and draw a ghost face, you’ll have a box perfect for Halloween.
Let’s make a ghost!

Fold the origami paper in half into a square twice to make creases.
Open it, then fold the top and bottom edges to meet the horizontal crease.
From there, make additional creases and squash-fold the left and right sides into boat shapes.
On one of the boats, squash only one corner into a square to create the ghost’s face.
The sides of the face will be the hands, and the remaining part becomes the bottom.
Use the creases on the hands to create indentations so they look three-dimensional—that’s the key.
Soften the head by folding the corners to make it round, and finish by folding the bottom part up at a diagonal.
Draw the face with stickers or a pen to complete it.
Origami bat

Fold the origami paper twice to make a small triangle, then make a slit under the top corner, parallel to the base.
Make the slit from the side opposite the fold, being careful not to cut it off.
The upper triangular section you slit will become the bat’s head, and the lower part will be the wings.
Open the paper back into the large triangle, and fold the slit section toward the central crease to form the head shape.
Fold the same parts back to create the bat’s distinctive ears.
Use a zigzag (mountain–valley) fold for the junction between the head and body.
Finally, fold the remaining wings several times to add creases and give it a three-dimensional finish, and you’re done.
A Halloween card with a pop-up witch hat
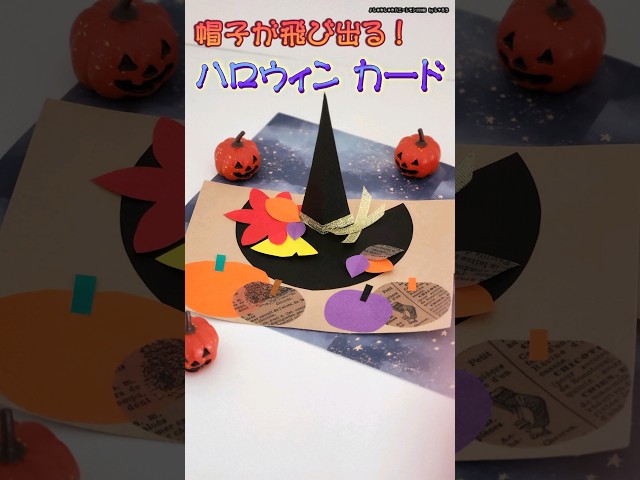
A high-impact message card where a large triangular hat pops up from the center when opened.
The hat’s wide brim gives you plenty of space to write messages, add patterns, or stick on your favorite stickers.
Cut the triangular hat and brim from black construction paper, glue them together, and attach a decorative ribbon.
Fold the base in half, then glue the folded triangular hat along the crease.
Use the remaining space to decorate for Halloween with any parts you like, such as pumpkins or bats.
Halloween wreath made with rings
@minnaderhythmic #Halloween craftswork#HalloweenWreathJust have them put some stickers on it.
♬ Halloween comical horror song – PeriTune
Pass the ring-shaped parts—made by rolling strips of construction paper—through a slim circular base and secure them.
Attach a spiderweb made from transparent origami paper to the center of the base, and tie on a hanging string.
Stick jack-o’-lantern faces and stars onto the ring parts, and glue on a spider made from pipe cleaners and pom-poms to finish.
The ring parts use orange, purple, and brown construction paper, but feel free to use any colors you like.
Enjoy making your original Halloween wreath!
Ghost candy container

Let’s make a ghost-themed candy holder that’s perfect for Halloween events.
Cut your favorite color construction paper into a fan shape, roll it into a cone, and glue it in place.
This will be the body of the bag—and the ghost’s body too.
Attach eyes, mouth, and hand parts made from other sheets of paper, then punch two holes at the top of the bag.
Thread a ribbon through the holes and tie it to create the handle, and your candy holder is complete.
You can draw the ghost’s face with crayons, or decorate it with stickers for an extra cute touch.
spinning ghost

If you hang this up, the kids might be startled and shout, “A ghost is flying!” On a sheet of white construction paper, draw a spiral inspired by a snail and a ghost’s face.
Cut away any unnecessary parts with scissors, then cut along the lines to turn it into a long ghost shape.
Punch a hole in the ghost’s head, thread a string through, and secure it with tape so it doesn’t come off.
And that’s it—your twirly ghost is complete! Drawing the spiral is fun, but be careful: if you draw too many spirals, the cutting will become difficult.