[Grown-up Cute] Easy Handmade Ideas for Miscellaneous Goods and Interior Accessories

Handmade items have been trending in recent years, haven’t they?
I’m sure many of you browse or use handmade marketplaces and sites.
In this article, we introduce ideas for charming, grown-up handmade accessories, small goods, and interior decor items.
If you have fabric scraps and aren’t sure how to use them, or you’re interested in popular 100-yen shop decor or Korean-style interiors but don’t know how to make them, take a look for inspiration and try creating something you love—your very own original piece.
Many projects can be made with materials from 100-yen shops, so you can get started right away!
- [Handmade] Delightful Handmade Fabric Accessories to Receive
- [For Adults] Simple yet Impressive Crafts: A Stylish, Eye-Catching Collection
- [Beginner Friendly] Easy Craft Ideas You Can Do
- [Easy and Simple] Popular DIY Ideas You Can Make with Materials from 100-Yen Shops
- [Easy] Practical craft ideas. Great for beginners too!
- Stylish and Easy! DIY Wall Decoration Ideas
- Christmas crafts for adults: stylish project ideas you'll want to display
- Craft projects recommended for adult hobbies: a stylish and cute collection of works
- [For Girls] Make It with Everyday Items! Easy but Super Cute Craft Ideas
- [100-Yen Store Crafts] Handmade ideas that captivate adults too. Stylish DIY/handmade.
- Let's make a handmade tissue case: a collection of stylish and easy ideas
- Handmade Gifts: Ideas That Will Delight Older Adults
- Handmade winter garlands: cute ideas that are easy to make
Grown-up Cute: Easy Handmade Ideas for Accessories and Interior Decor (11–20)
macrame keyholder

Let’s try making a handmade keychain using materials from the 100-yen shop.
Macramé is a type of textile art characterized by crossing and knotting to create beautiful decorations.
The knotting patterns may feel a bit difficult at first, but once you learn them and get used to the process, it’s not that hard.
Get accustomed to it little by little while watching videos.
Since you can review as many times as you like, you’ll get better and better at making them.
For macramé, use lace thread from the 100-yen shop.
A keychain featuring delicate macramé lace has a unique charm, and by the time you finish, you’ll be attached to it.
Why not practice a lot, make plenty of pieces, and create your very own macramé keychain?
Volume scrunchie

Hair accessories are something you can never have too many of.
Scrunchies, which let you quickly style your hair and add a touch of flair, are great to have in multiples.
And if they’re made from your favorite fabric and in a design you love, that’s even better.
Why not try handmaking a scrunchie with lots of volume, just the way you like it? It’s easy to do.
By changing the size or pattern of the fabric, you can create all kinds of scrunchies.
Feel free to get creative with the variations.
Let’s handcraft an original, cute, and lovely scrunchie that’s uniquely yours.
Glass sand art
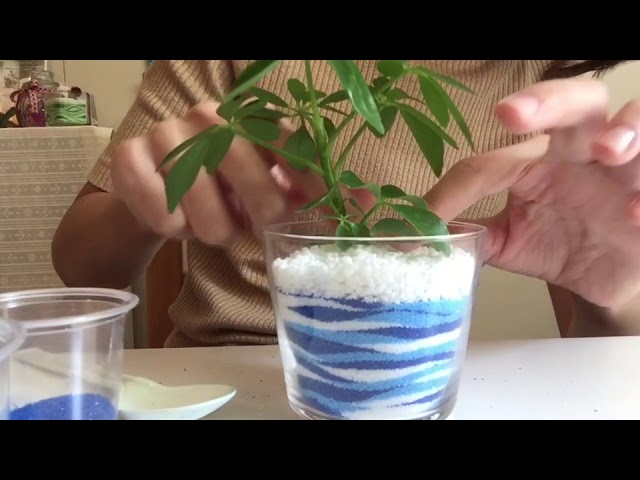
Glass sand art involves pouring colorful sands into a glass containing a potted houseplant to create beautiful layers.
All you need are a plant in its pot, a glass large enough to comfortably fit that pot, and several colors of sand.
Place the potted plant into the glass, then pour sand around it.
The key to creating clean layers is to slowly add small amounts while rotating the glass to keep the balance.
Once the pot is fully concealed, you’ll have a high-quality piece that’s hard to believe was made just by adding sand!
Clay tray

Stylish accessory trays made with 100-yen shop paper clay.
Like a fun craft project, you can create your own original home decor items.
No advanced techniques or knowledge required.
Think freely about designs for the kind of tray you want, and bring them to life.
Clay is easy to handle and not a difficult material, so feel free to give it a try.
Once you shape the clay, let it dry for about 1–2 days, then sand the surface and edges with sandpaper.
When the clay feels smooth, add color and let it dry.
This is where you can really show your taste.
Once it’s finished, try displaying perfume or accessories on it.
[Resin] Chopstick Rest
![[Resin] Chopstick Rest](https://i.ytimg.com/vi/n1594NMyVAU/sddefault.jpg)
These days, resin tools are available even at 100-yen shops, so many people are enjoying making resin crafts.
Why not take this opportunity to start working with resin yourself? Here’s an idea for chopstick rests made with resin.
Nuance art using mirror powder and color gel looks beautiful against the clear resin.
Since you’ll paint the art with a brush, try designing it with your own sense of style.
Using sequins or glitter can also give it a glamorous finish.
suncatcher

A sun catcher that sparkles as it reflects sunlight.
You’ve probably seen them hanging by windows or inside cars.
You can easily find parts for sun catchers at 100-yen shops and the like.
As long as the pieces have holes for threading fishing line, they don’t have to be specifically made for sun catchers.
Once you have the parts you want to hang, some thread such as fishing line to connect them, and crimp beads to secure the parts, all you have to do is string them onto the line in any order you like.
If you use crimp beads between the parts, you can create space between them.
Gather your materials and give it a try!
[Grown-up Cute] Easy Handmade Ideas for Miscellaneous Goods and Interior Accessories (21–30)
Macramé smartphone shoulder strap

This is a charmingly textured braided shoulder strap that can be used as a bag shoulder strap or a smartphone sling.
It’s a simple design with hardware attached to both ends of a braided cord, so you can freely customize it by choosing different cord materials, colors, and types of hardware.
First, tie the cord to one piece of hardware.
Then take the six strands extending from there, group them into three bundles of two strands each, and braid them into a three-strand plait.
It’s important to keep each pair of strands side by side without overlapping; aligning them as you braid brings out a clean, distinct braid pattern.
Once you’ve braided to your desired length, tie on the other piece of hardware to finish.
The way you tie the hardware and the length you choose can also reflect the maker’s personal touch.