[Grown-up Cute] Easy Handmade Ideas for Miscellaneous Goods and Interior Accessories

Handmade items have been trending in recent years, haven’t they?
I’m sure many of you browse or use handmade marketplaces and sites.
In this article, we introduce ideas for charming, grown-up handmade accessories, small goods, and interior decor items.
If you have fabric scraps and aren’t sure how to use them, or you’re interested in popular 100-yen shop decor or Korean-style interiors but don’t know how to make them, take a look for inspiration and try creating something you love—your very own original piece.
Many projects can be made with materials from 100-yen shops, so you can get started right away!
- [Handmade] Delightful Handmade Fabric Accessories to Receive
- [For Adults] Simple yet Impressive Crafts: A Stylish, Eye-Catching Collection
- [Beginner Friendly] Easy Craft Ideas You Can Do
- [Easy and Simple] Popular DIY Ideas You Can Make with Materials from 100-Yen Shops
- [Easy] Practical craft ideas. Great for beginners too!
- Stylish and Easy! DIY Wall Decoration Ideas
- Christmas crafts for adults: stylish project ideas you'll want to display
- Craft projects recommended for adult hobbies: a stylish and cute collection of works
- [For Girls] Make It with Everyday Items! Easy but Super Cute Craft Ideas
- [100-Yen Store Crafts] Handmade ideas that captivate adults too. Stylish DIY/handmade.
- Let's make a handmade tissue case: a collection of stylish and easy ideas
- Handmade Gifts: Ideas That Will Delight Older Adults
- Handmade winter garlands: cute ideas that are easy to make
[Chic and Cute for Adults] Easy Handmade Ideas for Accessories and Home Decor (41–50)
cushion cover

Here’s how to make a simple cushion cover without a zipper.
Let’s handcraft a cute, easy cushion cover without the tricky step of attaching a zipper.
You can choose any fabric you like—fluffy and cozy for cooler seasons, or light and breezy for warmer months.
If you want to make a cushion cover but find zippers a hassle, this method lets you finish one with ease.
It’s a simple design: sew a bag-like cover and tuck the fabric inside to close it around the cushion.
Try making different styles of cushion covers to match your mood or interior decor.
[Chic and Cute] Easy Handmade Ideas for Accessories and Interior Decor (51–60)
Crocheted flowers you can make in 3 minutes

Recommended even for your first project! Here’s a crochet flower idea you can make in 3 minutes.
It’s perfect if creating large, impressive pieces still feels challenging, or if you want to start small and build up your skills step by step.
While the flower looks simple, making it lets you practice starting a magic ring, chain stitches, and slip stitches.
It’s a project that doubles as practice while you finish a finished piece—so we encourage you to give it a try!
Remake can

You often see and hear about remake cans using empty cans, but you might wonder, “Are they easy to make?” Turning empty cans you’d normally throw away into stylish items feels like a great deal, and it really suits the times, doesn’t it? You can use any kind of can—tomato, tuna, mackerel, whatever.
Peel off the label first, then apply a primer, which is a base coat that helps the paint adhere better.
After that, paint over it; regular paint works, and you can even use leftover acrylic paints you have at home.
If you dab the color on with a sponge, it gives a nice texture.
Torokira Keychain
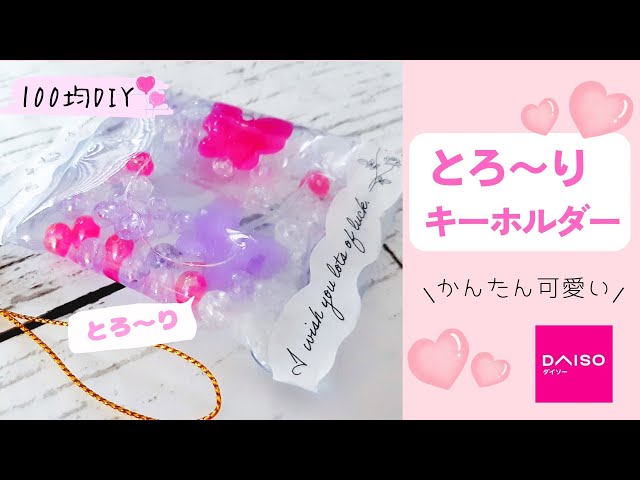
Do you know those cute accessories with a little doll floating in a tiny plastic bag? You often see them as prizes at festival raffles, but actually, you can make them yourself.
You only need items mostly from a 100-yen shop—like a soft card holder, beads and glitter, liquid laundry starch, and masking tape—so it’s a budget-friendly craft project.
Add cutouts of your favorite character or idol to the decorations, and it instantly becomes merch for your fave! You’ll want to make them for everyone!
Leather magnetic bookmark

Introducing a smart leather magnetic bookmark with a sophisticated, grown-up vibe.
While imagining how it will clip onto a book page, attach two magnets to the leather.
Glue the leather together so that the magnets are sandwiched inside.
Then stitch the leather with thread.
Once the glue has dried, fold it in half, sand the edges all around, and you’re done.
It grips firmly, so you won’t have to worry about the bookmark slipping out.
Give this practical and stylish leather magnetic bookmark a try!
cloth slippers
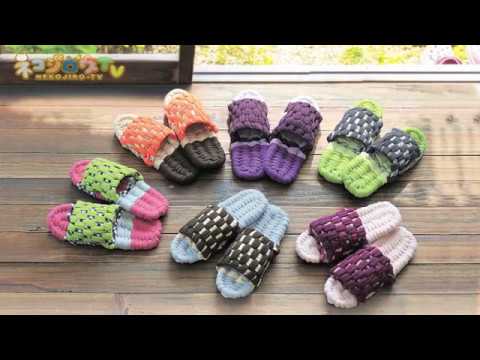
These are fabric slippers with a colorful, soft look, made by braiding long, rolled strips of cloth.
Tie four plastic cords together at one end, then use those four cords as guides to braid the long fabric strips.
Avoid leaving gaps in the fabric and make sure the guide cords don’t show—this will result in a sturdier finish.
Once the base is braided, use another piece of fabric to add the arch section and decorations to complete the slippers.
It’s a craft that requires careful fine-tuning, such as stiffening certain parts and keeping others gently flexible to fit the foot, all while maintaining good balance.
Easy Long-tailed Tit

This is about making a long-tailed tit, notable for its white and soft appearance, using faux fur fabric.
The key points are how to make the most of the fabric’s softness and how rounded to make the final shape.
You’ll cut the fabric using a pattern, sew the pieces together, then stuff them with filling to create a round form.
Since you’ll combine the body and tail before adding the stuffing, it may be important to sew while keeping the final shape in mind.
It’s also interesting that the impression changes depending on how much stuffing you use.