[Childcare] Decorate in April! Butterfly Wall Display Ideas


In this article, I’ll introduce wall decoration ideas that are perfect for April.
This time, we’re focusing especially on butterflies and have selected a variety of ideas.
In addition to classic ideas that involve cutting and pasting construction paper, we’ll also share plenty of fun new ideas to display—so please use them for inspiration.
These are craft ideas that children can enjoy making, so teachers, be sure to have fun creating butterflies together with your students.
Now, let’s dive right in and take a look at butterfly wall decoration ideas that are perfect for April!
- Recommended for graduation ceremonies! A collection of handmade cherry blossom ideas to decorate your walls
- [April] Cute spring-themed classroom wall decoration ideas for early childhood education
- [Childcare] Decorate in April! A collection of recommended wall display ideas for Easter
- Spring wall decorations: A roundup of recommended motifs for nurseries and kindergartens
- [For 4-year-olds] A collection of April craft ideas that capture spring, such as Easter and cherry blossoms
- [Childcare] Simple origami ideas for kids, perfect for spring
- Recommended for graduation ceremonies! A collection of stylish wall decoration ideas
- Recommended decorations for kindergarten graduation! A collection of DIY wall displays and decoration ideas
- [Graduation Ceremony Wall Decor] A collection of rainbow-themed ideas to send off the children
- [Childcare] Butterfly craft ideas
- [Childcare] Perfect for April: Wall decoration ideas to celebrate starting school and moving up a grade
- [Childcare] Let’s make things with various materials! A collection of recommended craft ideas for April
- [Preschool] Tulip wall display ideas to make in April
[Childcare] Decorate in April! Collection of Butterfly Wall Display Ideas (21–30)
A butterfly incorporating decalcomania

Here’s a craft idea for making butterflies using decalcomania.
Decalcomania means transferring images.
In this idea, you’ll enjoy creating symmetrical patterns on the butterfly.
First, fold a sheet of construction paper in half, draw half of a butterfly along the fold, and cut it out.
Open the paper and apply paint only to one wing.
Once the paint is on, close the paper along the center fold, rub well, then open it.
The paint will have transferred to the other side, creating a mysterious pattern! Finally, attach antennae made from a wire tie to finish.
Because the purpose of decalcomania is to enjoy freedom of expression, let the children choose the paint colors and how to use them.
Ask questions like, “I wonder what pattern we got?” to build excitement for the big reveal when they open it.
Once displayed, it will make a uniquely eye-catching wall decoration!
A butterfly made by attaching round parts together

Let’s make an adorable butterfly fluttering about in the spring sunshine.
Using circular construction paper in two colors and four sizes, you can create a cute butterfly.
Use two circles of different colors and sizes to make the wing parts.
Layer them so that the larger wing pieces are on top.
Attach the construction paper body and antennae to finish.
Adding round stickers to the antennae enhances the butterfly’s look.
You can enjoy this craft with different ideas, such as changing the wing colors to a variety of hues.
A three-dimensional butterfly made from drawing paper
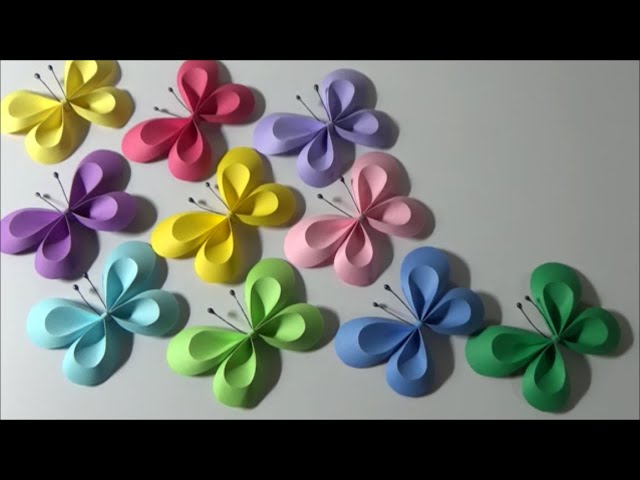
Let’s make a 3D butterfly using construction paper! First, prepare a sheet of construction paper and draw a butterfly shape.
Overlap two rectangles—3 cm tall × 10 cm wide on top of 3 cm tall × 8 cm wide—and round the ends into gentle curves.
Next, draw one smaller wing inside each wing.
The sizes are: upper wing 2 cm tall × 7 cm wide, lower wing 2 cm tall × 6 cm wide.
Draw a 2 cm horizontal line in the center of both, too.
Once you’re ready, first cut around the outer edges of the wings, then trace over the inner wing lines and the central horizontal lines with a pen to score them.
Doing this on a soft surface makes it easier to leave marks.
After scoring, make mountain and valley folds in sequence, pinch and fold the butterfly’s center tightly, and glue it in place.
Finally, add the antennae, and your 3D butterfly is complete! Use these dimensional butterflies to decorate your walls and make them stand out from flat designs!
Accordion-fold butterfly made with origami

Let me share an idea for making a butterfly using accordion-folded origami.
I think this idea also pairs well with a Japanese-style wall display.
First, fold the origami paper in half to make a crease, then open it and fold the top and bottom edges to meet the center line.
Next, make a mark 5 cm in from the right edge.
Fold the corner of the paper outward so that this mark connects in a straight line with the bottom-right corner of the rectangle.
Repeat the same outward fold for the remaining three corners.
Turn the paper vertically in that state and make an accordion fold to divide it into 16 sections.
Press firmly at the center to shape a neat butterfly, and glue it so it holds its form.
Prepare two thin strips of origami paper: fold one into a V shape to make the antennae and attach it to the head area; then wrap the entire butterfly with the other strip and glue it to finish.
Butterflies made from construction paper with various cute expressions

Here’s a wall decoration idea for making butterflies using construction paper.
First, cut out the butterfly parts from the paper.
If you’re making several, it might be a good idea to create a template and cut multiple pieces at once.
Decorate the wings with flowers made using a craft punch.
After that, glue the butterfly parts together and draw the face to finish! You can either attach face parts made from construction paper or draw them with a pen.
Try making butterflies with a variety of expressions to create a lovely spring-themed wall display.