Simple yet amazing crafts: craft ideas that elementary school students will want to make


“I don’t have much time for crafts…” “But I want to make something that will amaze everyone when it’s done!” If that sounds like you, you’re not alone.
In this article, we’re sharing craft ideas with simple steps that still make you say “Wow!” when they’re finished—featuring clever mechanisms and magical effects.
From moving toys to piggy banks where coins disappear, these are fun, play-with-after-you-make-it projects.
They’re easy to try with everyday materials, so go find your favorite and give it a go!
- For summer vacation homework! Simple and amazing crafts for elementary school students that you’ll want to make after seeing them
- For upper-grade boys! Simple yet awesome craft project [Don’t call it lazy]
- Fun crafts using straws
- Paper cup crafts that elementary school kids will love! A collection of fun project ideas
- Elementary School Students: Simple One-Day Science Project and Craft Ideas
- Simple but awesome! Craft ideas for upper-grade girls
- DIY science projects that elementary school boys will love: ideas you can make with everyday materials
- Recommended for elementary school students! Science fair topics & craft ideas
- Toys you can make from cardboard crafts! Authentic ideas you can build and play with
- [Hand Sewing] Easy crafts recommended for elementary school students. Let's handmake something cute!
- Crafts parents and kids can enjoy together. Recommended craft ideas to keep children entertained.
- [For Upper Elementary Students] Simple but Awesome! A Collection of Summer Vacation Craft Ideas
- [For Kids] Today’s Handmade Craft Ideas
Paper, Origami, Papercraft, Easy Art/Decor (11–20)
butterfly
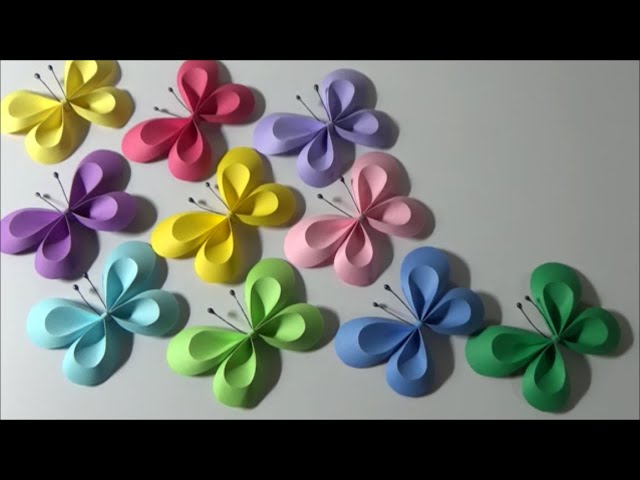
Here’s a fun idea for making butterflies—the more you make, the more enjoyable it gets.
First, prepare two pieces of paper: one measuring 2 cm × 7 cm and another measuring 6 cm × 10 cm.
Cut out the parts from each and combine them to create a three-dimensional butterfly.
Once the butterfly’s shape is complete, attach antennae made from wire to finish.
You can make a colorful array of butterflies inspired by spring, or choose color schemes that resemble real butterflies.
The World of Masks

Why not make a free-form mask and transform into a different persona? It would be so much fun to express your emotions—fear, joy, and more—by turning them into a mask.
First, punch holes where the eyes go in a sheet of colored construction paper in your favorite color.
It’s also fine to have no holes at all, and to use any shapes you like.
Then freely cut out facial features, fangs, horns, and more from origami paper, and attach them with cellophane tape.
Finally, draw patterns with a felt-tip pen to finish.
It sounds really fun to express your transformed self with a mask, doesn’t it?
Thick paperboard diamond sword

Let’s make a diamond sword—the weapon you can obtain in Minecraft—by combining colored paper and cardstock.
The key to conveying that it’s from Minecraft is the arrangement of continuous squares.
First, crease the colored paper into an even grid, then use those creases as guides to draw your design.
Once you’ve drawn the design on the colored paper, glue it onto the cardstock and cut it out.
Attach decorative parts made with a different color, and one side of the design is complete.
Next, make the same piece again and glue it to the back.
Then, to both emphasize that it’s a block and hide the exposed edges of the cardstock, apply colored paper to the sides as well.
If you finish it with a thickness about the same as the grid squares, it should give a solid three-dimensional effect.
Lucky Star

Let’s make a cute, puffy lucky star! You can make this with just construction paper.
First, cut the construction paper into a strip and tie a single overhand knot near one end.
Don’t pull it too tight—fold it neatly so a small pentagon shape forms, then flatten it gently.
Tuck the short end into the knot to hide it.
Next, wrap the remaining long end around the pentagon, following the edges as you go.
When you’ve wrapped it all, tuck the end into the knot again.
Gently press each side of the pentagon inward and pinch the corners to shape it.
Your lucky star is complete!
Box of Light

Would you like to make a light box with a beautiful appearance? All you need are a tissue box, thermal aluminum sheet, and a clear file folder.
First, cut out the tissue box.
Next, cut the thermal aluminum sheet into thin strips, roll them up, and pack them inside the box.
Finally, color the clear file, attach it to the box, and close it up to finish.
It won’t light up on its own, but when sunlight hits it, it shines like stained glass.
Try finishing it with colors and patterns that match your room’s design.