[For Seniors] Add Color to Your Room: A Collection of Flower Craft Ideas


Here are some flower craft ideas for older adults.
Why not try making seasonal flowers—like tulips, hydrangeas, sunflowers, and cherry blossoms—using tissue paper, construction paper, or origami paper?
In addition to crafts that create the flowers themselves, there are plenty of cute and charming ideas for wall decorations and displays, as well as projects that you’ll want to give as gifts to family and friends once they’re finished.
These are recommended not only for those who love flowers and crafting, but also for anyone looking to exercise their fingers and hands.
Handmade paper flowers never wilt, so once you make them, you can enjoy your favorite blossoms for a long time.
- [For Seniors] Lovely Crafts Made with Tissue Paper: Ideas Collection
- [For Seniors] Perfect Finger Exercises! Seasonal Flower Origami
- Craft ideas with plum blossoms for seniors
- [For Seniors] Feel the Arrival of Spring: A Collection of Cherry Blossom Craft Ideas
- [For Seniors] A Collection of Craft Ideas Using Paper Cups
- For Seniors: Simple and Lovely Crafts – A Collection of Take-Home Project Ideas for Day Service
- [For Seniors] Fun to Make! Paper Quilling Ideas
- [For Seniors] Enjoy Something New Every Day! Today’s Origami
- [For Seniors] Small craft ideas: for yourself and as gifts!
- [For Seniors] Practical Crafts to Make in Day-Service Recreation: Idea Roundup
- Easy origami that delights the elderly. Enjoy a heart-lifting time with seasonal origami.
- [For Seniors] Easy Construction Paper Crafts Activity
- [For Seniors] Simple Handicrafts Recommended for Finger Exercise
[For Seniors] Add color to your room. A collection of flower craft ideas (141–150)
cosmos

We’d like to introduce a torn-paper art project that’s perfect for the season: making cosmos flowers.
Start by sketching the outline of cosmos flowers in pencil on paper.
Then tear pieces from newspaper to prepare the parts.
When tearing the newspaper, it’s recommended to use the colored sections to make your parts.
It’s also fun to spend a moment imagining what color you want your cosmos flowers to be.
Glue the pieces onto your sketch to complete your cosmos flowers.
Moving your hands provides good exercise for the brain and can help improve concentration.
Give it a try!
A clover flower crown

An irresistibly cute finish that’s sure to make your heart flutter! Here are some ideas for a white clover flower crown.
Many of you may have made flower crowns with white clover or clovers when you were little, right? This fun craft will bring back those memories.
You’ll need a stapler, white and pale light-green tissue paper, scissors, green pipe cleaners, and green duct tape.
After making white clover blossoms and clover leaves out of tissue paper or paper tape, twist and wrap them together just like you would when making a real white clover crown to complete it!
dandelion
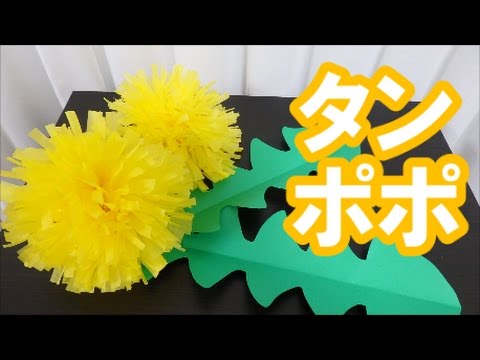
How about making a cute, round dandelion out of tissue paper? First, accordion-fold yellow tissue paper and staple or otherwise secure it in the middle.
Cut slits from both ends toward the center.
Be careful not to cut your hand with the scissors.
After making the slits, gently and thoroughly fan out each petal one by one.
Carefully separate the layered sheets one at a time so they don’t tear.
Finally, shape the tissue paper into a round form while imagining a dandelion, and you’re done.
It’s a perfect craft for spring!
hibiscus

Recommended when you want a taste of summer! Here are some hibiscus ideas.
Speaking of hibiscus, it’s one of the flowers that represent Okinawa.
It’s also designated as Hawaii’s state flower, so many people may associate it with the tropics.
This time, let’s make tissue-paper hibiscus flowers so you can enjoy a tropical vibe indoors.
What you’ll need: double-sided tape, string, tissue paper, yellow tissue paper cut into 3 cm-wide strips, floristry wire, and scissors.
Many people probably imagine red when they think of hibiscus, but since there’s a wide range of colors, it could be fun to experiment with different variations.
morning glory

Let me introduce a torn-paper collage using newspaper that perfectly matches the gentle feel of morning glories.
Look for pink- and purple-toned areas in the newspaper and tear them into circles.
Heart shapes are great too.
Use greenish parts of the newspaper to tear and create leaves and vines.
Once you paste them onto a postcard, it transforms into a lovely picture postcard.
By using various parts of the newspaper as you create, you might make new discoveries.
Let’s appreciate everyone’s finished pieces together to enhance communication and enjoy a sense of accomplishment from what we made.
Hydrangea ball bouquet

When hung up, it sways gently in the breeze! Here are some ideas for hydrangea ball bouquets.
Hydrangea colors each have their own character—there’s a wide range like pink, purple, light blue, and white, and many people love the subtle nuances of their shades.
This time, let’s make a ball bouquet that makes the most of the hydrangea’s round form.
You’ll need ribbon, tissue paper, origami paper, adhesive, a clear file, scissors, and more.
There’s plenty of room for creativity, so try making your favorite design.
Hydrangea wreath

Let’s express the beautifully blended colors of hydrangeas using tissue paper! Here’s a hydrangea wreath idea.
When you think of hydrangeas, you picture that distinctive round shape made up of many small blossoms, right? This time, we’ll make tiny flowers with tissue paper and arrange them into a wreath.
You’ll need a foam wreath form, tissue paper, cardstock, scissors, glue, toothpicks, and rhinestone stickers.
Use the toothpicks to help insert the tissue paper hydrangea flowers into the foam.
For the finishing touch, stick rhinestone stickers in the center of each flower to create an elegant look!