Cute Origami Ideas for Girls

We’ve gathered origami ideas for girls.
From items you can use for doll play and pretend shops to animals and characters girls love, cute letters, and fun toys you can play with—we’ll introduce lots of ideas that girls will enjoy!
If you’re looking for easy origami kids can make or ideas you can make for your child, please use this as a reference.
Origami is said to be great for early childhood development, so keep trying new things.
If you make something cute, it would be fun to trade with friends, too!
- [Origami] She’ll love it if you fold these! Simple ideas for girls
- Popular characters that are easy to make with origami. A collection of creations you can enjoy with children.
- Cute origami ideas
- Kids will love it! Easy origami ideas—great as gifts too!
- Kids’ Origami: Cute and Easy Ideas to Make for a Birthday
- [For Kids] Let's Fold! Today's Origami Idea Collection
- Children’s Origami: Easy Single-Sheet Flower Ideas
- Simple origami for kids: cute, playable origami ideas
- Origami ideas boys will want to make!
- Made of paper! A fun collection of DIY toy ideas you can play with
- Easy flower craft ideas you can make with a single sheet of origami paper
- [Origami] Have fun with kids! A collection of easy snowman origami ideas
- [Kids] Let’s Make Origami! A Collection of Easy Goldfish Folding Methods
[For Girls] Cute Origami Ideas (121–130)
chocolate

Line up little square chocolates made from origami inside a matching origami box, and you get an adorable piece that looks just like a gift.
Fill it not only with brown chocolates but also with pink, white, and yellow ones to make it visually vibrant and double the fun of making.
Each piece uses a simple folding method, so as you create them little by little, you can enjoy it with a collector’s mindset—that’s part of the charm.
It’s fun to display and to play with, and if you work on it together as a parent and child, it’ll feel like running your very own chocolate shop.
You can’t eat them, but these origami sweets are a delight to look at.
Best friends rabbits
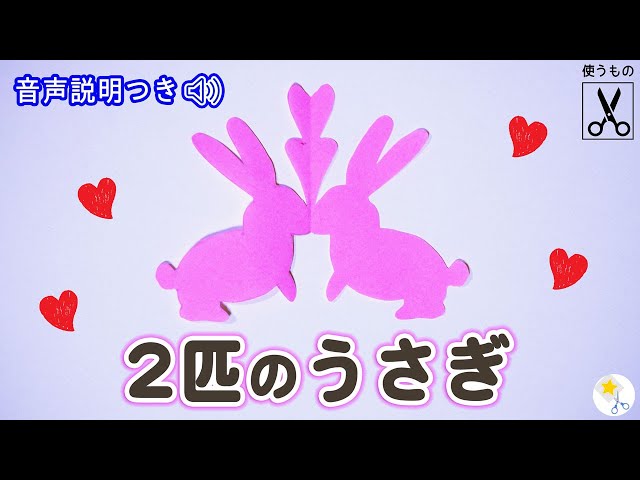
The combination of hearts and rabbits is so cute! Here are some ideas for friendly rabbits.
You might have a chance to make rabbit crafts for the autumn moon-viewing event.
These heart-and-rabbit ideas are perfect for that.
It would also be lovely to layer this piece and stick it inside a full moon made from yellow origami.
Choose any colors you like for the origami.
Colored paper is great, but using white origami might be adorable too.
Be sure to give it a try!
Origami The Very Hungry Caterpillar

Let me show you how to make The Very Hungry Caterpillar with origami.
Prepare six sheets of origami paper and cut them into quarters.
Using the cut pieces, make two types of parts and combine them.
The folding methods are similar, but there are differences, so be careful about the orientation as you fold.
When assembling each part, interlock them so that the two types alternate.
The key is to combine them in order without mixing up the sequence or the parts.
Kids will be delighted when the caterpillar wiggles and squirms when you hold it!
smartphone

Some children may admire the smartphones that adults use every day.
In that case, why not make one out of origami so they can feel like they’re using a smartphone themselves? Fold the origami paper in half and open it, then fold each of the facing edges in by about 5 mm, and fold them toward the center line.
Continue folding while making small cuts so it becomes a long, smartphone-like shape.
Attach a screen piece made from another sheet of origami paper, and it’s done.
Write the time on the screen or draw your favorite pictures to enjoy making your very own smartphone!
[For Girls] Cute Origami Ideas (131–140)
Shiba Inu

I will show you how to fold a cute cat-and-carnation card.
First, make a crease by folding into a triangle.
Fold the bottom corner up to the center to make a crease, then fold the corner along that line.
Align so that the folded corner is perpendicular, and fold the left and right edges up on a diagonal.
Turn it upside down, flip it over, fold the bottom corner up to the top, and fold in any excess.
Fold the bottom edge up slightly.
Fold the lower left and right edges up diagonally.
Slightly fold the corners and shape them into a cat’s face—this completes the face.
Next, the body.
Start with the “boat” fold.
Turn it sideways, then fold the top corners diagonally to form the arms.
Fold the lower part halfway up to the center, tuck the left and right sides inward to shape the legs, then fold up to the center once more and glue to secure.
For the flower, fold a triangle twice to make creases.
Fold both ends diagonally so they stick out just a little, then fold a small portion back.
Fold the folded section in half inward and fold back again.
Trim the tip into a carnation shape to finish.
For the grass, use the “balloon” fold.
With a corner at the bottom, fold the left and right of one layer to the center.
On the other layer, fold the left and right slightly on a diagonal.
Fold the bottom corner upward to finish.
Princess Tiara

Don’t most girls dream of being a princess at least once? And the tiaras that princesses wear on their heads are so cute that you end up wanting one yourself, right? So here are some origami tiara ideas.
You can make them with just one sheet of origami paper, and the steps aren’t very complicated.
Since you fold the front and back in exactly the same way, you’ll probably memorize it after a few tries.
If you use double-sided origami paper, it will look even cuter.
Pooh

Let Pooh’s laid-back personality soothe you! Here are some Winnie-the-Pooh craft ideas.
When you think of “Pooh,” you probably picture the main character from the various stories of Winnie the Pooh.
Many people find his way of speaking, his personality, and his cute, round form comforting.
This time, let’s make Pooh with origami.
You’ll need yellow-toned origami paper, a pen, and colored pencils.
It’s simple, but the key step is making the ears, so it’s best to focus as you work.