Cute Origami Ideas for Girls

We’ve gathered origami ideas for girls.
From items you can use for doll play and pretend shops to animals and characters girls love, cute letters, and fun toys you can play with—we’ll introduce lots of ideas that girls will enjoy!
If you’re looking for easy origami kids can make or ideas you can make for your child, please use this as a reference.
Origami is said to be great for early childhood development, so keep trying new things.
If you make something cute, it would be fun to trade with friends, too!
- [Origami] She’ll love it if you fold these! Simple ideas for girls
- Popular characters that are easy to make with origami. A collection of creations you can enjoy with children.
- Cute origami ideas
- Kids will love it! Easy origami ideas—great as gifts too!
- Kids’ Origami: Cute and Easy Ideas to Make for a Birthday
- [For Kids] Let's Fold! Today's Origami Idea Collection
- Children’s Origami: Easy Single-Sheet Flower Ideas
- Simple origami for kids: cute, playable origami ideas
- Origami ideas boys will want to make!
- Made of paper! A fun collection of DIY toy ideas you can play with
- Easy flower craft ideas you can make with a single sheet of origami paper
- [Origami] Have fun with kids! A collection of easy snowman origami ideas
- [Kids] Let’s Make Origami! A Collection of Easy Goldfish Folding Methods
[For Girls] Cute Origami Ideas (151–160)
Gyoza mascot
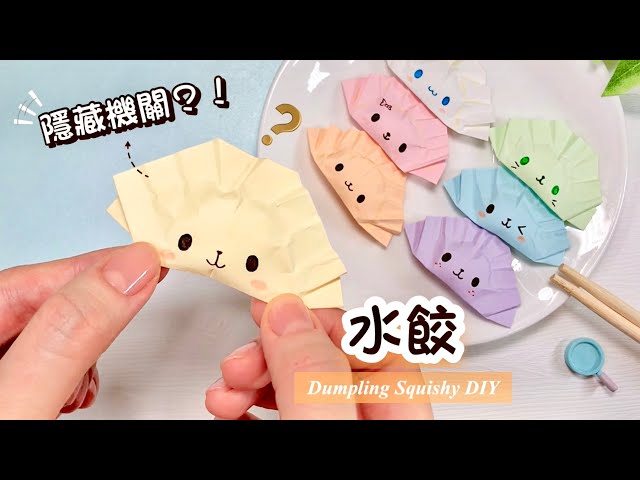
Here’s how to fold a cute dumpling mascot! You’ll need one sheet of origami paper, some cotton, and glue.
First, fold the origami paper into a triangle twice to make crease lines.
Fold one corner along the front crease, then fold it once more along the new crease.
Repeat the same for the remaining corners.
Tuck the top edge into the top edge, and starting from the left end, accordion-fold it while imagining dumpling pleats.
Open it once, put cotton inside, and glue the edges to finish! Drawing a face on the dumpling makes it extra cute.
You can also skip the cotton, write a message inside, and add it to a gift—highly recommended.
bear

I’ll show you how to fold a cute bear holding a heart message card.
Fold into a triangle twice to make crease lines.
Bring the corners to the center and fold upward, then fold upward diagonally.
Align the bottom corner with the starting fold, fold the corner, and fold the tip slightly.
Fold in any corners sticking out.
The head is complete.
Next, the body.
First, fold it using the boat fold.
Turn it sideways to the back, fold the top tip inward on a diagonal, and fold the corner just a little.
Fold inward and open diagonally.
Flip it over, fold the bottom part up to the center, then tuck the corners inward to shape the feet.
Finally, make the heart.
Make a crease by folding in half, fold the bottom edge up to the center, flip it over, fold in half to crease, then fold both bottom ends up to the center.
Turn it over and fold the bottom corner up to the top.
Turn it over again, open the bottom area with your fingers and squash-fold it.
Fold the square’s corners diagonally and fold the tips slightly.
Fold both sides to meet at the center, then fold the bottom corner up to the center once more, and you’re done!
Sanrio character(s)

If she’s a girl, there’s a good chance she likes Sanrio characters.
Speaking of Sanrio, Hello Kitty, Kuromi, and My Melody are especially famous.
This idea is about making those Sanrio characters with origami.
Basically, you just fold the paper by following the steps.
However, some characters may require using scissors, so if a child is making them, please work together with a guardian and proceed slowly to avoid injuries.
panda

It has a cute look—a panda holding a big heart—that seems perfect for mascots or gifts.
You fold the panda’s face, body, and the heart as three separate parts, then combine them to create this shape.
Because the parts are assembled separately, the heart can be removed, so it’s also great for writing a message later.
Another nice point is that you can really add personality with what you draw afterward, such as the message on the heart or the panda’s facial expression.
Also works as a finger puppet! Shima-enaga

The long-tailed tit, known as the “snow fairy,” lives in Hokkaido.
Its plush-like round shape and beady eyes are truly adorable.
This is an origami piece inspired by that bird.
Amazingly, it can also be used as a finger puppet—an idea kids will love.
First, fold the origami paper into a triangle, then fold the left and right corners inward so they overlap at the center.
Flip the paper top to bottom, then fold the left and right corners back to form the wings.
Fold down the top corner, which becomes the head, to round it out, and tuck the bottom triangle inward to finish.
Use a pen to draw the wing patterns and face as the final touch.
Origami Cat Ear Headband

Here’s an idea for making a cat-ear headband out of origami.
For the cat ears, use origami paper trimmed by about 3 cm to make it slightly smaller.
First, fold it in half and glue it, then fold it in half again.
Open it up, fold the top corners down to meet the bottom line, and then use the diagonal creases you made to fold the paper the other way.
Unfold the section you just folded, and attach pink, triangle-cut origami to the triangular areas.
Apply glue to the trapezoid in the center, fold along the center crease, and press to stick—your cat ear parts are done! Finally, fold a strip of paper into a long, narrow band, punch holes in both ends, thread rubber bands through, and attach the cat ears to this base to complete the headband.
[For Girls] Cute Origami Ideas (161–170)
Rilakkuma
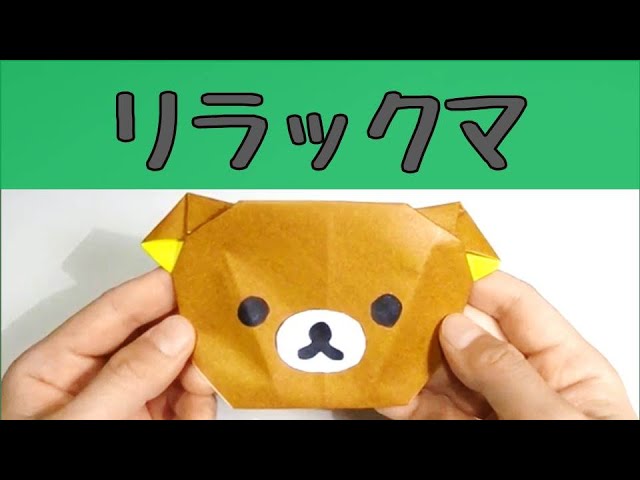
A costumed bear that appeared out of nowhere! Here are some ideas for Rilakkuma.
Did you know there’s a zipper on Rilakkuma’s back? It’s soothing, but also a bit mysterious—so let’s make Rilakkuma with origami this time! You’ll need yellow origami paper, brown origami paper, glue or double-sided tape, scissors, round-cut white pieces, and a black pen.
The key is layering different colors of origami paper, so take your time to get it just right.
Also, the balance of the facial expression is important!