![[Preschool] Tulip wall display ideas to make in April](https://i.ytimg.com/vi_webp/3PybgbGY5vc/maxresdefault.webp)


Tulips that burst into a rainbow of blooms in April make you feel festive just by looking at them, don’t they?
Let’s create tulip wall decorations to beautifully brighten up your room!
We’ve gathered a variety of ideas, from cute flat tulips to realistic three-dimensional ones.
Another charm of wall displays is that the atmosphere changes depending on the motifs you combine.
Mix and match your favorite motifs and have fun making a spring-filled wall display together with the kids!
- Spring wall decorations: A roundup of recommended motifs for nurseries and kindergartens
- [Childcare] Let’s make things with various materials! A collection of recommended craft ideas for April
- [Childcare] Fun to Make! Recommended Craft Ideas for Spring
- A floral wall to brighten up the kindergarten graduation ceremony! A collection of fun-to-make ideas
- Preschool: Ladybug Craft Ideas
- [April] Cute spring-themed classroom wall decoration ideas for early childhood education
- [Childcare] Decorate in April! A collection of recommended wall display ideas for Easter
- [Childcare] Perfect for April: Wall decoration ideas to celebrate starting school and moving up a grade
- [Childcare] Decorate in April! Butterfly Wall Display Ideas
- Wall Decor: Celebrate April! A Special Feature on Cherry Blossom Wall Decoration Ideas
- [Childcare] Ideas for March wall decorations
- Perfect for spring crafts! A collection of recommended ceiling decoration ideas for childcare rooms
- [Childcare] Wall decoration craft ideas featuring a cherry blossom motif
Childcare: Tulip wall display ideas to make in April (1–10)
Tulip wreathNEW!

How about a beautiful wreath adorned with colorful tulips? It may look difficult, but each individual part is easy to fold, so let’s work together to make it! Prepare 8 sheets of origami for the wreath’s leaf section, and for the flowers, use paper that’s one-quarter the size of the wreath pieces—three sheets per flower, for a total of 8 flowers.
Crease firmly as you fold, and use the larger origami to create the wreath components.
Once you’ve made all 8, assemble them to form a circular wreath.
Next, make 8 flowers using 3 small sheets each, and attach them along the wreath’s stem area.
Combine all the parts everyone made and complete a lovely wreath.
A tulip you can stand up and display! A three-dimensional tulipNEW!

Here’s a cute tulip idea you can display on a tabletop rather than on a wall.
For the flower, fold a sheet of origami paper into a triangle twice, then squash the pocket into a square.
Fold the left and right corners inward to form the tulip shape.
Before spreading the flower open from the center, make a small cut at the bottom with scissors so you can insert the stem later.
The leaf and stem are made from a single sheet of origami paper.
First, fold it into a triangle once.
Open it after creasing, then fold the two left edges to the crease line twice, and the right edge once to the crease line.
This way, the stem will be on the left and the leaf on the right.
Finally, fold the stem and leaf together in half, and insert the stem into the flower to finish.
Candy fits inside too! Cute tulip origami

Let’s use two sheets of origami paper to make a tulip flower and leaves.
First, we’ll make the flower: fold the origami into a triangle.
Once folded, starting from the center of the base, fold the left and right corners upward at an angle to form the petals.
Turn the paper over, then fold the left, right, and bottom corners into triangles, and the flower is done! Next, for the leaf piece, also start by folding it into a triangle.
Fold the top corner down to meet the base.
Flip the paper top-to-bottom, then fold up each half of the base along the center line to create two leaves.
Turn the paper over, fold up the bottom corner, and it’s complete.
Combine the two parts to make a cute tulip.
You can place sweets inside from the top of the flower.
Two easy and cute spring wall decorations
Here are two quick and easy tulip crafts perfect for when you’re short on time.
The first is an origami tulip.
Start with the back side of the origami paper facing up, fold it into a triangle twice, then open it once.
Using the center line of the edge as an axis, fold up the left and right corners diagonally to suggest the shape of a tulip.
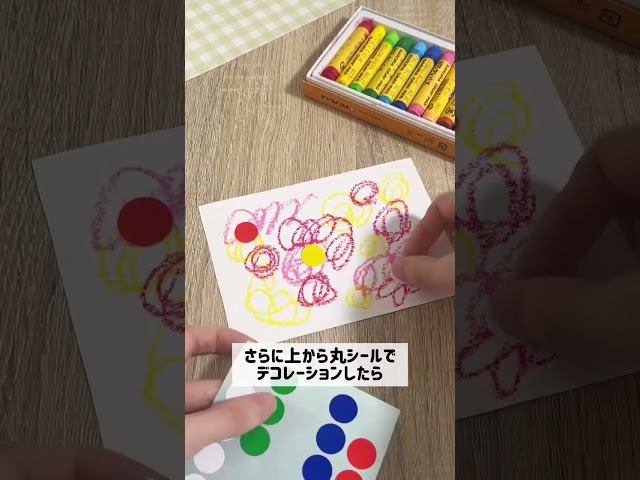
Glue it in place and you’re done! The second uses a sheet of drawing paper in a size that’s easy for kids to draw on.
Let them freely add color with crayons.
Then decorate with round stickers and the like, have an adult cut it into a tulip shape, and paste it onto a backing sheet.
Finally, draw the stem and leaves with crayons to finish.
It’s fun to play with all kinds of colors, so be sure to give it a try.
3D tulip wreath

Here’s how to make a 3D tulip wreath.
Gather thick paper (cardstock), decorative paper, and ribbon.
Draw a circle on the cardstock, cut out the center, and form a wreath base.
Glue origami or decorative paper along the wreath shape to create the foundation.
Using a tulip template, cut out petals from origami paper.
Glue the cut tulip petals together to form each tulip flower.
Roll origami paper into tubes to make stems, then add leaves and the tulip flowers, and glue them onto the wreath base to complete it.
When gluing the petals together, be careful not to overlap them.
Adding a ribbon gives it a fresher, spring-like feel.
Puffy tulip wall decor

When children see these cute, puffy tulip wall decorations, they might just want to poke them! Fold a square of origami paper in half, then fold it in half again, and fold it into a triangle.
Draw a teardrop shape and cut along the outline to get four petal pieces.
On the non-pointed side of each piece, make a slit and overlap the edges by about 1 cm, gluing them to create a plump, three-dimensional shape.
Then, layer the pieces while imagining the shape of a tulip to complete the flower.
Make the leaves and stem from origami paper as well, and decorate the wall.
Easy tulips you can enjoy by sticking them on
@hoiku.labo For a March wall display: Just cut and paste! Easy tulips 🌷#Childcare CraftingNursery teacher / Childcare worker#Drawers of Childcare#NurseryTeacherInTraining#NurseryTeacherThingsWith childrenFelt#Wall CreationTulip
♪ Original Song – Craft Ideas for Childcare ♪ Hoiku Kyujin Labo – Hoiku Kyujin Labo | Nursery Teacher Job Changes and Helpful Information
Here’s a gentle and fun craft that lets you enjoy a springlike atmosphere.
Cut construction paper into the shape of a tulip to make a base.
Next, prepare felt in your favorite colors and cut it into circles, squares, or any sizes and shapes you like.
Once you’re ready, stick the felt pieces onto the tulip base to decorate.
If you start with the larger felt pieces, it’s easier to keep things balanced and to place them.
By decorating freely, you’ll create a colorful and cute tulip.
Finally, glue on a stem and leaves made from construction paper to finish.