Recommended for elementary school students! Science fair topics & craft ideas


Speaking of summer vacation, choosing a topic for the independent research project can often be tough.
Science experiments and crafts are both fun! If your child is good at crafts, we recommend crafts because they can enjoy the process as they go.
When they get absorbed in it, they might even finish in just a few days.
Here, we’ll introduce a variety of ideas for independent research and crafts! If you’re struggling to pick a theme, please use these as a reference.
To create fun summer memories, make a one-of-a-kind project of your own!
- For summer vacation homework! Simple and amazing crafts for elementary school students that you’ll want to make after seeing them
- Simple yet amazing crafts: craft ideas that elementary school students will want to make
- Elementary School Students: Simple One-Day Science Project and Craft Ideas
- DIY science projects that elementary school boys will love: ideas you can make with everyday materials
- [For Upper Elementary Students] Simple but Awesome! A Collection of Summer Vacation Craft Ideas
- For upper-grade boys! Simple yet awesome craft project [Don’t call it lazy]
- Fun crafts using straws
- Recommended for lower elementary school students! A collection of plastic bottle craft ideas made with everyday materials.
- Simple and cute summer project crafts! A collection of ideas for girls that will make you want to create
- [Middle School Students] Easy One-Day Science Projects and Crafts Ideas
- Toys you can make from cardboard crafts! Authentic ideas you can build and play with
- Simple but awesome! Craft ideas for upper-grade girls
- Crafts parents and kids can enjoy together. Recommended craft ideas to keep children entertained.
For upper grades (151–160)
Craft ideas made with origami and a shredder
@n.annlee321 The shredder was a fun crafting tool ☺️🙌 This is a piece my son made 😁 More details in the comments →#tiktok classroomLife with children#StayHomeTime
♬ Nerd Strut (Instrumental) – Gen Hoshino
Let’s use the shredding function that cuts paper into fine strips to create various shapes.
We’ll use a hand-crank shredder, and by controlling where you stop shredding and other small tricks, you can make different parts and combine them.
Food motifs are an easy example: if you insert long, thin strips sideways and shred them even finer, they can look like a coating or breading; roll up long, thin strips and they’ll resemble shredded cabbage.
By layering parts and experimenting with how you bend them, you can also add a sense of three-dimensionality.
Think carefully about how to reproduce what you want to make.
Simple salt sand art
@watako.hoiku Also great for summer projects 🌻 | Salt Sand Art |Simple craftIndependent Researchtranslation
♬ เสียงต้นฉบับ – น้องมิแมวว♡ – ⋅˚₊‧ ୨ 𝒎𝒎𝒊𝒊 ୧ ‧₊˚ ⋅
This is about layering different colors of salt in a glass to create a picture-like, beautiful look.
Start by making colors that match what you want to create: mix paint into the salt to prepare it.
Once your colored salt is ready, simply layer it into the glass.
It’s best to pay attention to the boundaries between colors and avoid overmixing.
After filling the glass, press the layers to compact them—you can aim for more complex shapes this way.
Try various patterns to see what you can achieve.
Paper cup Tyrannosaurus

This activity involves combining paper cups to create a three-dimensional, dynamic Tyrannosaurus.
The key is how you connect the cups: by trimming the edges and adding slits, you can set firm angles.
Build it by linking the cups from the head to the tail, then attach separately made legs and arms at the end to finish.
Try different variations, such as using cups of the same color for a cohesive look or mixing different colors for a colorful effect.
Making a marble run with an ice box
https://www.tiktok.com/@silk_haru3mama/video/7396983174892375297Summer is the season that makes you crave ice cream, and as you eat it, you might find the boxes piling up.
This idea uses those leftover ice cream boxes to make a marble run.
Use a large box, like a milk carton, as the base, and attach slopes made by cutting the ice cream boxes around it.
Adjust the angles and heights carefully, keeping in mind the strength needed so it won’t break when the marbles hit.
Using ice cream sticks to reinforce it is also recommended—they’ll make the whole thing sturdier and give it a cohesive look.
Roll-and-drop game made with straws
@n.annlee321 Roll, roll... ☺️#tiktok classroomLife with children#Summer VacationSummer Vacation Craft
♬ Athletic Meet “Heaven and Hell” (No Introduction) – Shinonome
Here’s a fun-to-make, fun-to-play marble run you can build with straws.
Gather tapioca (boba) straws, beads, masking tape, and scissors, and let’s get started.
Cut the tip of a tapioca straw at an angle, then tape it to a wall with masking tape, adjusting the angle as you go.
Add guards at the ends of the straws so the rolling beads don’t fall out.
The key is to tweak the angles so the beads roll smoothly.
Once it’s finished, try rolling some beads and play! It could also be fun to turn this into a little science project—prepare beads of different sizes and time how many seconds each one takes to roll through.
Deodorizing pot made with an ice pack
@poccle Easy with an ice pack! I made a cute bottled deodorizing pot—perfect for a science project or a fun craft at home ♥ #craftsProduction#StayHomeTime#AtHomePlayIndependent ResearchSummer vacation homework #NurseryTeacher#NurseryTeacherMomParentingCoolant packDeodorization
♬ Relaxing, cute everyday BGM – Avi
Do you have leftover cold packs from buying cakes and other treats sitting in your freezer? Here’s a deodorizing gel pot you can make with those cold packs—perfect as a summer science or craft project for upper elementary students.
Get your materials ready: cold packs, beads, a plastic container, an empty jar, colored markers, a bowl, water, and a stirring stick.
Squeeze the contents of the cold pack into the bowl, add water, and stir until it becomes a gel.
Color the bottom of the plastic container, then add the gelled cold pack and mix to tint it.
Spoon the mixture into the empty jar, add beads or other decorations, and you’re done.
It’s a simple deodorizing pot you can make with everyday items—try creating your own original version!
For upper grades (161–170)
Well-spinning paper cup top
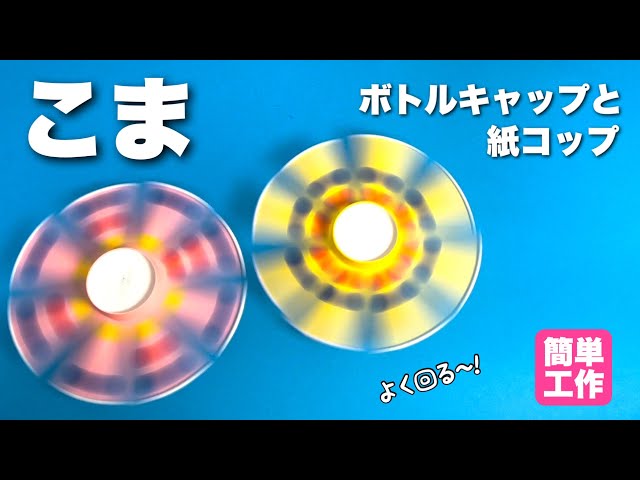
This is a spinning top made with a paper cup that spins well and is fun to watch because of its colorful look.
All you need are a paper cup and two plastic bottle caps.
First, cut slits into the paper cup and spread them out like propeller blades, then attach an axle made by combining the two caps.
That’s enough to complete the basic shape, but it’s recommended to decorate the “propellers” with an eye toward how it will look while spinning.
The impression changes depending on whether you spread the propellers before decorating or decorate first and then cut the slits, so try out various patterns.