![[Thank-You Party] Instantly Brighten the Venue! A Collection of Stylish Decoration Ideas](https://i.ytimg.com/vi_webp/m03TYTXQ69Y/maxresdefault.webp)
[Thank-You Party] Instantly Brighten the Venue! A Collection of Stylish Decoration Ideas


Are you struggling to decide how to decorate for the thank-you party? Since it’s a special celebration, you want the space to feel stylish and festive, right? In this article, we introduce lots of decoration ideas to brighten up your party, from easy options to more dynamic ones.
Everything can be made with familiar materials like balloons, origami, and artificial flowers.
Parents—and kids too—can enjoy preparing together.
Create a memorable thank-you party with decorations that instantly light up the venue!
[Thank-You Party] Instantly Brighten the Venue! A Collection of Stylish Decoration Ideas (1–10)
Whiteboard Art
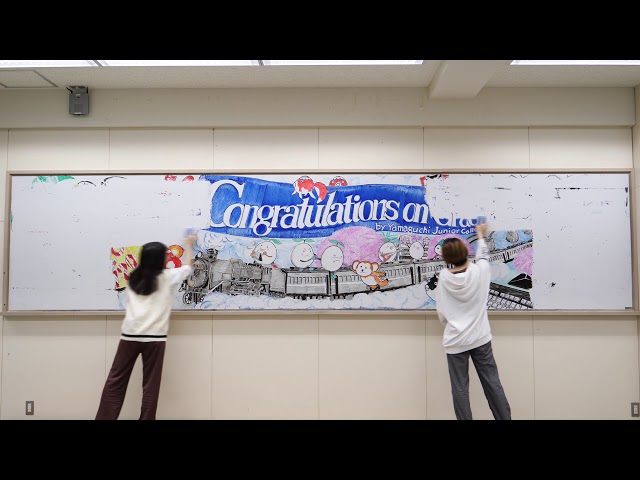
How about expressing art using the whiteboard you use at school? Because graduation is such a special occasion, it’s nice to leave a final piece that everyone created together.
Use a variety of colors, divide up the work a little among everyone, and complete a single picture on the blank whiteboard.
If the whiteboard is large, it can become the highlight decoration of the venue and make the atmosphere of the thank-you party even more vibrant.
Including the time everyone worked hard together, it will surely become an unforgettable and wonderful memory.
Welcome Board

Let’s make a clear and glamorous welcome board using items from a 100-yen shop.
You’ll need a large frame and some dried flowers.
First, write a message like “Congratulations on your graduation” with a pen on a clear sheet that will sit on top of the frame.
Once you’re done writing, arrange your favorite dried flowers inside the frame to create a floral border.
If you don’t have dried flowers, artificial flowers are fine.
Check the balance as you go by comparing it with the lettering.
When the border is finished, place the clear sheet on top, and you’re done!
Giant paper flower

Let’s make big flowers to decorate the venue in a festive way! First, use tissue paper to make three sizes of flowers: large, medium, and small.
For the large flower, fold the tissue paper into thirds; for the medium flower, fold a square sheet of tissue paper into quarters; for the small flower, use the leftover tissue paper cut into a square and accordion-fold it.
For each one, trim the edges into rounded, petal-like shapes and open them up.
Then accordion-fold each sheet, open them one layer at a time, and fluff them into three-dimensional petals.
Next, partially unwind a wire hanger and use it to combine the three flowers into one large flower.
Finally, cover any visible parts of the hanger with kitchen paper and tape, and you’re done! Try making flowers in different colors and patterns.
Balloon tower

How about making a dynamic tower using balloons? Prepare two or three colors of balloons you like, with enough to match the number of tiers you want in your tower.
Mix the colors and group the balloons in sets of four.
Once you’ve prepared as many sets as the number of tiers, fill two small uninflated balloons with water, stack them together, and use them as a weight.
Attach the weighted balloons with fishing line to the set that will be the bottom tier.
Then keep stacking the balloon sets on top, securing each one with fishing line.
Finish by adding a balloon in your favorite shape—like a crown, star, or heart—at the very top.
The best part is that it stands firmly on its own.
Try displaying it at the venue entrance or on both sides of the stage!
balloon arch

Balloons are one of the must-have items for party and celebration decorations.
Not long ago, you could only find certain types at balloon shops, but these days you can find cute and festive ones even at 100-yen stores.
How about using those balloons to make a balloon arch? You can set it up at the entrance or exit, or place it along a wall to create a photo spot.
Bright and colorful is great, but opting for a chic monochrome or earth-tone palette can elevate the style even more.
Spinning origami decoration

How about an eye-catching origami decoration that twirls as it spins? First, cut a sheet of origami paper into six long, narrow strips.
Fold one end of each strip slightly into a triangle, and the other end slightly into a square.
Apply glue to the triangular folds and stack all six strips, gluing them together.
For the square-folded ends, twist each strip around and glue them together.
Once you shape it, you’ll have a droplet-like form.
If you fold both ends of the six strips into triangles and similarly twist and glue them together, you’ll get a leaf-like shape—so try making both.
Finally, combine the pieces you’ve made and connect them with string to finish.
Balloon garland
https://www.tiktok.com/@little_kidsparty/video/7173249197280349442How about a cute garland made with balloons? Inflate balloons in your favorite colors and patterns to the size you want for the garland.
You can buy air-stopper clips that let you secure balloons without tying the neck at 100-yen shops and similar stores, so using those is recommended.
Some air-stopper clips have holes, so you can simply thread a string through the holes to connect them and easily make a balloon garland.
Try pairing it with other decorations and display them together!