Crafts you can make with 100-yen shop items! A collection of fun project ideas that elementary school kids will love


“Amazing crafts from dollar store materials!?” Eye-catching ideas like these are hugely popular among kids right now.
From original keychains and colorful lanterns to fluffy squishies, you can actually make surprisingly high-quality projects with materials you can find nearby.
Here, we’ll introduce fun craft ideas using dollar store supplies that even elementary school children can easily try.
Find your favorite project and enjoy making it!
- Simple yet amazing crafts: craft ideas that elementary school students will want to make
- [For Elementary School Students] A Collection of Simple Handmade Gift Ideas
- Simple but awesome! Craft ideas for upper-grade girls
- [For Girls] Make It with Everyday Items! Easy but Super Cute Craft Ideas
- Let's make it with 100-yen shop materials! A roundup of Christmas craft ideas
- [Indoor Activities] A Collection of Craft Ideas Recommended for Elementary School Students
- A collection of summer vacation craft ideas made with 100-yen shop materials
- For summer vacation homework! Simple and amazing crafts for elementary school students that you’ll want to make after seeing them
- [Easy and Simple] Popular DIY Ideas You Can Make with Materials from 100-Yen Shops
- [Summer Vacation Crafts] Stylish Ideas for Girls
- [For Adults] Simple yet Impressive Crafts: A Stylish, Eye-Catching Collection
- Christmas crafts for adults: stylish project ideas you'll want to display
- Kids get hooked on crafts with toilet paper rolls! Idea collection for elementary school students
Sparkly, Cute Crafts (71–80)
A turtle that runs on rubber power!

Moving toys are appealing no matter how old you are, and they’re especially popular with lower-grade elementary school kids.
This is a paper cup turtle craft that zooms forward using rubber-band power hidden in its shell.
First, cut slits halfway down a paper cup and fold them in to make the legs.
The remaining part becomes the body.
For the face, stick round stickers on as eyes to make it cute.
Take a used AA battery, wrap a rubber band around it, attach kite string with cellophane tape, and set the mechanism inside the turtle’s shell.
Even though it’s a turtle, it moves surprisingly fast and with big motions—so much fun!
A beanbag-toss game using ping-pong balls

Here’s a fun and engaging game using ping-pong balls: a ball-toss challenge.
Gather chopsticks, clothespins, tape, and paper cups to make it.
When building the launcher, be mindful of the angle as you fix the chopsticks in place with tape.
Secure them firmly with tape and test to make sure it works properly as you build.
Attach a pair of plastic bottle caps to the back end of the chopsticks, and it’s complete.
You can decorate it however you like.
Stick paper cups on the wall to create goals, then try shooting from the launcher and have fun playing!
Paper yo-yo made from disposable chopsticks and wrapping paper

Let me introduce a paper yo-yo made from chopsticks and wrapping paper that’s fun to stretch and snap back.
Prepare some chopsticks and wrapping paper, and let’s get started.
Measure the length and cut the wrapping paper into a rectangle, then join the pieces with glue or tape.
Secure a chopstick with tape and roll the paper around it.
The key is to roll it tightly so there are no gaps.
Finish with decorations, and it’s done.
Try different wrapping papers to make your own original paper yo-yo and have fun! Be safe and don’t aim it at people.
Sparkly, Cute Crafts (81–90)
Target-throwing game with disposable chopsticks and clothespins

Let me introduce a target-shooting game that launches with a burst of energy using chopsticks and a clothespin.
Prepare two chopsticks, a clothespin, tape, and a plastic bottle cap to make it.
For the launcher, clip the clothespin’s metal spring onto a chopstick, then tape the clothespin’s handle and the chopstick together to form the base.
Cut a slit in the plastic bottle cap and fasten it to the chopstick with a rubber band.
Make a target out of a milk carton and draw point values on it.
Set a marble-sized ball on the finished launcher and try aiming at the target.
Have fun seeing how many points you can score!
Disposable chopstick holder
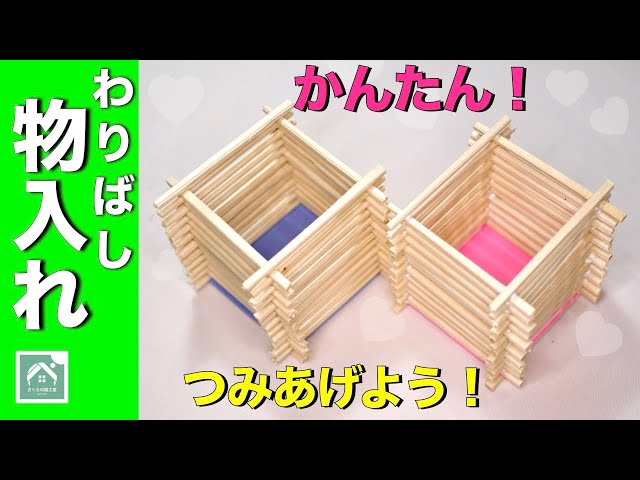
Here’s a chopstick accessory holder that’s perfect for a summer vacation craft.
Prepare 12 pairs of disposable chopsticks, glue, and colored construction paper.
Split the chopsticks in half, then use scissors to cut all the way around the midpoint to make them half-length pieces.
With 12 pairs, you’ll get 48 sticks.
Cut the colored paper into a square, apply glue to the left and right sides, and attach chopsticks; then flip it over, rotate it, and glue chopsticks onto the sides that don’t have them yet.
Apply glue where the chopsticks overlap and stack the sticks one by one.
Make sure they stack up straight.
Let it dry thoroughly, and it’s done!
How to make a chopstick tree
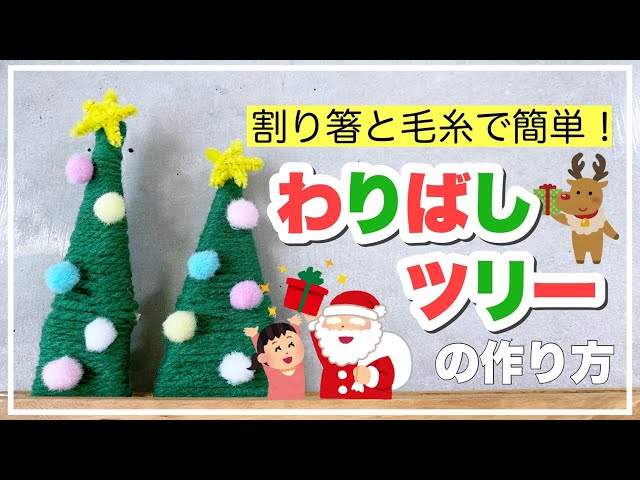
Here’s how to make a chopstick tree that lets you enjoy a cozy nighttime atmosphere when you light it up.
Prepare chopsticks, yarn, glue, and decorations like beads, then get started.
First, build the tree’s frame with chopsticks.
Wrap yarn evenly around the base.
For a summery feel, you could use colors like light blue or pale green.
Once you decorate it with summer-themed items such as watermelon or fish-shaped wind chimes, your chopstick tree is complete.
It’s sure to captivate elementary school kids, too.
Try changing the seasonal theme as you make it—you might discover something new each time.
Chopstick grabber
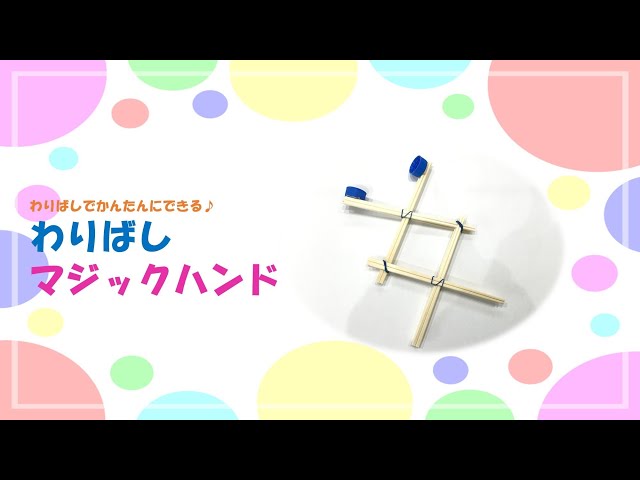
Let me introduce a chopstick grabber that’s fun to make and fun to play with.
Prepare eight wooden chopsticks, double-sided tape, plastic bottle caps, and rubber bands.
Stack four chopsticks in a crisscross pattern and secure the center with a rubber band.
Make another set the same way.
Combine the two finished sets and bind them with rubber bands where the chopsticks overlap to hold them together.
Finally, attach two plastic bottle caps to the tip, and it’s done.
Try moving the handle and have fun playing with it!