Crafts you can make with 100-yen shop items! A collection of fun project ideas that elementary school kids will love


“Amazing crafts from dollar store materials!?” Eye-catching ideas like these are hugely popular among kids right now.
From original keychains and colorful lanterns to fluffy squishies, you can actually make surprisingly high-quality projects with materials you can find nearby.
Here, we’ll introduce fun craft ideas using dollar store supplies that even elementary school children can easily try.
Find your favorite project and enjoy making it!
- Simple yet amazing crafts: craft ideas that elementary school students will want to make
- [For Elementary School Students] A Collection of Simple Handmade Gift Ideas
- Simple but awesome! Craft ideas for upper-grade girls
- [For Girls] Make It with Everyday Items! Easy but Super Cute Craft Ideas
- Let's make it with 100-yen shop materials! A roundup of Christmas craft ideas
- [Indoor Activities] A Collection of Craft Ideas Recommended for Elementary School Students
- A collection of summer vacation craft ideas made with 100-yen shop materials
- For summer vacation homework! Simple and amazing crafts for elementary school students that you’ll want to make after seeing them
- [Easy and Simple] Popular DIY Ideas You Can Make with Materials from 100-Yen Shops
- [Summer Vacation Crafts] Stylish Ideas for Girls
- [For Adults] Simple yet Impressive Crafts: A Stylish, Eye-Catching Collection
- Christmas crafts for adults: stylish project ideas you'll want to display
- Kids get hooked on crafts with toilet paper rolls! Idea collection for elementary school students
Made with 100-yen store items! A collection of fun craft ideas that will delight elementary school kids (1–10)
Handmade star wand
@n.annlee321 Replying to @miukanon0101 Star wand ☺️✨#tiktok classroom#StayHomeTimeLife with childrenTanabata#Summer Vacation
Shuwa-shuwa Honey Lemon 350ml – Sharou
Many girls probably love wands, don’t they? You often see them in anime with magical-girl themes.
This time, I’ll introduce an idea for making a simple wand.
Thread ten 2 cm pieces of straw and five beads alternately onto a 30 cm chenille stem (pipe cleaner), then shape it into a star.
Twist the two ends of the stem together to secure it, trim any excess, then take a 15 cm chenille stem folded in half, hook it onto the star, and twist it into a single rod.
Slide on a straw and glue it in place to finish.
It might also look cute decorated with washi tape, etc.
Craft ideas made with origami and a shredder
@n.annlee321 The shredder was a fun crafting tool ☺️🙌 This is a piece my son made 😁 More details in the comments →#tiktok classroomLife with children#StayHomeTime
♬ Nerd Strut (Instrumental) – Gen Hoshino
Let’s use the shredding function that cuts paper into fine strips to create various shapes.
We’ll use a hand-crank shredder, and by controlling where you stop shredding and other small tricks, you can make different parts and combine them.
Food motifs are an easy example: if you insert long, thin strips sideways and shred them even finer, they can look like a coating or breading; roll up long, thin strips and they’ll resemble shredded cabbage.
By layering parts and experimenting with how you bend them, you can also add a sense of three-dimensionality.
Think carefully about how to reproduce what you want to make.
Simple salt sand art
@watako.hoiku Also great for summer projects 🌻 | Salt Sand Art |Simple craftIndependent Researchtranslation
♬ เสียงต้นฉบับ – น้องมิแมวว♡ – ⋅˚₊‧ ୨ 𝒎𝒎𝒊𝒊 ୧ ‧₊˚ ⋅
This is about layering different colors of salt in a glass to create a picture-like, beautiful look.
Start by making colors that match what you want to create: mix paint into the salt to prepare it.
Once your colored salt is ready, simply layer it into the glass.
It’s best to pay attention to the boundaries between colors and avoid overmixing.
After filling the glass, press the layers to compact them—you can aim for more complex shapes this way.
Try various patterns to see what you can achieve.
Crafts with 100-yen store items! A fun collection of project ideas that even elementary school kids will love (11–20)
paper cup hat
https://www.tiktok.com/@lunimama_asobi/video/7383701099234004240If you’re looking for a craft idea that can double as a decoration, how about making a paper cup hat? Cut off the rim of a paper cup, then leave about one-third from the bottom intact and make many vertical slits starting from the rim side.
Spread the slit sections outward, then weave them by folding them up diagonally from the rim side to form the brim of the hat.
Decorate it with your favorite ribbon and you’re done.
The color and pattern of the paper cup will become the hat’s design as-is, so choosing the cups is part of the fun, too.
Metal craft
@utatan_simple_crafts ← Fun original craft recipe Good evening, this is Utatan 🐰 We’re halfway through summer vacation… so this time I’m sharing a satisfying craft that even elementary schoolers will enjoy ✨ It’s an arrangement of a copper wire craft I tried at a neighborhood summer festival when I was in second grade, updated with transparent origami paper ✂️ That was the first time in my life I worked with metal, and it was a valuable experience where I learned: “Metal is a fascinating material—hard and durable, yet flexible enough to deform when bent or hammered with force.” Trying, touching, and using all kinds of materials really expands your world, doesn’t it? ♪ My daughter used a hammer and needle-nose pliers for the first time, and it became a special experience for her! (Tip: If you want to make fine curves or angles, use needle-nose pliers 👍) Metal isn’t often used in kids’ crafts, but this summer vacation, I’d love for you to try this project that lets you fully feel the properties of metal ☺️ Materials: • 2 mm aluminum craft wire (purchased at Daiso) • Transparent origami, aurora sheet • (Optional) Faux leather cord Tools: • Wire cutters, needle-nose pliers • Hammer • Work gloves • A brick or flat stone • Multi-purpose glue • Toothpicks • Scissors • Pen Caution: Please take great care to avoid injuries from wire ends and the hammer. Important: Because this is an original recipe, we prohibit the following: ▪ Unauthorized reposting of images/videos ▪ Commercial use of the work/recipe ▪ Publishing the instructions as videos/images ▪ Unauthorized use in paid craft/art classes or production workshops When posting reference works, please mention @utatan_simple_crafts ✨ We’re also looking forward to your “made it!” posts ☺️ ****************************************** Creating daily with my 5-year-old ♪ Original craft recipes for parents and kids to enjoy (We also sell craft kits and digital files 🌸) Utatan’s Simple Crafts → @utatan_simple_crafts ONLINE STORE →https://utatan-crafts.stores.jpThank you in advance 🐰✨work#I love craftsStained glassWire CraftSummer Vacation Craft#Summer vacation homework#HandmadeToysHow to Spend Summer VacationLife with childrenLife with children#HandmadeToys#diy#AtHomePlay#StayHomeTime
♪ Original Song – Utatan’s Simple Crafts | Exciting DIY for Kids and Adults – Utatan’s Simple Crafts | Exciting DIY for Kids and Adults
Let’s try a metal craft project using soft wire you can find at 100-yen shops and similar stores.
First, come up with a few patterns that can be drawn in a single stroke.
After cutting the wire to an appropriate length, shape it to match the pattern.
If bending it by hand is difficult, it’s a good idea to use tools like pliers.
Once the shape is made, hammer it to flatten the joints.
Then cut transparent origami paper to fit the pattern, and attach it from the back with glue to finish.
Cute paper cup finger puppets
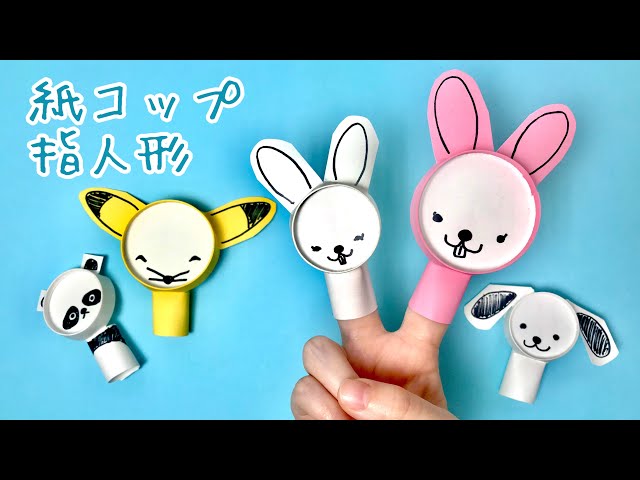
Here’s an idea for making finger puppets using paper cups.
The example shown here is a dog finger puppet, but with a little creativity you can make all kinds of animals.
Once you have a paper cup, cut four vertical slits along the side and remove the excess parts while shaping the dog’s ears and the rings that go around your fingers.
The bottom of the cup will be the face, so draw any expression you like with a pen.
Paper cups come in various colors, so using different colors might expand your range of expression.
Paper cup Tyrannosaurus

This activity involves combining paper cups to create a three-dimensional, dynamic Tyrannosaurus.
The key is how you connect the cups: by trimming the edges and adding slits, you can set firm angles.
Build it by linking the cups from the head to the tail, then attach separately made legs and arms at the end to finish.
Try different variations, such as using cups of the same color for a cohesive look or mixing different colors for a colorful effect.