Crafts you can make with 100-yen shop items! A collection of fun project ideas that elementary school kids will love


“Amazing crafts from dollar store materials!?” Eye-catching ideas like these are hugely popular among kids right now.
From original keychains and colorful lanterns to fluffy squishies, you can actually make surprisingly high-quality projects with materials you can find nearby.
Here, we’ll introduce fun craft ideas using dollar store supplies that even elementary school children can easily try.
Find your favorite project and enjoy making it!
- Simple yet amazing crafts: craft ideas that elementary school students will want to make
- [For Elementary School Students] A Collection of Simple Handmade Gift Ideas
- Simple but awesome! Craft ideas for upper-grade girls
- [For Girls] Make It with Everyday Items! Easy but Super Cute Craft Ideas
- Let's make it with 100-yen shop materials! A roundup of Christmas craft ideas
- [Indoor Activities] A Collection of Craft Ideas Recommended for Elementary School Students
- A collection of summer vacation craft ideas made with 100-yen shop materials
- For summer vacation homework! Simple and amazing crafts for elementary school students that you’ll want to make after seeing them
- [Easy and Simple] Popular DIY Ideas You Can Make with Materials from 100-Yen Shops
- [Summer Vacation Crafts] Stylish Ideas for Girls
- [For Adults] Simple yet Impressive Crafts: A Stylish, Eye-Catching Collection
- Christmas crafts for adults: stylish project ideas you'll want to display
- Kids get hooked on crafts with toilet paper rolls! Idea collection for elementary school students
Sparkly, Cute Crafts (51–60)
Key rack made from 100-yen shop materials

This is a key rack packed with ideas, made using photo frames.
Prepare three identical photo frames: two will form the body and one will be the lid.
Start by making the body.
First, cut a cork sheet to fit the inside dimensions of a photo frame, apply a decorative remake sheet, and attach it to the first frame.
Next, glue the second frame on top of the first.
That completes the body.
Then, use hinges to connect the third frame to the body as a lid.
Finish by attaching an arch latch.
By inserting aluminum pins into the cork sheet, you can hang your keys on them.
It’s a creative project that turns photo frames into a key rack.
Try painting it or adding your own touches to make it uniquely yours.
cool pen holder

Let me introduce a very handy and stylish pen holder.
Prepare a wooden box, wooden boards, an interior mesh frame, paint, a brush, glue, and sandpaper, and let’s get started.
Cut the wooden boards, paint them, and glue them together.
Glue on the interior mesh frame as well.
Once it’s dry, it’s complete.
This pen holder makes the contents easy to see and offers great ventilation—give it a try! Adding illustrations or decorations to give it a personal touch will make it even more wonderful.
Candy Magnet

Let’s make a magnet that looks like a candy with twisted ends.
The materials and steps are very simple, so it’s highly recommended.
First, prepare strong magnets from a 100-yen shop, a plastic bottle cap, and a fabric scrap with a pattern you like.
Start by gluing the magnet to the back of the bottle cap.
Next, cut the fabric scrap to 14 cm by 10 cm, then fold back and glue three sides, leaving just one of the short sides unfolded.
Once the glue is dry, wrap the bottle cap with the fabric and secure it with glue.
Finally, to create the candy shape, gather and stitch the fabric at both ends with thread.
You’re done! Try making lots in different colors and patterns.
Let’s play with paper blocks!

Prepare some construction paper and try playing with paper blocks.
Using long, narrow strips of construction paper, make triangles, circles, and squares, then assemble them into artworks.
By folding or curling the narrow strips, you can express a variety of shapes.
Attaching the parts you’ve made with glue or clear tape and combining them will broaden the range of your creations even more.
As children think about shapes and combine them to make pieces, they can expand their imaginations.
You can also mount the combined works on construction paper for display.
For pieces with movement, hanging them with thread is also recommended.
Sparkly, Cute Crafts (61–70)
A one-of-a-kind toy clock in the world

The idea is to make a clock using a clock movement and a board, then attach various toys to it.
You can get a clock movement at a 100-yen shop or a handmade goods store, and you can buy the board for the clock face at a home improvement store.
First, draw diagonal lines on the board to find the center point, and mark where to drill the hole for the movement.
Next, use a protractor to decide where to place the numbers on the clock.
After drilling the hole and painting if you like, it’s time to decorate the face.
Use a hot glue gun to attach the toys however you like.
Finally, secure the clock movement in the hole, and you’re done.
Arrange your favorite toys with style and create a wonderful clock!
disposable chopstick coaster

Introducing a chopstick coaster that lets you feel the warmth of wood.
Gather disposable chopsticks, glue, sanding sealer, varnish, and a brush, and let’s get started.
Glue chopsticks around the base board.
If you score the chopsticks with a utility knife before splitting them, they’ll break cleanly.
Lightly sand the tips to round them off.
Continue gluing the chopsticks from the outside toward the inside.
Adjust the size of the chopsticks as you go, fitting them while slightly changing the angle.
Brush on varnish and let it dry, and you’re done.
Give it a try!
small accessory case
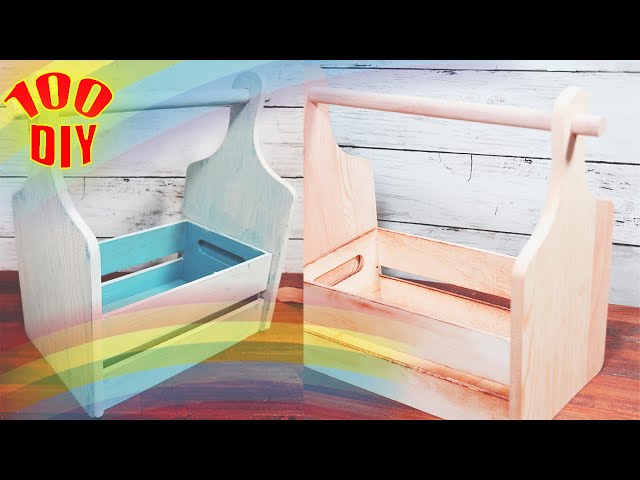
Let me introduce a cute and handy little storage container.
Get a wooden box, a cutting board, a round dowel, a hot glue gun, and a saw, and let’s get started.
Use the hot glue gun to attach the cutting board to the left and right sides of the wooden box.
Cut the round dowel to the appropriate length, sand the ends smooth, thread it through the holes, and secure it with the hot glue gun.
The process is simple and easy to make, so definitely give it a try.
It’s also recommended to paint it to add a personal touch.