Crafts you can make with 100-yen shop items! A collection of fun project ideas that elementary school kids will love


“Amazing crafts from dollar store materials!?” Eye-catching ideas like these are hugely popular among kids right now.
From original keychains and colorful lanterns to fluffy squishies, you can actually make surprisingly high-quality projects with materials you can find nearby.
Here, we’ll introduce fun craft ideas using dollar store supplies that even elementary school children can easily try.
Find your favorite project and enjoy making it!
- Simple yet amazing crafts: craft ideas that elementary school students will want to make
- [For Elementary School Students] A Collection of Simple Handmade Gift Ideas
- Simple but awesome! Craft ideas for upper-grade girls
- [For Girls] Make It with Everyday Items! Easy but Super Cute Craft Ideas
- Let's make it with 100-yen shop materials! A roundup of Christmas craft ideas
- [Indoor Activities] A Collection of Craft Ideas Recommended for Elementary School Students
- A collection of summer vacation craft ideas made with 100-yen shop materials
- For summer vacation homework! Simple and amazing crafts for elementary school students that you’ll want to make after seeing them
- [Easy and Simple] Popular DIY Ideas You Can Make with Materials from 100-Yen Shops
- [Summer Vacation Crafts] Stylish Ideas for Girls
- [For Adults] Simple yet Impressive Crafts: A Stylish, Eye-Catching Collection
- Christmas crafts for adults: stylish project ideas you'll want to display
- Kids get hooked on crafts with toilet paper rolls! Idea collection for elementary school students
Sparkly & Cute Crafts (41–50)
Rubber band gun with two materials
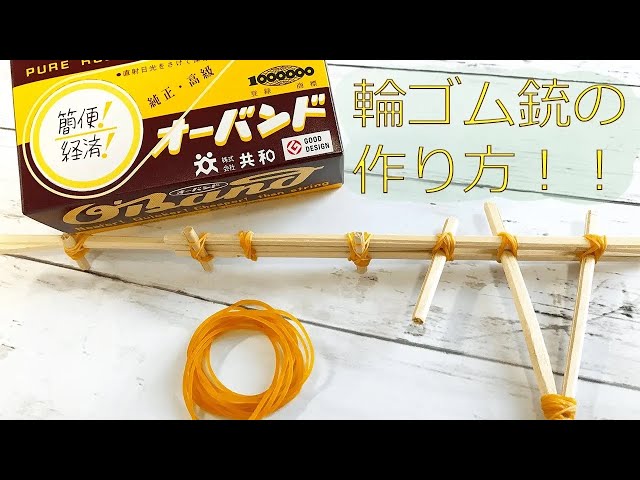
Here’s a simple rubber band gun idea you can make with about three pairs of disposable chopsticks and around ten rubber bands.
Split all the chopsticks into single sticks; leave three as they are, and cut the rest into three different lengths.
If you use a utility knife for cutting, handle it with care.
It’s also a good idea to sand the cut edges for safety.
Combine the cut chopsticks to build the body, grip, and trigger, and finally create a notch at the front end of the body where the rubber band will hook.
The body tends to be long and unstable, so reinforce it by bracing it from below with shorter chopstick pieces.
An exceedingly simple chopstick gun
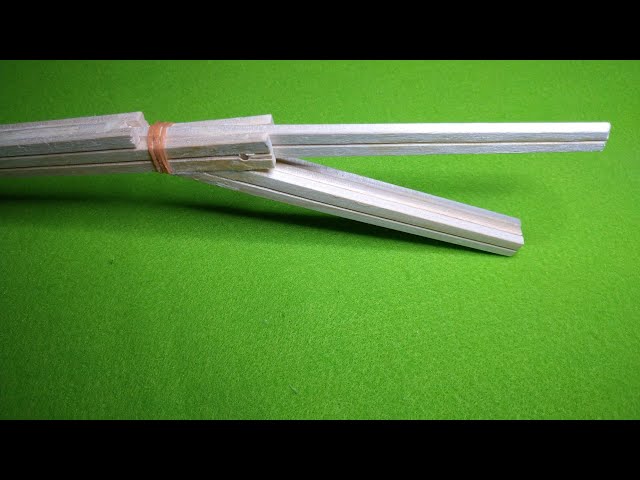
A simple rubber band gun made from disposable chopsticks and rubber bands is a craft project that both kids and adults can get hooked on.
However, the one introduced here is surprisingly authentic, with steps that even involve using a utility knife and a screwdriver.
Kids should make it together with an adult and enjoy the process.
You can also make targets easily with chopsticks, so once you’re done, you can have fun playing a target-shooting game! It’s simple, but you can customize it with a bit of creativity, letting you experience the fun of making things.
Be sure to build and play together—kids and adults alike—and enjoy a great time!
Sparkling Kaleidoscope

If you’re unsure what to make for your summer vacation craft project, why not try a sparkling kaleidoscope? You can make this kaleidoscope with recycled materials and items from the 100-yen shop.
Cut a hard plastic case and form it into a triangular prism, then place beads in the bottom and secure them.
On the opposite end, attach a piece of black construction paper with a peephole.
Glue a milk carton—lined on the inside with black construction paper—around the triangular prism, and decorate it as you like to finish.
While kaleidoscopes typically use mirrors, in this idea the hard plastic case serves that role.
A flying octopus? Tako-copter
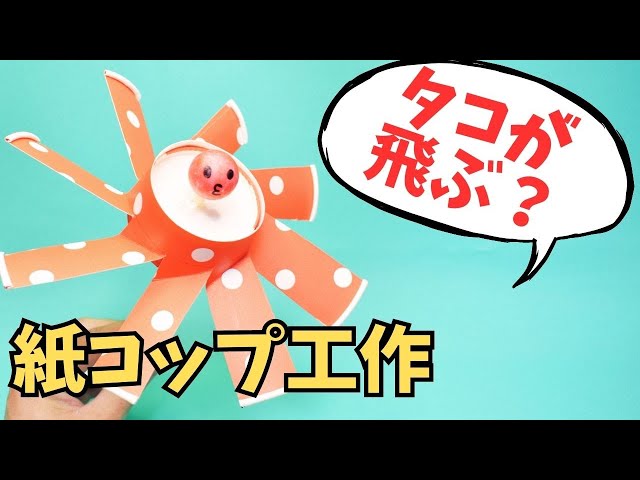
It’s a toy that combines paper cups and a round chopstick to spin like a bamboo-copter and soar into the sky.
By spreading “wings” that catch the wind and coloring it mainly red, it takes on a curious form—a flying octopus.
You’ll use two paper cups and a round chopstick: attach the chopstick and the octopus’s facial parts to a paper cup with only the bottom left to create a launcher.
Then cut slits into the other paper cup, spread it out to form propeller-like blades, and attach it to the launcher to finish.
Fine-tune the propeller angles to make your octopus fly even higher.
A marble coaster with interchangeable tracks!

When you keep playing with the same toy, you can get bored, right? At times like that, try making a marble run with interchangeable courses so you can keep it fresh! First, build the base track out of cardboard.
Using bamboo skewers or similar materials, create features like an escalator-like lift that carries the marbles upward, or a spiral where the marbles twirl down.
For the swap-in courses, prepare pieces of cardboard shaped to fit into the base track, and on each one attach small cut pieces of cardboard, straws, or short wooden sticks to make a variety of course types.
By swapping these in and out, you can enjoy your marble run for a long time without getting bored!
square bag
@n.annlee321 A cool-looking square bag design 💕 Perfect for a summer vacation craft project, too 🥰🫶✨#100-yen-shop#100-yen shop DIY#Summer VacationSummer Vacation CraftDaiso
♬ Good luck to me tomorrow – NANAOAKARI
Let me introduce a square bag made with fluffy yarn.
We’ll use clear bag parts sold at 100-yen shops.
The bag parts will serve as the bottom of the bag.
Because they’re transparent, even though we use yarn, the bag still feels cool and airy.
Cut craft mesh, then stitch yarn onto the mesh with a needle so the yarn catches on the grid.
Connect the bag parts and the yarn-stitched mesh together with yarn.
For the handles, use chenille stems (pipe cleaners).
Adding pearls to the stems makes it even cuter.
Finish by attaching ruffles to the edge of the bag with double-sided tape.
It’s a breezy, lovely bag that both adults and kids will want to carry.
Locker-style storage box
@miwagon [100-Yen Shop DIY] Locker-Style Storage Box#diy#100-yen-shop#100-yen shop DIYDaisoSeria
♬ Simple, light and bright song – Kohrogi
Introducing a stylish, highly functional locker-style storage box.
Glue the panels together to form the box.
Line up and glue craft sticks, then paint over them.
Adding a nameplate will enhance the stylish look.
Prepare your favorite paint colors and think about the atmosphere you want to create based on where you’ll use it.
You can also adjust the size by changing the dimensions of the panels to fit your space perfectly.
It’s a great DIY project when you want to keep your room looking sleek while adding storage.