Simple but awesome! Craft ideas for upper-grade girls


We’ve got easy craft ideas for upper elementary school girls who want to make cute and amazing projects for their summer vacation! From melon cream soda and candied apple squishies to fluffy pipe-cleaner dolls, these are creations that are exciting just to look at.
We’ve gathered lots of crafts that are simple to make but will still make people’s eyes light up with a “Wow!” Plus, the materials can all be found at 100-yen shops.
Make it a fun and memorable summer break project!
- For summer vacation homework! Simple and amazing crafts for elementary school students that you’ll want to make after seeing them
- [Summer Vacation Crafts] Stylish Ideas for Girls
- [Hand Sewing] Easy crafts recommended for elementary school students. Let's handmake something cute!
- [For Adults] Simple yet Impressive Crafts: A Stylish, Eye-Catching Collection
- [For Girls] Make It with Everyday Items! Easy but Super Cute Craft Ideas
- [For Upper Elementary Students] Simple but Awesome! A Collection of Summer Vacation Craft Ideas
- Simple and cute summer project crafts! A collection of ideas for girls that will make you want to create
- Simple yet amazing crafts: craft ideas that elementary school students will want to make
- [For Kids] Today’s Handmade Craft Ideas
- [Middle School Students] Easy One-Day Science Projects and Crafts Ideas
- Elementary School Students: Simple One-Day Science Project and Craft Ideas
- Adults will be hooked! A collection of craft ideas using toilet paper rolls
- Fun crafts using straws
Handmade Accessories and Small Items (71–80)
Key rack made from 100-yen shop materials

This is a key rack packed with ideas, made using photo frames.
Prepare three identical photo frames: two will form the body and one will be the lid.
Start by making the body.
First, cut a cork sheet to fit the inside dimensions of a photo frame, apply a decorative remake sheet, and attach it to the first frame.
Next, glue the second frame on top of the first.
That completes the body.
Then, use hinges to connect the third frame to the body as a lid.
Finish by attaching an arch latch.
By inserting aluminum pins into the cork sheet, you can hang your keys on them.
It’s a creative project that turns photo frames into a key rack.
Try painting it or adding your own touches to make it uniquely yours.
Let’s make a cardboard pochette
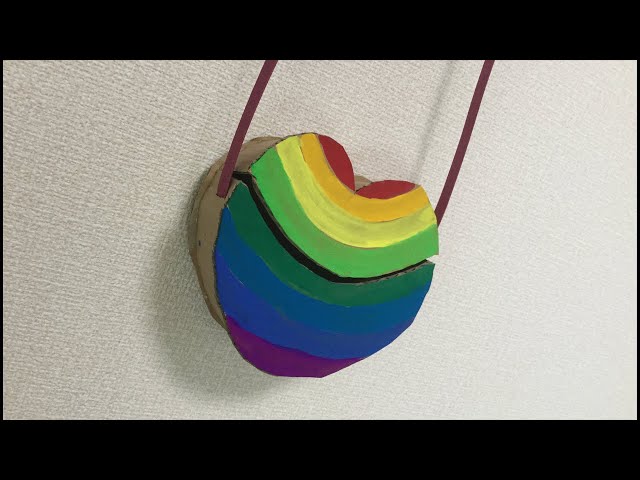
Here’s an introduction to making a pochette using cardboard.
Do you have cardboard boxes at home from parcel deliveries or from purchases at the supermarket? If you have some on hand, you can make a pochette simply by cutting it into shape, folding it, and assembling it.
Cardboard has lines where the inside is hollow.
The key is to keep those lines in mind when you cut.
If you want to create curves in your cardboard parts, cut across those lines.
Doing so will expand your creative possibilities.
Designing the pochette itself is sure to be an enjoyable time, too.
disposable chopstick coaster

Introducing a chopstick coaster that lets you feel the warmth of wood.
Gather disposable chopsticks, glue, sanding sealer, varnish, and a brush, and let’s get started.
Glue chopsticks around the base board.
If you score the chopsticks with a utility knife before splitting them, they’ll break cleanly.
Lightly sand the tips to round them off.
Continue gluing the chopsticks from the outside toward the inside.
Adjust the size of the chopsticks as you go, fitting them while slightly changing the angle.
Brush on varnish and let it dry, and you’re done.
Give it a try!
Handmade Accessories & Small Items (81–90)
Snowflakes made of yarn
@hoikushisatomi [From around age 4] Snowflakes with yarnNursery teacher / Childcare workerKids will love it#NurseryTeacherDailyLifeHand gamesworkTranslation#NurseryTeacherThingsKnitting yarn#YarnPlay
♬ Stylish cafe-style BGM – Hiro Hattori
After cutting three disposable chopsticks short, use two of them to make an X shape, then place it over the remaining stick set vertically and secure them with yarn.
Next, wrap more yarn around them to create a snowflake.
When wrapping, go one stick at a time: loop the yarn once around a stick, then move on to the next chopstick.
The yarn doesn’t have to be the same color—switching to a different yarn partway through creates a pretty pattern.
You’ll get a variety of snowflakes depending on how many wraps you make and the types of yarn you use, so try making several kinds.
How to make a chopstick tree
Here’s how to make a chopstick tree that lets you enjoy a cozy nighttime atmosphere when you light it up.
Prepare chopsticks, yarn, glue, and decorations like beads, then get started.
First, build the tree’s frame with chopsticks.
Wrap yarn evenly around the base.
For a summery feel, you could use colors like light blue or pale green.
Once you decorate it with summer-themed items such as watermelon or fish-shaped wind chimes, your chopstick tree is complete.
It’s sure to captivate elementary school kids, too.
Try changing the seasonal theme as you make it—you might discover something new each time.
Cute herbarium

Why not try making a herbarium, a popular interior decoration? Prepare a container, your favorite flowers and beads, and baby oil.
First, place the flowers and beads into the container, being careful not to overfill it.
Also, if anything tends to float when put in liquid, soak it in the liquid beforehand.
Once you’ve added all the parts, slowly pour in the baby oil, close the container lid, and it’s done.
You can also focus on choosing a stylish container and decorate it with stickers or washi tape to make it extra cute.
Squeeze Fake Sweets: How to Make (1–10)
Apple candy squeeze

Let’s make a super summery, squishy candy-apple squeeze toy! First, make the candy apple using red slime and nano tape.
Fill a dropper with slime and inject it into the center of a piece of nano tape folded in half.
Be sure to seal the opening of the nano tape tightly so slime doesn’t leak out.
Insert a wooden skewer into the opening of the nano tape and secure it.
Next, cut several longer strips of nano tape, stick them together with tape, and add clear slime to create the candy apple’s cellophane bag.
Finally, place the candy apple you made into the bag, seal the top firmly, and you’re done.
If you like, add a ribbon or other decorations to make it extra cute.