Simple but awesome! Craft ideas for upper-grade girls


We’ve got easy craft ideas for upper elementary school girls who want to make cute and amazing projects for their summer vacation! From melon cream soda and candied apple squishies to fluffy pipe-cleaner dolls, these are creations that are exciting just to look at.
We’ve gathered lots of crafts that are simple to make but will still make people’s eyes light up with a “Wow!” Plus, the materials can all be found at 100-yen shops.
Make it a fun and memorable summer break project!
- For summer vacation homework! Simple and amazing crafts for elementary school students that you’ll want to make after seeing them
- [Summer Vacation Crafts] Stylish Ideas for Girls
- [Hand Sewing] Easy crafts recommended for elementary school students. Let's handmake something cute!
- [For Adults] Simple yet Impressive Crafts: A Stylish, Eye-Catching Collection
- [For Girls] Make It with Everyday Items! Easy but Super Cute Craft Ideas
- [For Upper Elementary Students] Simple but Awesome! A Collection of Summer Vacation Craft Ideas
- Simple and cute summer project crafts! A collection of ideas for girls that will make you want to create
- Simple yet amazing crafts: craft ideas that elementary school students will want to make
- [For Kids] Today’s Handmade Craft Ideas
- [Middle School Students] Easy One-Day Science Projects and Crafts Ideas
- Elementary School Students: Simple One-Day Science Project and Craft Ideas
- Adults will be hooked! A collection of craft ideas using toilet paper rolls
- Fun crafts using straws
Squeeze Fake Sweets: How to Make (1–10)
whipped resin
@chat_ange A craft project for summer break that even lower-grade kids can make… Instead of shaker resin, it’s whip resin. I hope it catches on as a new term! I tried applying the trendy whip deco to a shaker resin piece. I haven’t seen this anywhere else, so maybe it’s a first?! 🤣 I’m thinking it might be easier than regular shaker resin—what do you think? It’s cute as is, but once the whip dries, it could be turned into a keychain too. I’ll upload a video when I make another one. If you still haven’t made your summer break project yet, I hope this helps as a reference! 😆Summer Vacation Craft#Summer vacation homeworkFree craftUse it freely for crafts.#WhippedResin#HowToMakeShakerResinShaker resinResin#ResinHandmade#ResinWork
♬ For children, daily life, crafts, fun, free research(1004474) – NakayamaNorikazu
We’ll show you how to make whipped resin that feels just like making sweets.
First, let’s create the base with resin.
Pour resin into a mold and cure it.
You can make the color however you like.
Once the base is ready, add the deco “whip,” then place decorative parts on top to embellish it.
When the whip hardens, it’s done! Using store-bought decorative parts is easy, but if you’d like to try making more with resin, take this opportunity to handcraft the parts as well.
Strawberry roll cake squishy
@nadf11 Whipped cream deco for handmade squishies 🍰#HandmadeSqueeze#Whip Deco#SweetsDecoSilicone whip#Making Squeeze Toys
Merry Go Nyand – mg ⧓
A cute-looking strawberry roll cake squishy that’s perfect for a school science project.
Start by making the roll cake, then decorate it adorably with pink silicone whip! Experiment with color choices that make it look real and explore differences in texture as your theme.
It’s not only cute to look at, but also super squishy and soothing to the touch.
To make it even cuter, try adding strawberries, cookies, and pink pearls.
Displaying photos or the actual piece will surely convey the fun to anyone who sees it.
Squeeze Fake Sweets: How to Make (11–20)
Handmade croissant craft
@n.annlee321 Pretty hard to do in real life, huh? 🥹#ElementarySchoolMomSummer Vacation CraftParentingChildcareHandmade#100-yen shop DIY#100-yen-shop
♬ Touch – KATSEYE
Croissants, whose toasty aroma practically comes through just by looking at them, are a popular bread across generations.
Let’s recreate that delicious croissant appearance using materials you can get at a 100-yen shop.
For the base, cut a puzzle mat into three different sizes, then glue them together while creating steps.
Once the base is complete, apply double-sided tape across the entire surface and wrap brown yarn around it to mimic the look of a croissant.
Since the layered dough and variations in browning are part of a croissant’s appeal, experiment with how you wrap the yarn and also use paint to reproduce these details effectively.
Honey Toast accessory case

Almost real? Let’s make a sweet and cute “Honey Toast Trinket Box”! It’s a big hit with upper-grade girls: it looks like a dessert, but inside it’s a practical storage box.
The design mimics crispy honey toast topped with plenty of honey, ice cream, and fruit.
It’s a craft project with a soft, sweet vibe.
Using paper clay, sponge, and paints, you can create realistic “browned edges” and a “melty” look.
Coming up with the decorations will be fun to do with friends, too.
Try finishing it off cutely with silicone whipped cream and berries.
Sweets Bath Bomb
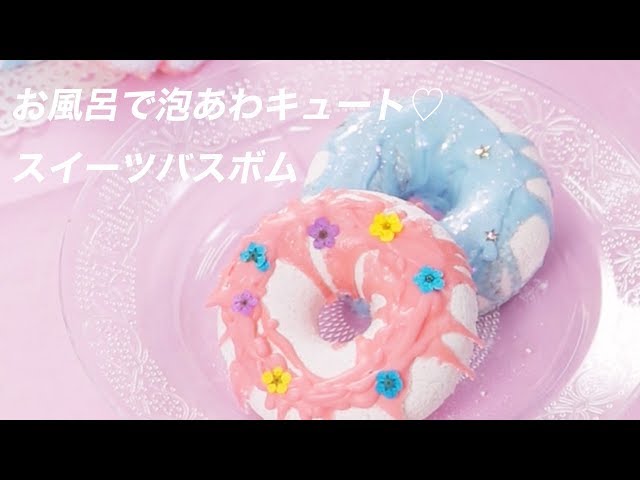
How about making bath bombs that you drop into the tub to enjoy their fizz and fragrance, but with a focus on appearance so they look like fake sweets? The ingredients are baking soda, citric acid, cornstarch, essential oils, and food coloring.
Mix everything thoroughly, then lightly mist with water so it holds together.
Press the mixture into silicone molds, let it set, and dry.
Melt glycerin soap in the microwave, tint it with food coloring to resemble chocolate sauce, and drizzle it over the hardened bath bombs.
Try making donut-shaped, chocolate-shaped, and other sweet-inspired bath bombs and have fun with the designs!
How to make a watermelon bar squishy

Looks just like a real ice pop!? Juicy to the eye and satisfyingly squishy to the touch, the “Watermelon Bar Squishy” is an adorable handmade craft perfect for summer.
It’s an easy yet highly polished project, especially recommended for upper-grade girls.
Start with a sponge from the 100-yen shop and cut it into the shape of a watermelon ice bar.
Carefully paint a red–green–white gradient with acrylic paints.
Recreate the seeds realistically using black paint or clay.
A wooden stick works perfectly for the ice pop handle.
People are sure to say, “That looks delicious!” It’s cute to look at and fun to touch—give this delightful summer science/craft project a try!
Handmade okonomiyaki craft
@n.annlee321 I already posted how to make okonomiyaki before. ☺️✨#HandmadeToysSummer Vacation CraftChildcare
♬ Athletic Meet “Heaven and Hell” (No Introduction) – Shinonome
Let’s try making okonomiyaki and yakisoba—just like the ones you see at summer festival stalls—using craft materials! Here, we mainly introduce how to make the griddle and spatula.
Feel free to create the okonomiyaki and yakisoba themselves using yarn, felt, and other materials.
For the griddle, cut 2 cm-wide strips from both long edges of a color foam board and attach silver origami paper to them.
Then cover the remaining center piece with black construction paper to form the griddle surface, and glue it between the cut side pieces.
Also attach 1 cm-wide strips of silver origami along the top and bottom edges of the griddle.
Draw in the vent openings, and it’s complete! For the spatula, cut a milk carton into a spatula shape and cover it with aluminum foil—that’s all you need!