[Origami] She’ll love it if you fold these! Simple ideas for girls


Introducing how to make origami accessories, clothing, and small items that are super popular with girls! You’ll find lots of easy projects, like an adorable heart necklace you’ll want to wear right away, a stylish dress, and a delicious-looking cake.
Many can be made with just one sheet of origami paper, and if you use your favorite colors or patterned paper, they’ll look just like real accessories! It’s also fun to play pretend or host tea parties with your finished creations, or give them as gifts to delight your friends.
Making them together as a parent and child will surely be a wonderful time!
- Cute Origami Ideas for Girls
- Kids will love it! Easy origami ideas—great as gifts too!
- Popular characters that are easy to make with origami. A collection of creations you can enjoy with children.
- Children’s Origami: Easy Single-Sheet Flower Ideas
- Simple origami that can be folded from a single sheet
- [For Kids] Let's Fold! Today's Origami Idea Collection
- Cute origami ideas
- [For Girls] Make It with Everyday Items! Easy but Super Cute Craft Ideas
- Cool origami that boys will love and want to fold
- Let's make it with origami! Ideas for simple 3D creations
- Kids’ Origami: Cute and Easy Ideas to Make for a Birthday
- Easy flower craft ideas you can make with a single sheet of origami paper
- [Kids] Let’s Make Origami! A Collection of Easy Goldfish Folding Methods
Accessories, Clothing, and Small Items (51–60)
For kids! Cute heart origami

Place the origami paper face up with an edge closest to you.
Fold it in half into a square twice to make crease lines, then fold the front edge up to the center twice to make creases.
Fold the front edge up to meet the front crease line, then rotate the paper and do the same on the opposite side.
Flip it over and fold both edges to the center line.
Flip it over so the longer side is closest to you, fold the front edge to the center to make a crease, then pull the center area and collapse it.
On the opposite edge, align with the topmost line to make a crease.
Fold along the bottommost crease to make another crease, then open both corners and flatten them.
Flip it over, apply glue on the triangular parts, refold, and shape it into a heart to finish!
A book-shaped accessory case

Even masking tape fits inside! It’s a cute book-shaped box.
First, turn the origami paper over with a corner facing you.
Fold it into a triangle twice, then open it and fold the corners to meet the center.
After folding all four sides up so their edges align with the central crease, open it and apply glue in the middle.
Fold the corners inward along the lines to form the shape of a box.
Next, let’s make the cover.
Turn the origami paper over with an edge facing you.
Fold it in half, open it, and fold the edges to meet the center crease.
Mark a point 6 cm from the edge, make a slit there, and open it.
Fold along the lines, then glue the box you made first to the center, and you’re done!
A cat-shaped box

If you want to add a creative touch to a small container, how about making it cat-shaped? First, fold all the corners of the origami paper toward the center, then flip the paper over.
Fold two opposite corners toward the center, then fold once more to make a rolled fold.
Fold the remaining two corners inward to form a box shape, and you’re done.
When folding, leave one outer flap unfolded to create cat ears, finishing it as a cat-shaped box.
Instead of making the box square, aim for a round shape to make it look even more cat-like.
How to fold a long, slender heart
A long, slender heart you can enjoy making with kids.
Fold 5 times to form the heart shape, then fold 4 more times to round it out.
First, fold the origami paper into a triangle.
Flip the triangle upside down, reposition the paper, and fold the left and right edges to meet the center crease.
Next, turn the paper over and fold the protruding tip into a small triangle.
After that, tuck in the top and the left and right corners slightly to finish! If you fold it 3 more times, you can turn it into a regular rounded heart, so shape it into the style you like.
Accessories, Clothing, and Small Items (61–70)
How to fold a winged heart
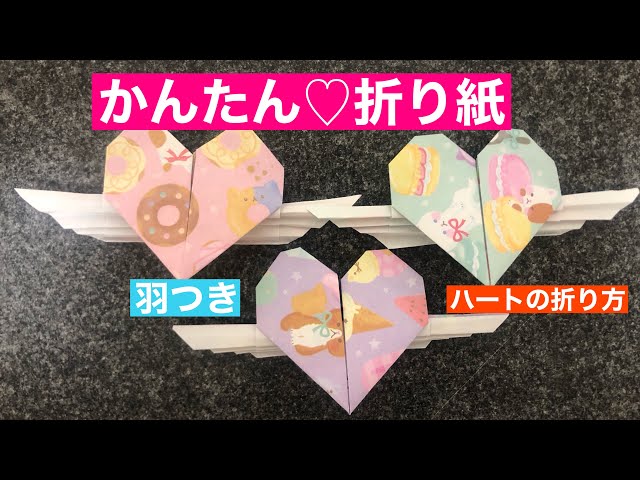
A simple heart with wings design boosts the cuteness and playfulness in no time! First, fold the paper in half twice to make creases.
Fold the near edge up to the center.
Flip it over, fold the left and right edges to the center, then fold the near edge like making a boat, pressing in fine folds to set the lines.
Open it and continue folding in an accordion style.
Next, fold both bottom corners up into triangles.
Shape the corners into a heart, and your winged heart is complete! By changing the angle and size of the wings, the look changes, so you can enjoy creating your own original design.
Playable! An origami box like a push pop

Here’s an idea for a Peekaboo Box that will soothe you instead of a push pop! You’ll use four sheets of origami paper to make it.
The parts you’ll make are two boxes for the exterior, a spring mechanism, and the face piece.
For the boxes, fold the sheet so the diagonal corners meet at the center, roll-fold once more, then fold in the remaining corners to form the box.
For the spring, connect strips of origami paper cut into halves to make it long, fold it in half, then accordion-fold.
For the face, fold the origami paper in thirds, cut 1 cm off the edge, and fold it into a U shape.
Connect the two boxes so there’s a slight gap between them, and attach the ends of the spring to the bottom of the lower box and the inside of the lid.
Finally, attach the face piece along the side of the lower box, and you’re done!
Foldable with a single sheet! How to fold a round tube

The bottom is octagonal, but viewed from directly above, it’s a cute box with a perfectly round rim.
First, place the color you want on the sides of the box on the back, and the color you want on the inside and rim on the front.
After folding the paper into thirds, fold the outer edge inward to align with the inner crease.
Repeat the same fold for the other three sides.
Make creases by folding in half vertically and horizontally.
Once you’ve added the finer creases, open it up and, using those creases as guides, fold all sides from the edges so the paper takes the shape of a box.
Finally, round the areas where two layers overlap firmly, and you’re done! Since the rim shows the front side of the paper, using double-sided origami will give the box an even more stylish look.