[Origami] She’ll love it if you fold these! Simple ideas for girls


Introducing how to make origami accessories, clothing, and small items that are super popular with girls! You’ll find lots of easy projects, like an adorable heart necklace you’ll want to wear right away, a stylish dress, and a delicious-looking cake.
Many can be made with just one sheet of origami paper, and if you use your favorite colors or patterned paper, they’ll look just like real accessories! It’s also fun to play pretend or host tea parties with your finished creations, or give them as gifts to delight your friends.
Making them together as a parent and child will surely be a wonderful time!
- Cute Origami Ideas for Girls
- Kids will love it! Easy origami ideas—great as gifts too!
- Popular characters that are easy to make with origami. A collection of creations you can enjoy with children.
- Children’s Origami: Easy Single-Sheet Flower Ideas
- Simple origami that can be folded from a single sheet
- [For Kids] Let's Fold! Today's Origami Idea Collection
- Cute origami ideas
- [For Girls] Make It with Everyday Items! Easy but Super Cute Craft Ideas
- Cool origami that boys will love and want to fold
- Let's make it with origami! Ideas for simple 3D creations
- Kids’ Origami: Cute and Easy Ideas to Make for a Birthday
- Easy flower craft ideas you can make with a single sheet of origami paper
- [Kids] Let’s Make Origami! A Collection of Easy Goldfish Folding Methods
Accessories, Clothing, and Small Items (21–30)
Origami ribbon with a heart

This is an adorable ribbon featuring a heart in the center.
It’s amazing that it’s made from just a single sheet of origami, isn’t it? Pick your favorite color or patterned paper and let’s get started! After cutting the origami paper in half, fold it lengthwise.
Unfold it and fold the sides along the crease.
Fold it in half vertically to start forming the ribbon shape.
Along the way, you’ll be able to create a heart in the center.
Some steps are a bit intricate, but you’ll feel a great sense of accomplishment once it’s finished.
It also makes a wonderful gift for children or for women.
Origami heart with a ribbon

A ribbon pops out of a heart! Here’s a very cute origami to try.
First, fold into a triangle twice to make creases, then squash along the creases.
Squash-fold the inner sections so they become triangles.
Fold all four corners up along the edges, then fold down both corners on one side.
Flip it over and shape it into a heart.
Turn it to the front and fold the two bottom corners diagonally outward so they stick out.
Open the top part into a pocket and adjust it into a ribbon shape, and you’re done! Writing a message and adding it as a gift will make it even more delightful.
That irresistibly puffy feel! A star-shaped box

Let’s try making an origami box with a fun shape: it has a small opening and a plump, rounded interior.
The puffy shape looks cute, and the overall star-like form makes it even more adorable.
After folding to a certain point, use scissors to cut about halfway.
When you unfold the cut piece, it becomes a pentagon.
Fold this pentagonal origami into the shape of a box.
Adjust the opening and the bottom, and you’ll have a plump, star-shaped box.
You can put in small items, of course, as well as little treats like candies or chocolates.
Long, lidded box

Kids just love boxes, don’t they? Wondering what might be inside, or excitedly thinking about what to put in them—that look on their faces is simply adorable.
To make this tall, rectangular box, if you firmly crease the fold lines as you go, it will be easier to shape it into a box and to fold the bottom neatly.
For the top lid, also make sure to press in the triangular and vertical creases well so it folds into a box shape more easily.
Once it’s finished, you could decorate it with sparkly gem stickers or cute tapes for a fun touch.
Square box with lid

Let’s make a cute lidded trinket box.
Rotate the paper and fold it into thirds twice to create creases for a 3×3 grid.
Add diagonal creases to the corner squares, then fold along the creases to form the box shape.
For the lid, first do a zabuton fold with the origami paper, then fold the top, bottom, left, and right edges in sequence to meet at the center.
Unfold those sections, and using the creases as guides, repeat the same folds once more.
Leave the two corners that are diagonal from the first folds intact, open all the other folded parts, and collapse into a box shape.
Next, tuck the rim inward to make the side height one-half.
Finally, attach a bead as a handle, and you’re done!
Unicorn bookmark
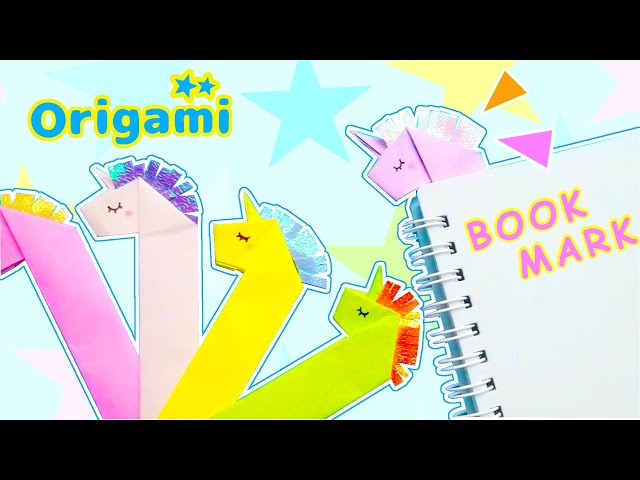
Here’s an origami idea that combines practicality with cuteness.
It’s meant to be used tucked into a book, and when you insert it into a closed book, the design looks as if it’s peeking out from inside—very eye-catching.
The folding process is relatively simple: you shape it so the neck becomes long as you go.
Adding eyes and a mouth to the face gives it expression, and the overall vibe can change dramatically depending on how you draw them.
Color choice also affects the impression—soft hues create a calm look, while bright colors make it pop.
Because you can enjoy it in everyday use, it’s not just something you fold and forget; it’s an idea that comes alive in daily life.
Easy! How to Fold a Cute Box

Even beginners at origami can make this! Here’s an easy way to fold a box.
First, flip the paper over, fold it into a triangle twice, and open it.
Fold each corner toward the center.
Open it up, then fold all four corners to the center along the crease lines.
After folding to the middle, lift one layer and fold it upward.
Keep folding along the lines, lift one layer, and fold it up.
Fold the triangular flaps to the back, then open it out so it forms a box shape.
Adjust the shape and you’re done! You can use it in many situations, so try making it to match the season.