[Origami] She’ll love it if you fold these! Simple ideas for girls


Introducing how to make origami accessories, clothing, and small items that are super popular with girls! You’ll find lots of easy projects, like an adorable heart necklace you’ll want to wear right away, a stylish dress, and a delicious-looking cake.
Many can be made with just one sheet of origami paper, and if you use your favorite colors or patterned paper, they’ll look just like real accessories! It’s also fun to play pretend or host tea parties with your finished creations, or give them as gifts to delight your friends.
Making them together as a parent and child will surely be a wonderful time!
- Cute Origami Ideas for Girls
- Kids will love it! Easy origami ideas—great as gifts too!
- Popular characters that are easy to make with origami. A collection of creations you can enjoy with children.
- Children’s Origami: Easy Single-Sheet Flower Ideas
- Simple origami that can be folded from a single sheet
- [For Kids] Let's Fold! Today's Origami Idea Collection
- Cute origami ideas
- [For Girls] Make It with Everyday Items! Easy but Super Cute Craft Ideas
- Cool origami that boys will love and want to fold
- Let's make it with origami! Ideas for simple 3D creations
- Kids’ Origami: Cute and Easy Ideas to Make for a Birthday
- Easy flower craft ideas you can make with a single sheet of origami paper
- [Kids] Let’s Make Origami! A Collection of Easy Goldfish Folding Methods
Accessories, Clothing, and Small Items (61–70)
How to fold a two-color heart
Let’s make a larger heart that can be displayed on a wall using two colors of origami paper! First, align the top and bottom edges of the paper and make a crease mark by pressing only the left edge.
Unfold the paper, then fold the bottom edge up to meet the mark and make another crease in the same way.
Next, fold the top edge down to align with the second mark you made.
Fold both sheets the same way, and on just one of them, fold the left corner up to meet the crease made by folding the top edge.
Stack and combine the two sheets, then fold the corners to shape the heart.
ribbon

Making a ribbon out of origami is just so cute, isn’t it? Simply fold the paper into thirds and tuck both ends inward, and you’ll have a lovely ribbon in no time! Use colorful paper and it will instantly brighten up your room.
It’s great for decorating gifts and makes a perfect accent for greeting cards, too.
If you make them together as a parent and child, it’s sure to become a fun memory.
One Piece

Let’s make a cute one-piece dress using just one sheet of origami! Prepare a sheet of your favorite origami paper.
As you fold, there are a few small, detailed steps, but you’ll start to recognize parts like the skirt and sleeves as they take shape, making it fun to fold! You can freely adjust the skirt size with the folding angles: add a slight angle for a flared, fluffy hem, or a larger angle for a tight, fitted dress.
Try making different styles of dresses! Solid-colored origami is adorable, but using patterned or foil origami looks wonderful too!
Cute and easy mittens

Let’s make gloves out of two sheets of origami paper to protect children’s hands from the cold and snow.
First, fold the paper in half twice to make a small square, crease well, and open it up.
Place the paper with the colored side facing up, then fold the bottom edge up to meet the crease.
Fold the left edge of the folded section diagonally to the bottom edge to make a triangle, then unfold it.
Next, fold the bottom edge up along the crease you just made, and perform a squash fold along that crease.
Turn the paper over and fold the left and right edges toward the center.
When you do this, align the two bottom corners together, but leave a small gap between the two top corners.
Fold the top two corners in to meet the center line, then fold the top corner down slightly.
Finally, take the lower right corner that you folded together earlier and fold it back outward, and you’re done.
When making the glove for the other hand, create the first triangle on the opposite side.
Best friends rabbits
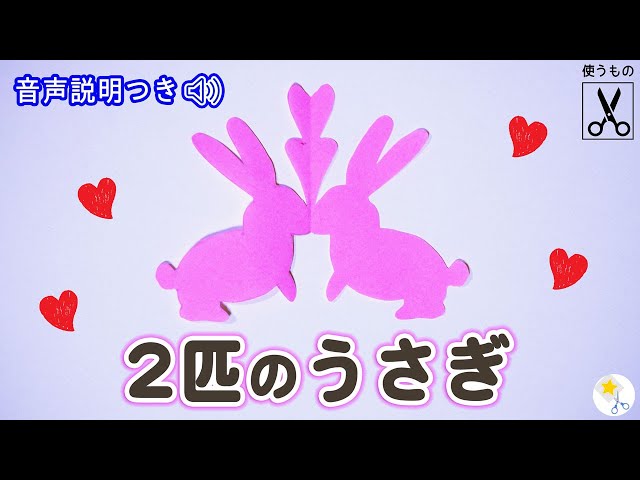
The combination of hearts and rabbits is so cute! Here are some ideas for friendly rabbits.
You might have a chance to make rabbit crafts for the autumn moon-viewing event.
These heart-and-rabbit ideas are perfect for that.
It would also be lovely to layer this piece and stick it inside a full moon made from yellow origami.
Choose any colors you like for the origami.
Colored paper is great, but using white origami might be adorable too.
Be sure to give it a try!
Fuzzy knit pouch

Recommended even for first-time crafters! Here are some ideas for a fluffy yarn pouch.
As the weather gets chilly, items made with fuzzy textures start to look even cuter, don’t they? This time, why not try making an easy, fluffy pouch that’s perfect for beginners at handcrafts? All you need are a non-slip mat, chunky yarn, scissors, and a magnetic button.
You can find all the materials at a 100-yen shop, so it’s great that you can pick them up easily whenever you feel like giving it a try!
Also works as a finger puppet! Shima-enaga

The long-tailed tit, known as the “snow fairy,” lives in Hokkaido.
Its plush-like round shape and beady eyes are truly adorable.
This is an origami piece inspired by that bird.
Amazingly, it can also be used as a finger puppet—an idea kids will love.
First, fold the origami paper into a triangle, then fold the left and right corners inward so they overlap at the center.
Flip the paper top to bottom, then fold the left and right corners back to form the wings.
Fold down the top corner, which becomes the head, to round it out, and tuck the bottom triangle inward to finish.
Use a pen to draw the wing patterns and face as the final touch.