Cute Origami Ideas for Girls

We’ve gathered origami ideas for girls.
From items you can use for doll play and pretend shops to animals and characters girls love, cute letters, and fun toys you can play with—we’ll introduce lots of ideas that girls will enjoy!
If you’re looking for easy origami kids can make or ideas you can make for your child, please use this as a reference.
Origami is said to be great for early childhood development, so keep trying new things.
If you make something cute, it would be fun to trade with friends, too!
- [Origami] She’ll love it if you fold these! Simple ideas for girls
- Popular characters that are easy to make with origami. A collection of creations you can enjoy with children.
- Cute origami ideas
- Kids will love it! Easy origami ideas—great as gifts too!
- Kids’ Origami: Cute and Easy Ideas to Make for a Birthday
- Children’s Origami: Easy Single-Sheet Flower Ideas
- Simple origami for kids: cute, playable origami ideas
- Origami ideas boys will want to make!
- Easy flower craft ideas you can make with a single sheet of origami paper
- [Hand Sewing] Easy crafts recommended for elementary school students. Let's handmake something cute!
- [Kids] Let’s Make Origami! A Collection of Easy Goldfish Folding Methods
- Handmade Lottery Draws Kids Will Love! A Fun Collection of Ideas to Make and Play
- Simple: A roundup of origami ideas perfect for Christmas
[For Girls] Cute Origami Ideas (131–140)
How to fold an easy and cute gift

Many children probably look forward to Christmas presents.
Let’s express that excitement about gifts with origami! First, prepare your favorite origami paper.
Fold it in half vertically and open it, then fold both sides toward the crease.
Repeat this process three times so that long, narrow folded sections are created on both sides.
Next, flip it over, fold both sides toward the center crease, flip it over again, and fold in half to make a crease.
Fold one end toward the crease twice, open the colored section to form a ribbon, then fold the remaining part up toward this section and tuck it inside to finish.
A long-tailed tit that can stand up or be displayed as a decoration

In winter, the long-tailed tit (Shima-enaga) becomes covered in pure white feathers, transforming into a plump and adorable figure.
Using a single sheet of black origami, you can make a stand-up type Shima-enaga—let’s give it a try! First, crease diagonally and vertically to make an X.
Fold it into a square as if tucking everything inward so it becomes about one-quarter of the original size.
On one side, fold in the surrounding paper so that the surface turns black.
Also make a tail on the black side so it can stand.
After folding in half, create a long, thin crease to mark the boundary between the face and the body.
Fold back the bottom and both ends of the white side to form the wings and feet, and you’re done! Draw the Shima-enaga’s face with a pen or add stickers to complete it.
Pooh

Let Pooh’s laid-back personality soothe you! Here are some Winnie-the-Pooh craft ideas.
When you think of “Pooh,” you probably picture the main character from the various stories of Winnie the Pooh.
Many people find his way of speaking, his personality, and his cute, round form comforting.
This time, let’s make Pooh with origami.
You’ll need yellow-toned origami paper, a pen, and colored pencils.
It’s simple, but the key step is making the ears, so it’s best to focus as you work.
Totoro
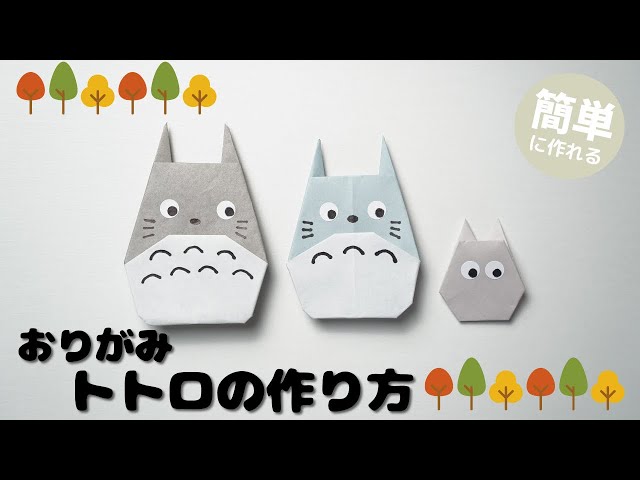
Here’s an introduction to Totoro origami, still popular thanks to the film.
There are three sizes of Totoro, and each can be folded from a single sheet of origami paper.
Which size of Totoro is most popular with girls? Try making your favorite Totoro! It also sounds fun to fold acorns and corn from the movie out of origami.
My Neighbor Totoro is a film enjoyed by people of all ages, and it makes a great topic to share with children—so folding Totoro origami can be a nice way to communicate while you create together.
Angel Heart

Angel Hearts may look difficult at first glance, but the steps are surprisingly simple.
First, fold the origami paper twice to make a square.
After creasing, open it with the white side facing up.
Fold the top and bottom edges to meet the center crease, then flip it over and fold both bottom corners up to the center of the top edge to form triangles.
Leave the white section at the bottom as it will become the wings.
Turn the paper over and fold the top edge down about 1 centimeter.
Open the colored section in the center of the folded-down part and squash it into a triangle.
Fold the two top corners of the squashed section into triangles, and your heart is complete.
Finally, fold the corners of the wings you left earlier into triangles to finish.